You know that feeling when you finally spot the ornament that looks exactly right for your tree — and then you flip the tag over and it is $18 a piece? Same. That is precisely why this list exists.
We spent serious time browsing Michaels, Hobby Lobby, and Etsy, plus the free aisle otherwise known as your backyard, and narrowed it down to 29 DIY ornament ideas for 2026 that actually deliver — from a $5 twig-and-twine project to a $60 felted showpiece.
Inside you will find rustic wood slice designs, whimsical needle-felted figures, glass and cork keepsakes, folded paper geometry, and a surprising number of upcycled odds and ends you probably already own — including a couple of tech bits headed for the trash. 2026’s tree is trending handmade, with Pinterest saves for scrap-fabric and felt ornaments climbing as people hunt for heirloom-style pieces that do not come off a big-box pallet. And stay until the end — we break down the most common mistakes that can ruin these looks.
📌 Save this to Pinterest for later — you’ll want to revisit these ideas.
1. Fabric-Wrapped Sphere Ornaments Built From Scrap Strips
What makes this one work is not the ornament alone — it is the contrast. Those horizontal fabric strips wrap a plain foam ball into something that looks like ribbon candy, and because the fabric is matte and multicolored, it holds its own hanging right next to shiny gold and red glass spheres. A tree full of nothing but gloss goes flat; one layered, textured piece gives the eye somewhere to land.
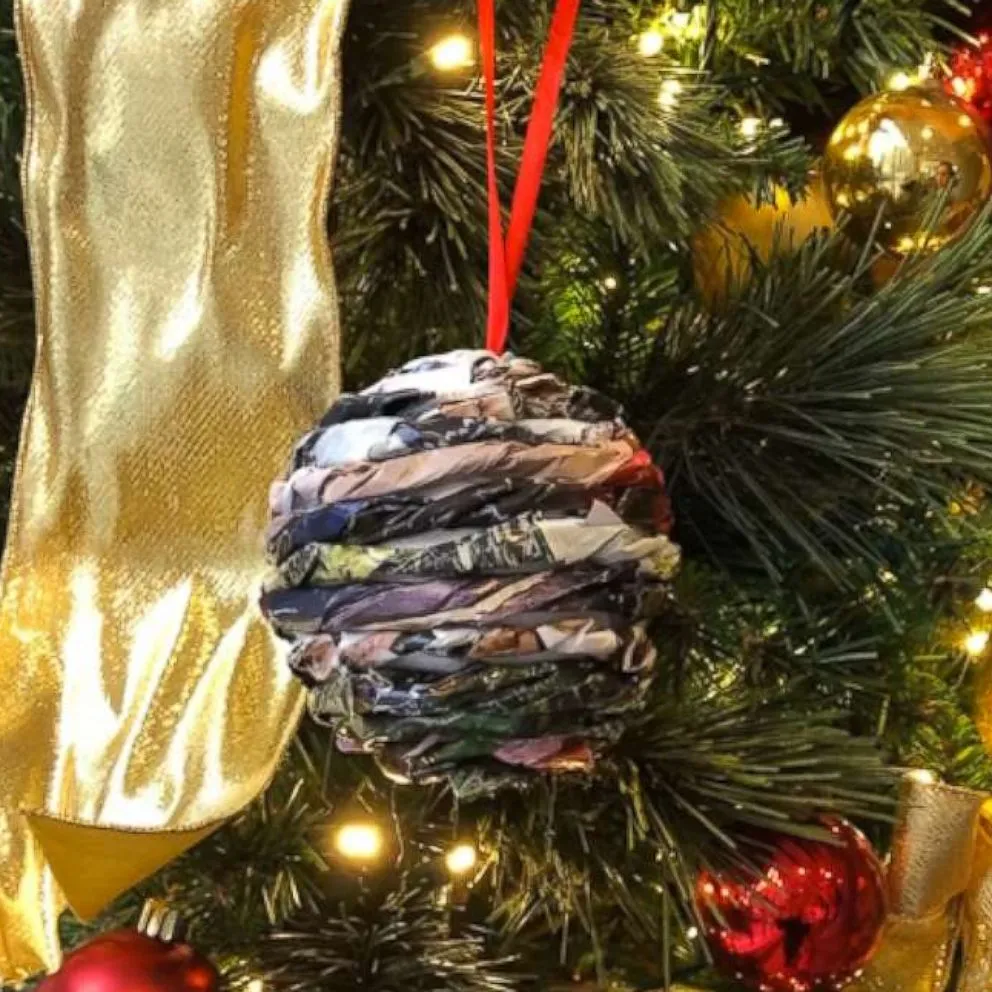
The repetition is doing quiet work too. Each strip overlaps the one above by about a third, so the finished surface reads as one continuous spiral rather than a stack of separate bands. That is the same principle behind a good striped rug, and it is why scrap-busting ornaments like this can look intentional instead of improvised.
Cut strips 1/2 inch wide and about 4 inches long for a standard 3-inch foam ball — you’ll need roughly 20 to 24 of them. Pin or glue each one so it overlaps the row above by a third, and use fabric glue or glue dots rather than hot glue. Hot glue leaves shiny crusts that catch the tree lights and telegraph every sloppy edge. A thin red ribbon loop pulls the whole thing together.
2. Twig-and-Button Tree Ornaments With a Matching Star
The buttons are the whole personality here. Without them, a twig tree is just a stack of sticks with a loop of twine — pleasant, but anonymous. Rows of brown, green, and yellow buttons do two jobs at once: they read as tiny ornaments on a tiny tree, and they add the color and shine raw twigs cannot provide. Keep the buttons mismatched on purpose. Uniform sizes make the whole thing look like it came out of a kit box.
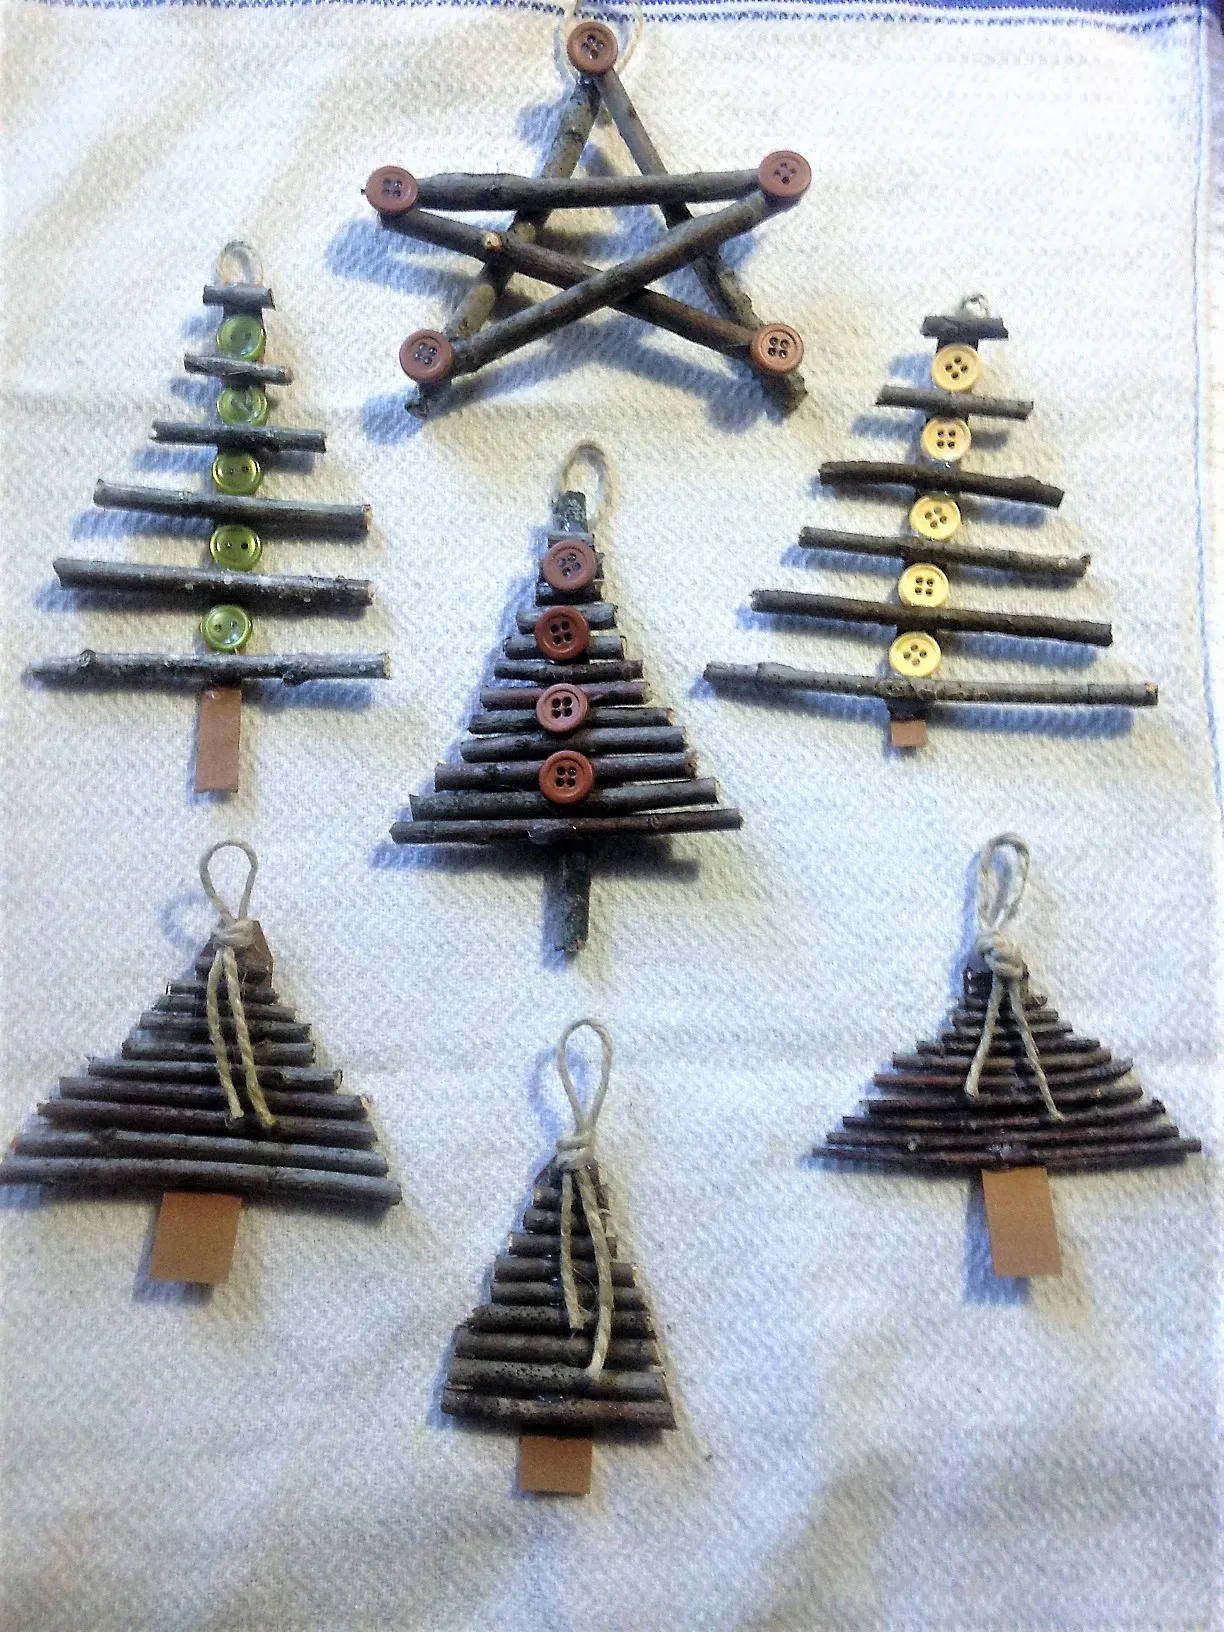
This is the best-value idea in the entire list. Prune three or four thin straight twigs from the yard — birch and dogwood hold their shape nicely — then pull buttons from a thrift-store jar or a $3 mixed bag at Michaels. Twine, tacky glue, and a single twig star built from two crossed pieces and you are in it for under $8. Compare with Idea #4 — same rustic logic, completely different material.
3. A Frosted Glass Tree Anchors This Candlelit Plaid Table
Those pillar candles look incredible next to the pine sprigs and wrapped boxes, and that is exactly the problem — this is a display you should never walk away from. Keep lit candles at least 12 inches from the plaid cloth, the ribbons, and anything paper. If this is your actual dinner table, swap to warm-white LED pillars; the glow reads nearly identical through glass, and you stop worrying about the napkins.
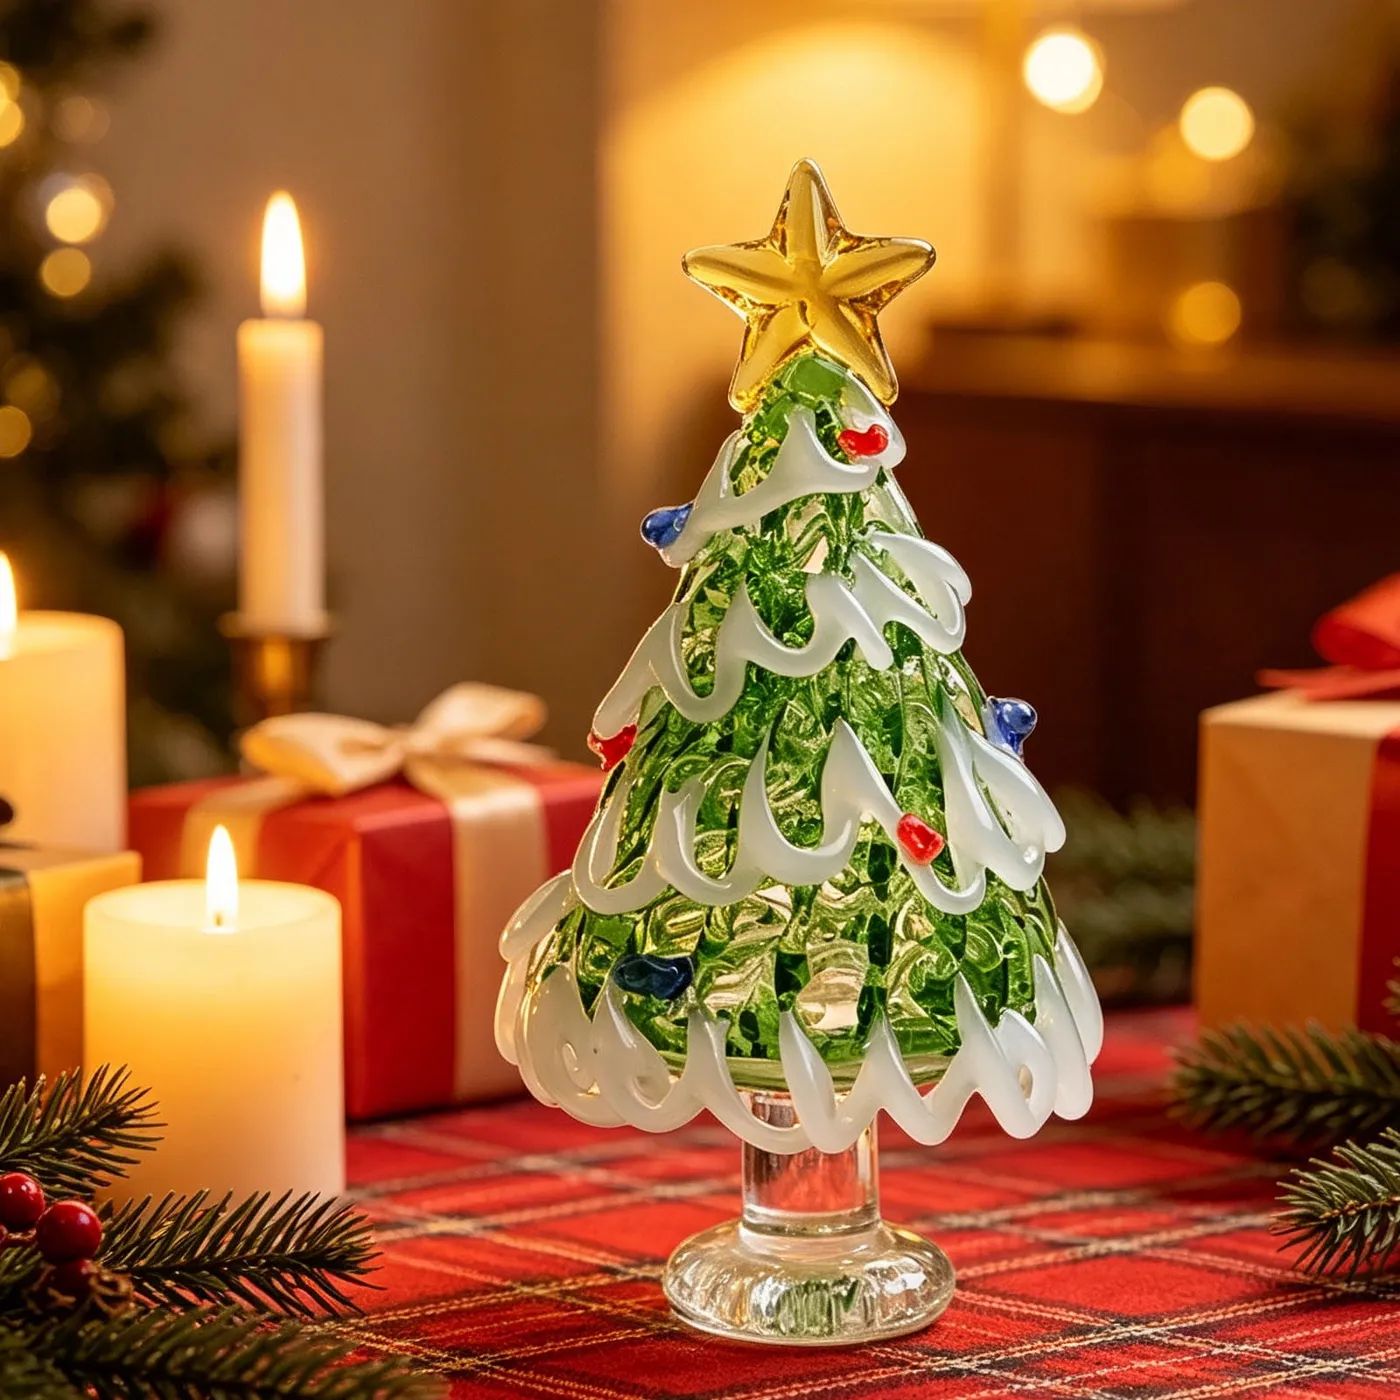
The formula runs about 55% red plaid, 30% green and clear glass, 15% gold and white accents. The plaid does the heavy lifting because it repeats across the whole tablecloth, so keep the glass tree simple — green, clear, frosted, nothing fussy. To shift the mood entirely, swap red plaid for charcoal buffalo check and let blue glass carry the accents. The balance stays identical.
4. Wine Cork Trees Topped With Colorful Buttons
Build one tree in about 40 minutes with roughly 30 corks.
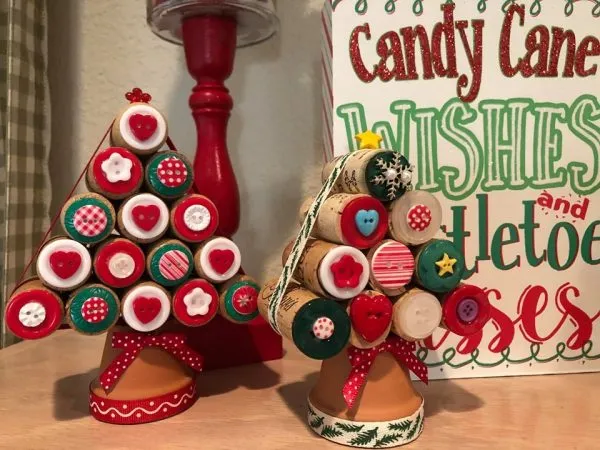
- Lay corks in rows on a flat surface — 6, 5, 4, 3, 2, then 1 — and test the triangle before gluing anything.
- Glue each row to the row below with tacky craft glue and let it set 20 minutes; hot glue slips on cork’s waxy surface.
- Glue one button to the exposed end of every cork, varying shapes and sizes as you go.
- Set the finished tree on an inverted terracotta pot or a flat wood base and wrap ribbon around the bottom.
- Top with a small berry cluster or a single star button.
Cork crafts are quietly having a moment because wine bars now hand back corks by the bag, and 2026’s decor mood leans hard toward made-from-what-you-have. It fits the bigger shift toward visible imperfection — mismatched buttons, uneven rows, real wood grain. Will cork trees last past this year? Probably not in this exact form, but the reuse instinct behind them is not going anywhere.
5. A Tiny Felt Orange Tree in a Gold-Stitched Pot
- Wool-blend felt sheets, 4 colors: $6–$10
- Embroidery floss, gold and green: $3–$5
- Polyfill stuffing, small bag: $4–$6
- Ribbon or string for hanging: $2–$3
- Needles and thread: $5–$8 if you do not already own them
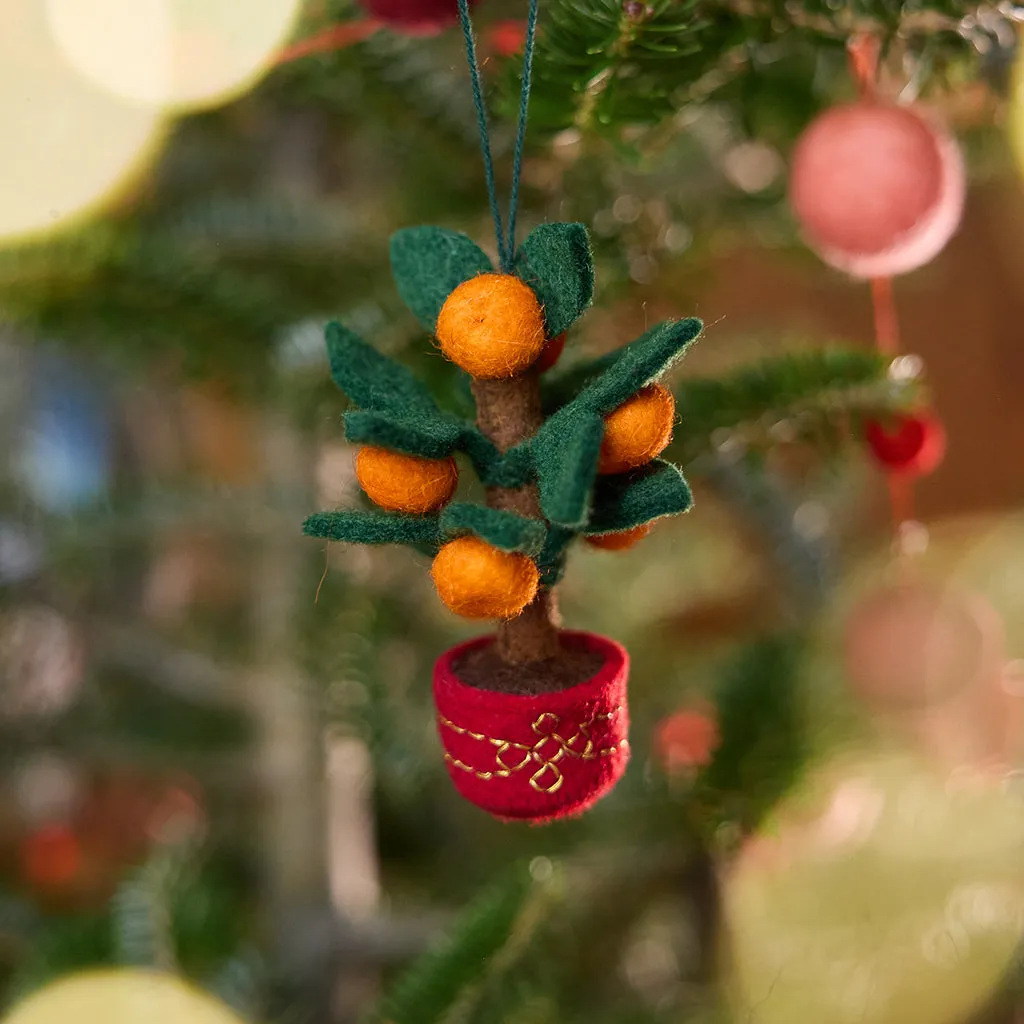
Total: $20–$32 for a batch of six ornaments, about $3.50 each. Skip the wool blend and use acrylic felt from a dollar-store sheet pack instead — $3 total. It pills faster and will not felt as cleanly, but at ornament scale nobody is inspecting.
Stitch the pot’s gold trim with a backstitch using two strands of metallic floss, not six. Six strands make a lumpy ridge that fights the shape of the pot. Cut the felt with pinking shears anywhere the edge stays raw — that little zigzag hides the fuzzy cut line plain scissors leave behind on wool blend, and it makes the leaves look deliberate rather than snipped in a hurry.
6. Three Wood Slices, Two Twig Arms, One Plaid Scarf
Three stacked wood slices do something a flat snowman cutout cannot: they give the figure real depth, so the bark edges cast small shadows and the whole thing reads as an object instead of a silhouette. The buffalo plaid scarf earns its place too. Black-and-white check against pale wood is a high-contrast pairing, which is why the drawn-on face still registers from across the room, and why the gold and matte white ornaments scattered nearby feel like a supporting cast.
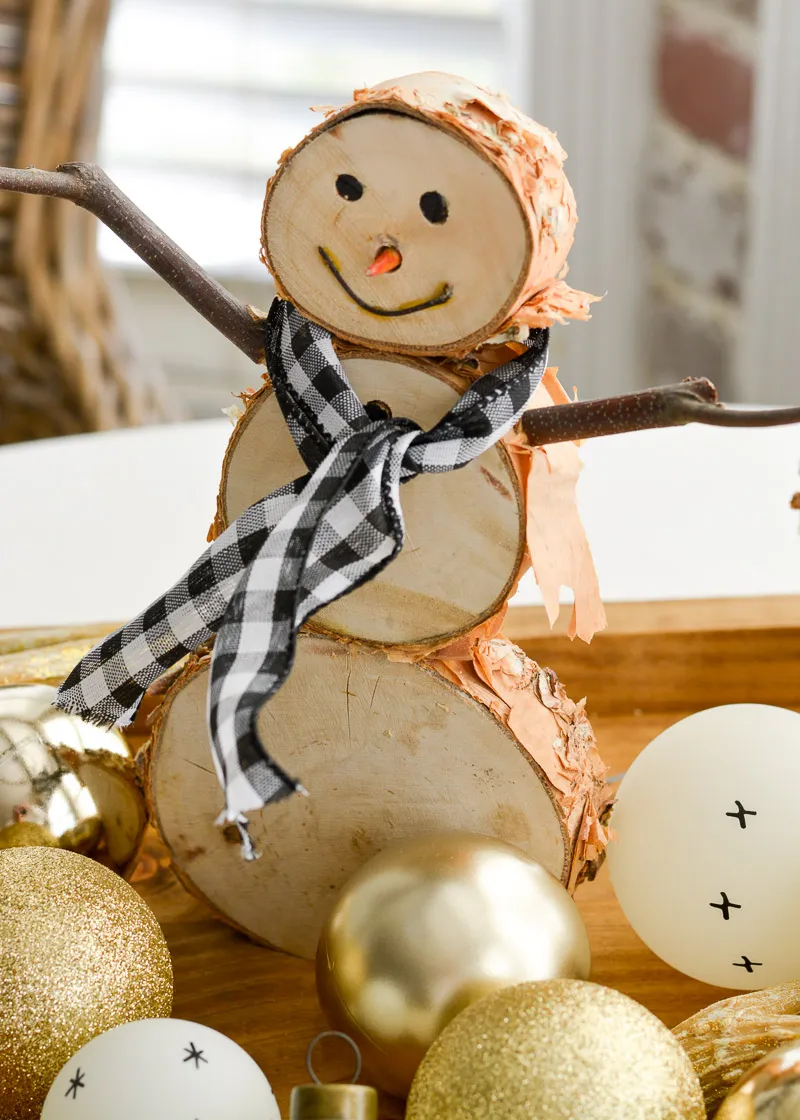
The scarf is the single element holding this together. Take it away and you are looking at three stacked discs with a marker face — cute, but vague. That ribbon wraps the seam between the middle and bottom slices, so it hides the join and tells you instantly that this is a snowman. Any 1.5-inch ribbon works; wrap twice and knot it rather than fussing over a perfect bow.
7. Flat White Tree Ornaments Dotted in Primary Colors
Flat ornaments need breathing room. On a 6-foot tree, hang them on the outer third of the branches and leave at least 4 inches between each one — a flat piece seen edge-on simply vanishes. A 7.5-foot tree can carry 12 to 15 of these comfortably. A 2-foot tabletop tree should get two or three at most, or it starts to look like a paper mobile, ribbons and all.
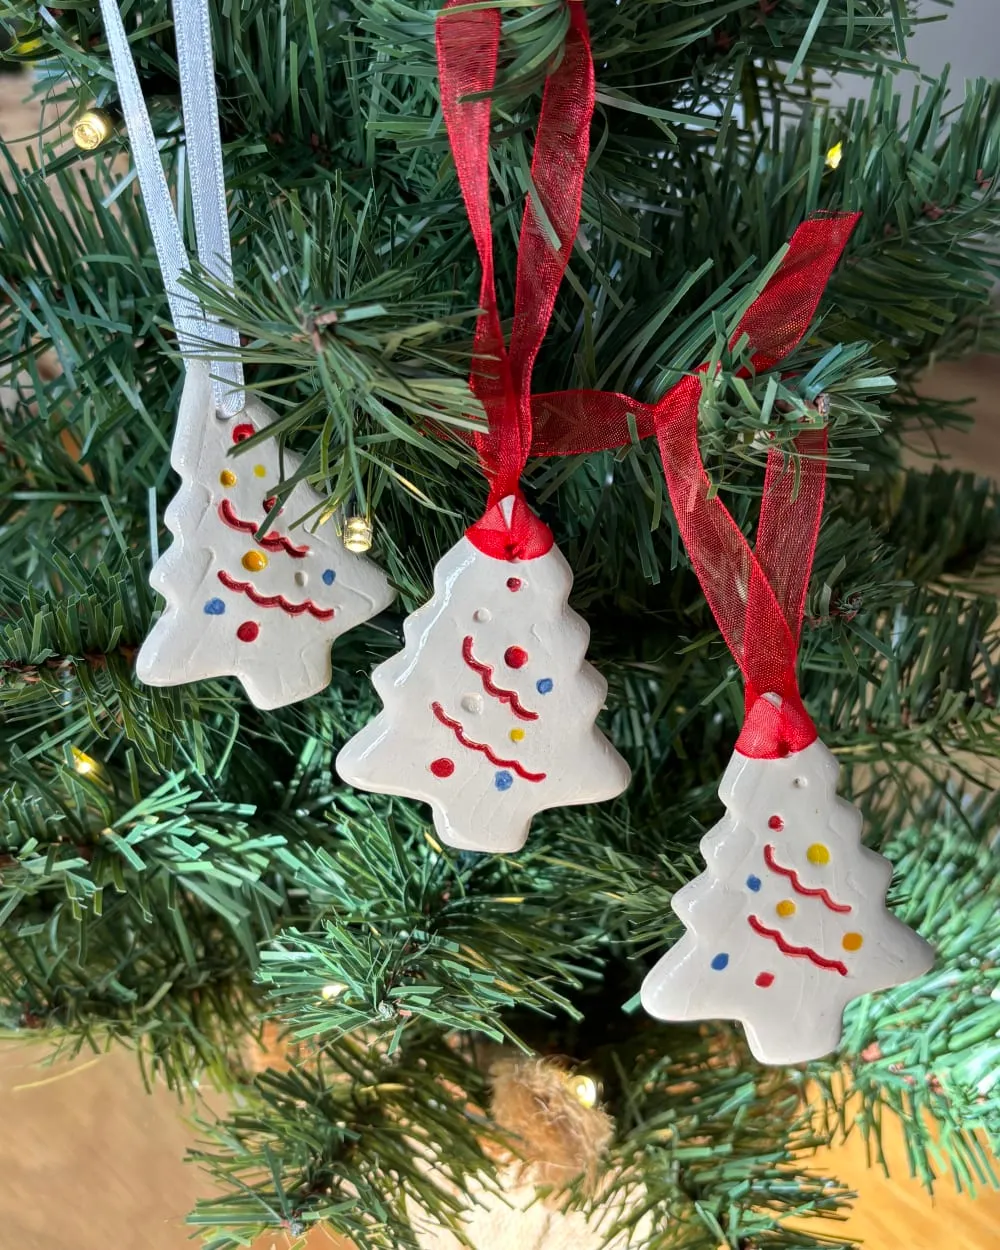
Painted clay or wood blanks chip along the edges, and the dots are always the first to go. One coat of matte acrylic varnish after painting makes a real difference — 15 minutes of drying and about $7 for a bottle that will outlast a decade of Decembers. Store them in a tissue-lined box, never a ziplock, and never stacked face to face. The sheer ribbon hangers fray, so plan on replacing those loops every couple of seasons.
8. A Felted Pup Dressed in a Knitted Beanie
You do not need to needle-felt anything to get this look. Target and Walmart sell tiny knit baby mittens and preemie hats for about $3 a pair on clearance, and a plain white felt or fleece stuffed shape costs almost nothing. Sew the hat on top, add a half-inch strip of mustard ribbing as the scarf, thread a red-and-white baker’s twine loop through the crown, and you are at $7 total instead of $25 for a needle-felted original.
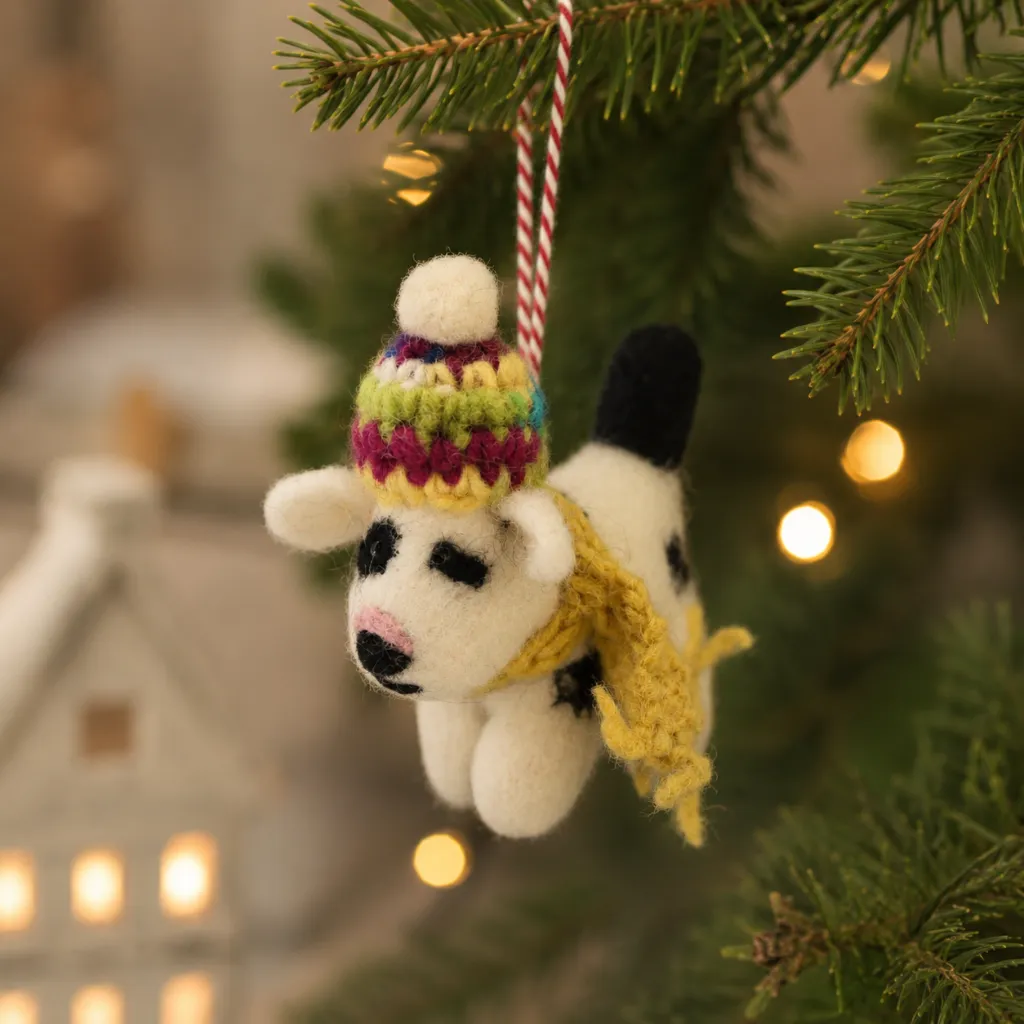
Keep the hat oversized by about 30%. A knit beanie that fits the felted head exactly looks tight and a little sad; one that slouches past the ears reads as cute. Use a real pom-pom, not a felt circle — that fuzzy texture is what sells the scale at ornament size. Same logic applies to the scarf: keep it loose and let one end dangle lower than the other.
9. Retired RAM Sticks, Reborn as Jingle-Bell Ornaments
Circuit-board ornaments started as a joke in maker circles and turned into a genuine trend as more people upgrade laptops and end up with dead hardware. There is a nostalgia layer here too — anyone who built a PC in the 2000s recognizes that green printed board instantly. It will not become a heirloom tradition, but as a one-season conversation piece it beats anything on a store shelf, and the striped bow keeps it from looking purely nerdy.
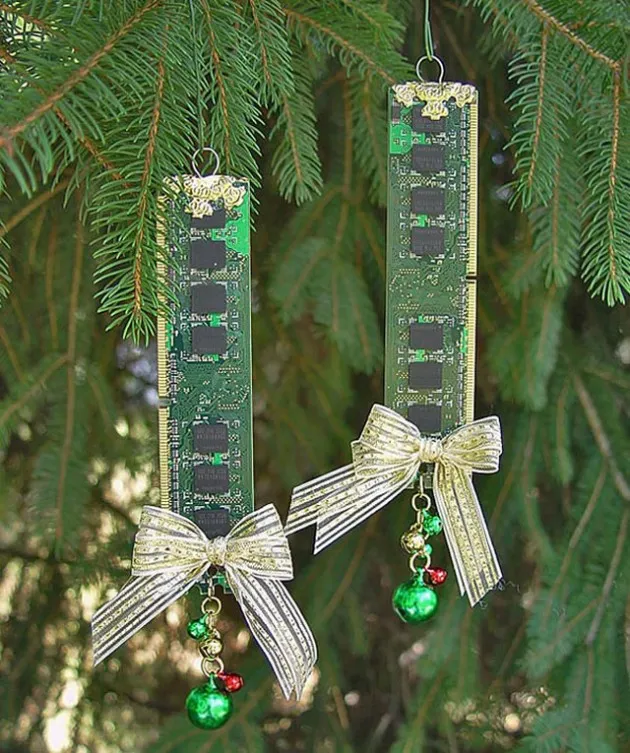
Two practical notes. RAM sticks are heavier than they look, so hang them on a branch near the trunk and use a real ornament hook rather than a bent paperclip. Wipe them down with isopropyl alcohol before you decorate — old boards hold dust and finger oils, and glue sticks to neither. Keep them above toddler reach, since those little green and red jingle bells come off with a firm tug. This is the techy counterweight to Idea #10‘s softer naturalist approach.
10. Acorn Caps Clustered Over a Clear Glass Sphere
The mix runs roughly 70% natural texture, 20% glass, 10% metal and ribbon. That heavy natural share is what keeps it from looking like a craft-store kit. Swap components freely as long as the ratio holds: pinecone scales instead of acorn caps, a brass cap instead of silver, linen ribbon instead of the striped one. Keep the sphere clear, though — tinted glass muddies the view of whatever is inside, and the whole appeal is seeing the caps through the walls.
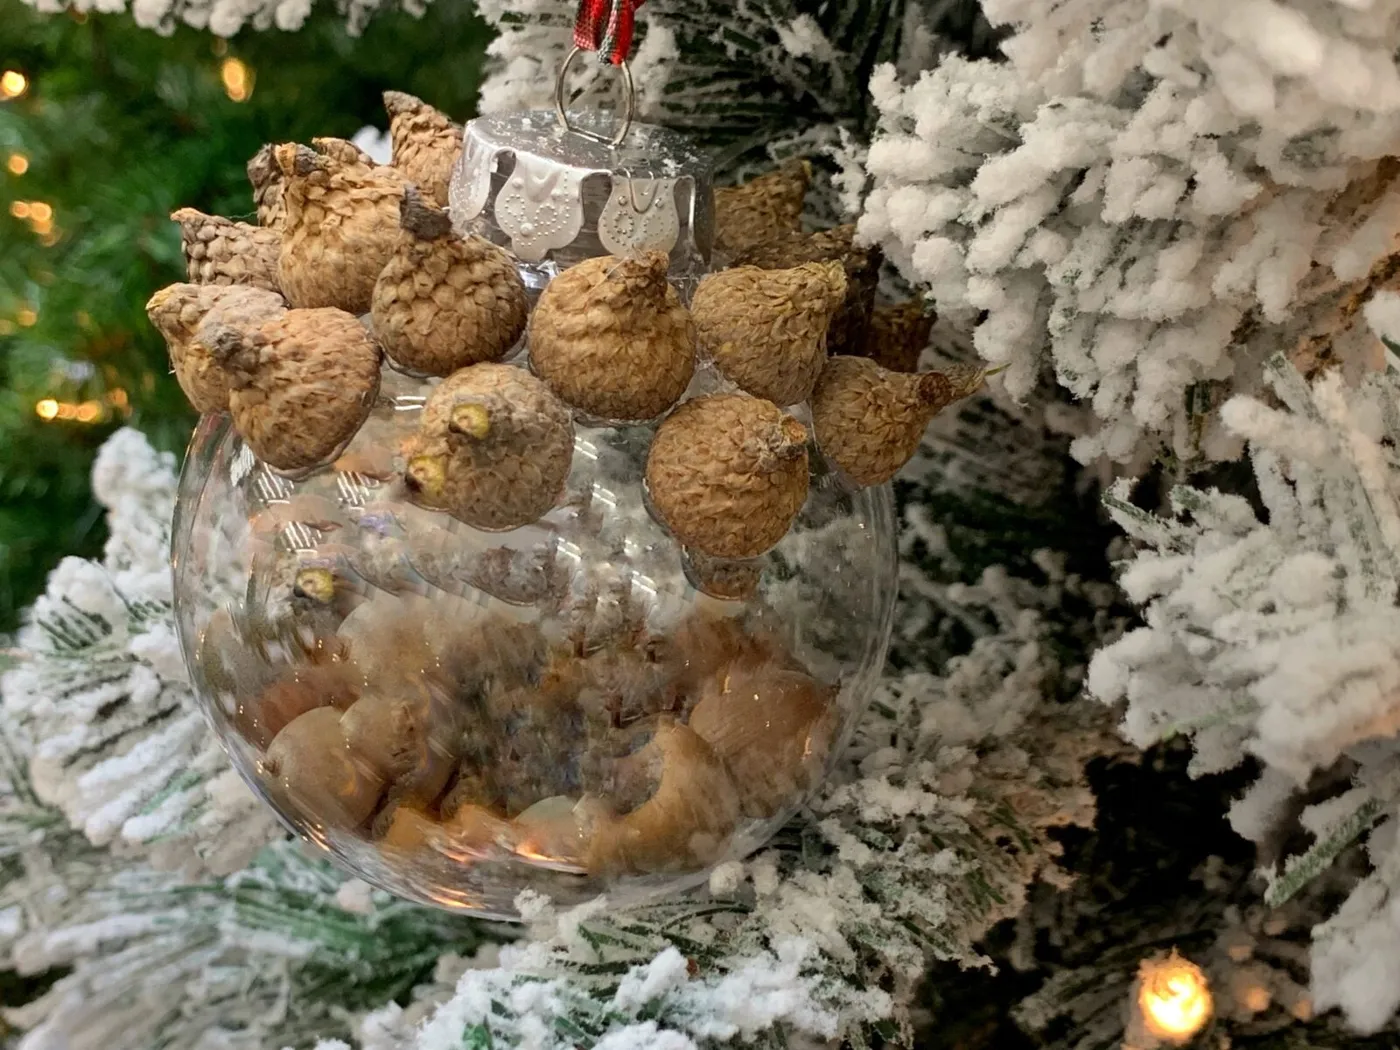
A few checks before you commit to a batch:
- Collect about 60 acorn caps for a 3-inch sphere; one oak tree gives you that in ten minutes in October.
- Soak caps in warm soapy water and dry them a full two days, or they curl off the glue by January.
- Confirm your ornament cap and hanger can carry the added weight — glass plus caps gets surprisingly heavy.
- Test your adhesive on one cap first; E6000 holds, white school glue absolutely does not.
11. Melted Peppermint Candies Turned Glassy Ornaments
Twenty minutes plus oven time for a set of six.
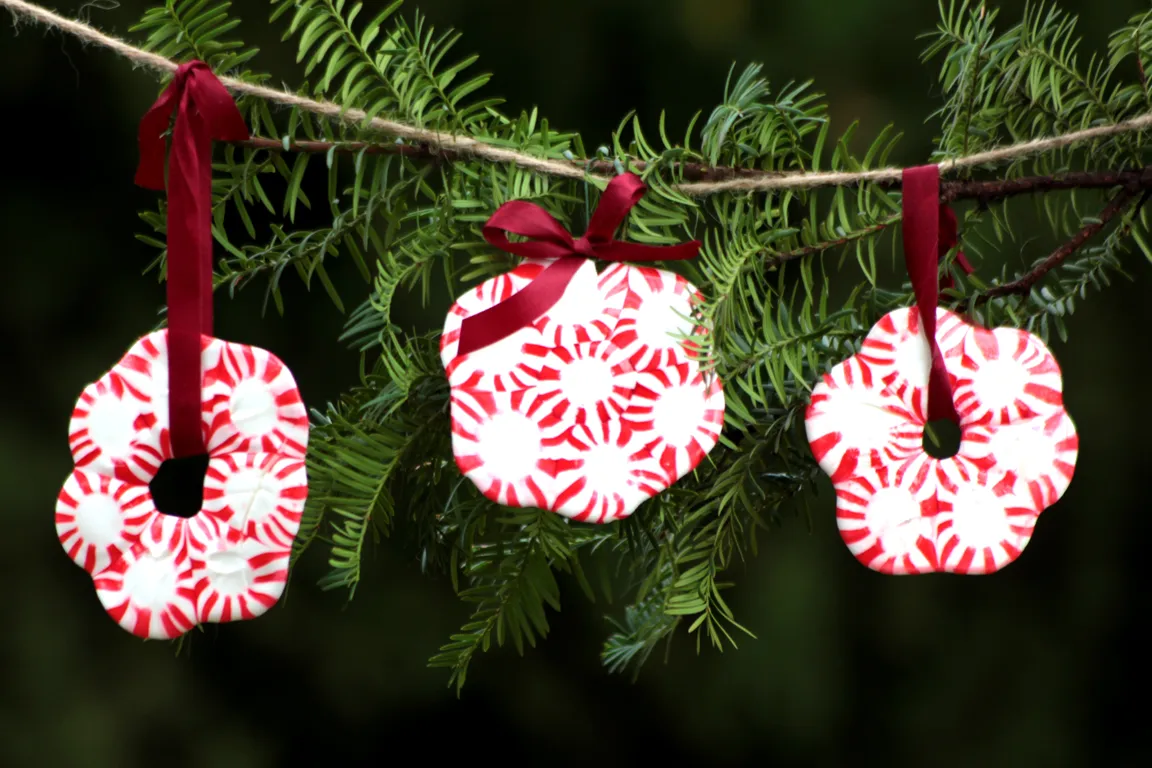
- Line a baking sheet with parchment and space unwrapped mints 3 inches apart in a ring of seven, with one in the center.
- Bake at 350°F for 8 to 10 minutes, watching closely — they go from domed to flat fast.
- Pull the tray and, while the candy is still soft, press a paper clip into the top edge for a hanger.
- Cool 15 minutes until fully hard, then peel off the parchment.
- Thread a narrow red ribbon through the clip and knot it snug.
That thin red ribbon is doing more than holding the ornament up. Melted candy is translucent, so light passes straight through and picks up whatever color the ribbon is — a red loop makes the whole disc glow rose under warm string lights, while green or gold gives you a cooler, more vintage read. Keep the hanger narrow. Wide ribbons cover the striped pattern that makes these worth making in the first place.
12. A Brown Ball Becomes a Googly-Eyed Reindeer
Antler placement is everything. Angle the pipe cleaners up and out at roughly 45 degrees from the top of the ball, not straight up — straight antlers make a bug. Trim the red tinsel pom-pom to about 3/4 inch, since anything larger swallows the googly eyes at ornament scale, and that is a real problem on a 2.5-inch sphere. Space the eyes about a half inch apart, slightly above center, so the nose has room.
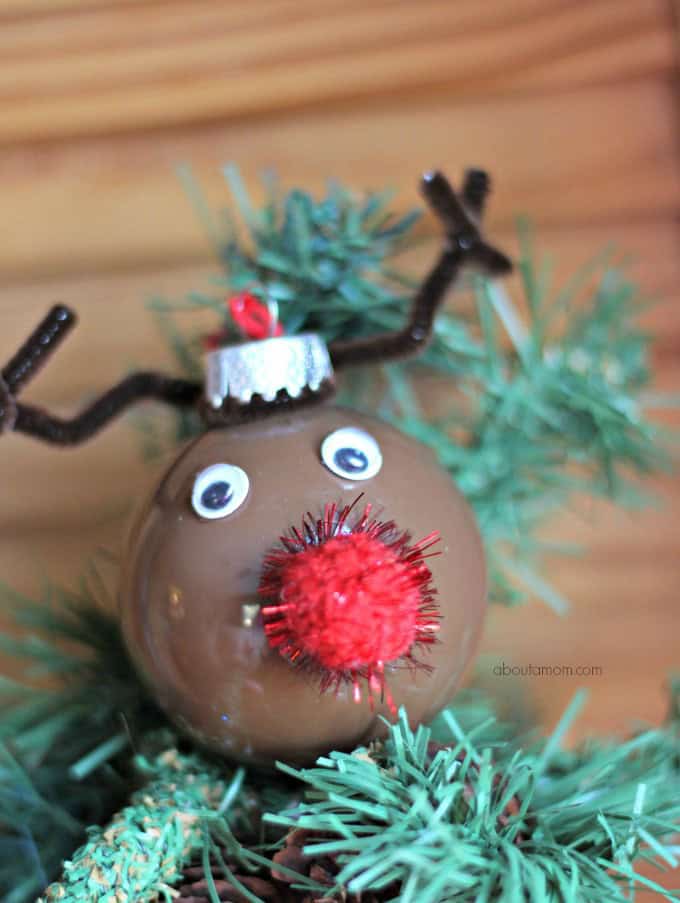
- Brown shatterproof ball ornaments, set of 12: $8–$14
- Googly eyes, assorted pack: $3–$5
- Brown pipe cleaners: $2–$3
- Red tinsel pom-poms: $3–$4
- Silver caps and string: $3–$5
Total: $19–$31 for a dozen reindeer, about $2 each. Repaint last year’s scratched baubles with brown spray paint and skip the new set entirely — $6 and a Saturday afternoon.
13. Recycled Cardboard Trees With Stripes and Smiles
Corrugated cardboard is genuinely fragile. It dents, it crushes if the storage box gets packed tight, and humidity will bow it by February if you keep decorations in a basement. Coat both faces with matte Mod Podge and it will hold its shape for years. Store them flat in a rigid box with tissue between layers. If that sounds like too much fuss, corrugated-look cardstock gives you the same ribbed texture with none of the crushing.
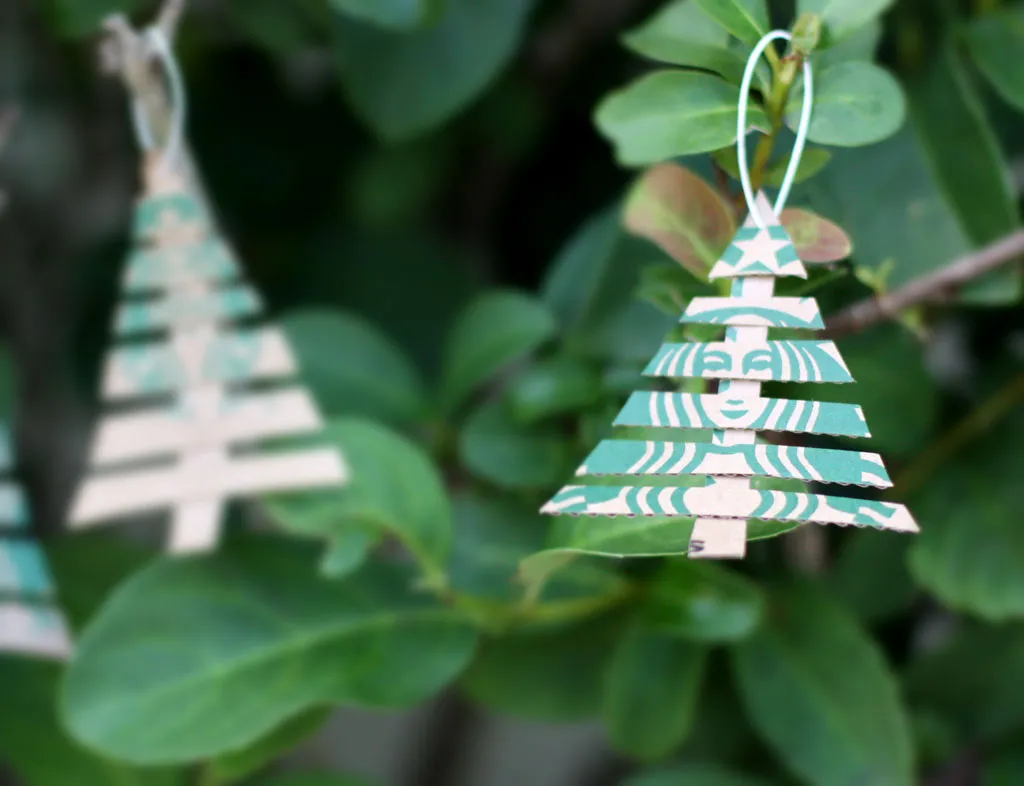
The visible corrugation is the entire point. That ribbed edge running along the tree’s outline adds texture without a single embellishment, and it keeps a very simple shape from looking unfinished. The green stripe pattern and the little face share the same graphic weight, so nothing competes for attention. Strip away the cardboard and you have a flat cutout; strip away the face and you have a plain beige triangle.
14. Santa Heads in Olive Hats Stitched With Stars
These read best at 4 to 5 inches tall — big enough that the embroidery is legible from a few feet away. They suit a full-size tree or a mantel garland. On a 2-foot tabletop tree, one is plenty. If your tree is over 8 feet, make them at 6 inches or they will disappear among larger ornaments. Compare with Idea #19, where smaller marbled pieces suit a tabletop display tree instead of a full one.
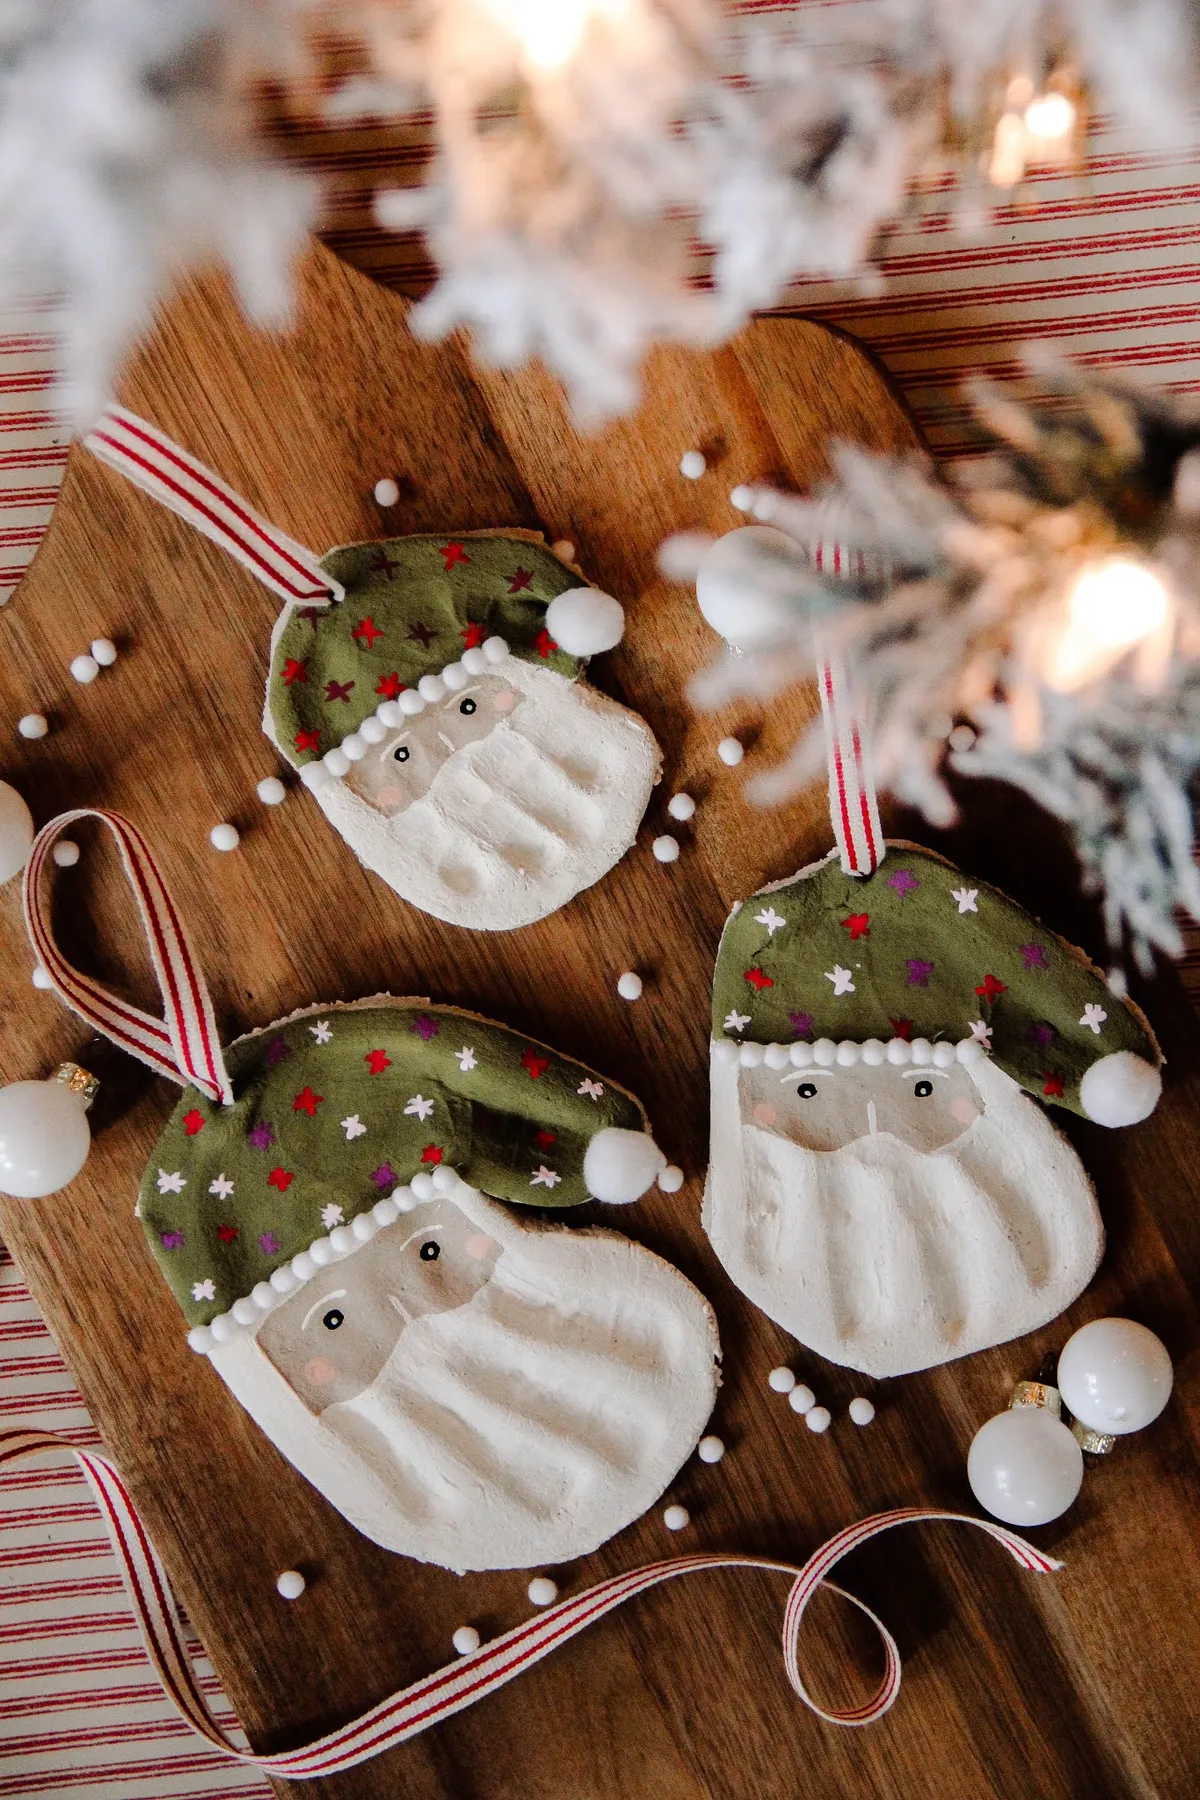
The mix is roughly 60% white texture — felt, fleece, or wool — 25% olive green, and 15% red-and-white stripe plus pom-pom trim. The olive hat is what keeps this from becoming a cartoon Santa; switch to a true bright red hat and it flips straight into kitsch. Want a different palette entirely? Deep forest green with silver trim delivers the same calm folk-art feeling with a slightly dressier edge.
15. Six Wood Slices, Six Painted Winter Scenes
- Wood slices with bark edges, 6-pack: $12–$18
- Acrylic craft paint, four or five colors: $8–$12
- Fine-tip brush set: $6–$10
- Twine for hangers: $3–$4
- Matte sealer spray: $6–$9
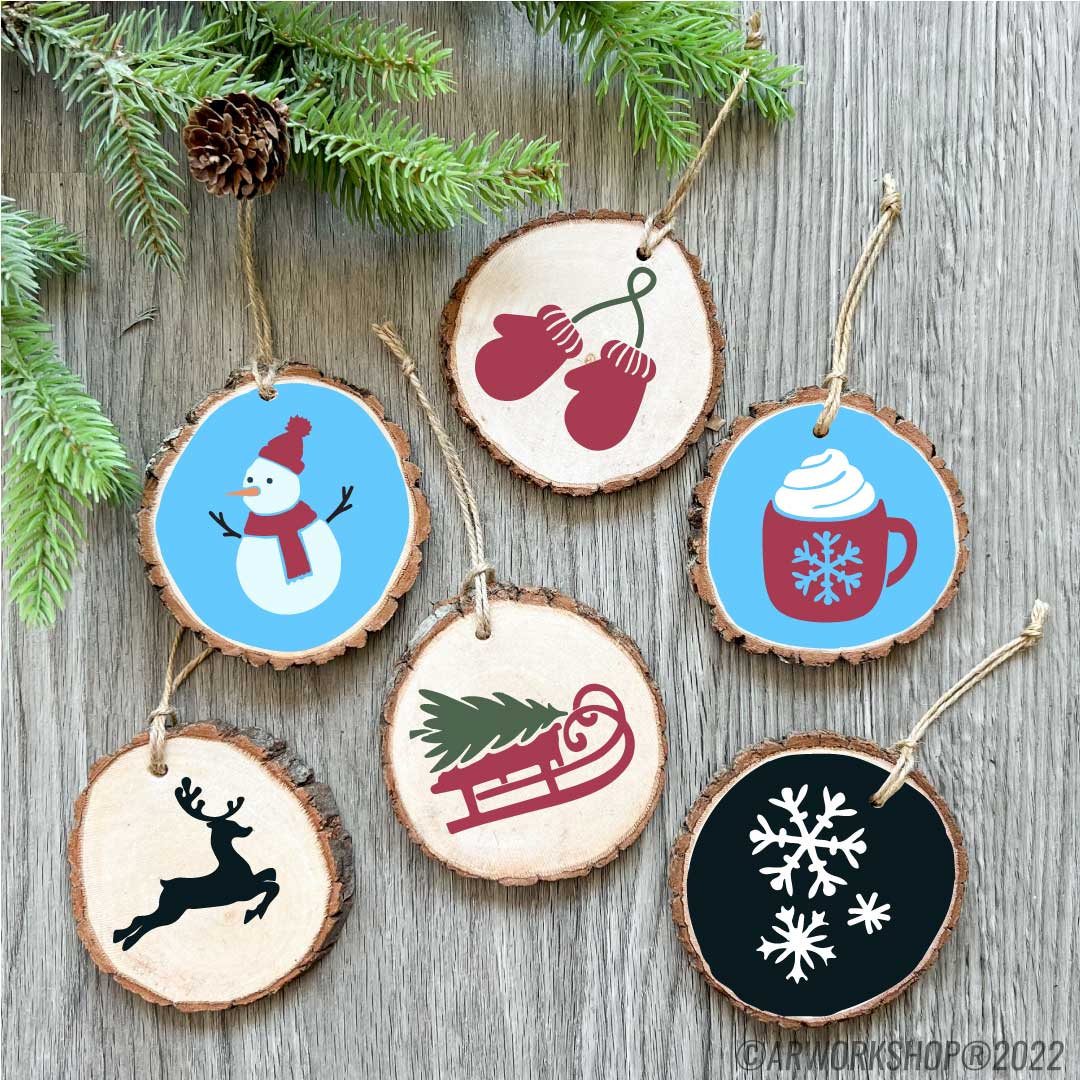
Total: $35–$53 for six ornaments. Cut your own slices from a fallen branch with a miter saw and let them dry three weeks — free, and the bark holds better than anything store-bought.
Walmart and dollar stores sell pre-painted wood slice ornament packs for around $5 that skip the design work entirely. If you want the handmade look without the brush hours, buy unfinished slices and use stencils plus a single black paint pen for the silhouettes — much faster and surprisingly crisp. Thrift stores also turn up bagged wood slices from abandoned craft projects for $2. Rub them with mineral oil to bring the grain back to life.
16. A Crocheted Gnome Guards a Miniature Gift Pile
A few checks before you start hooking:
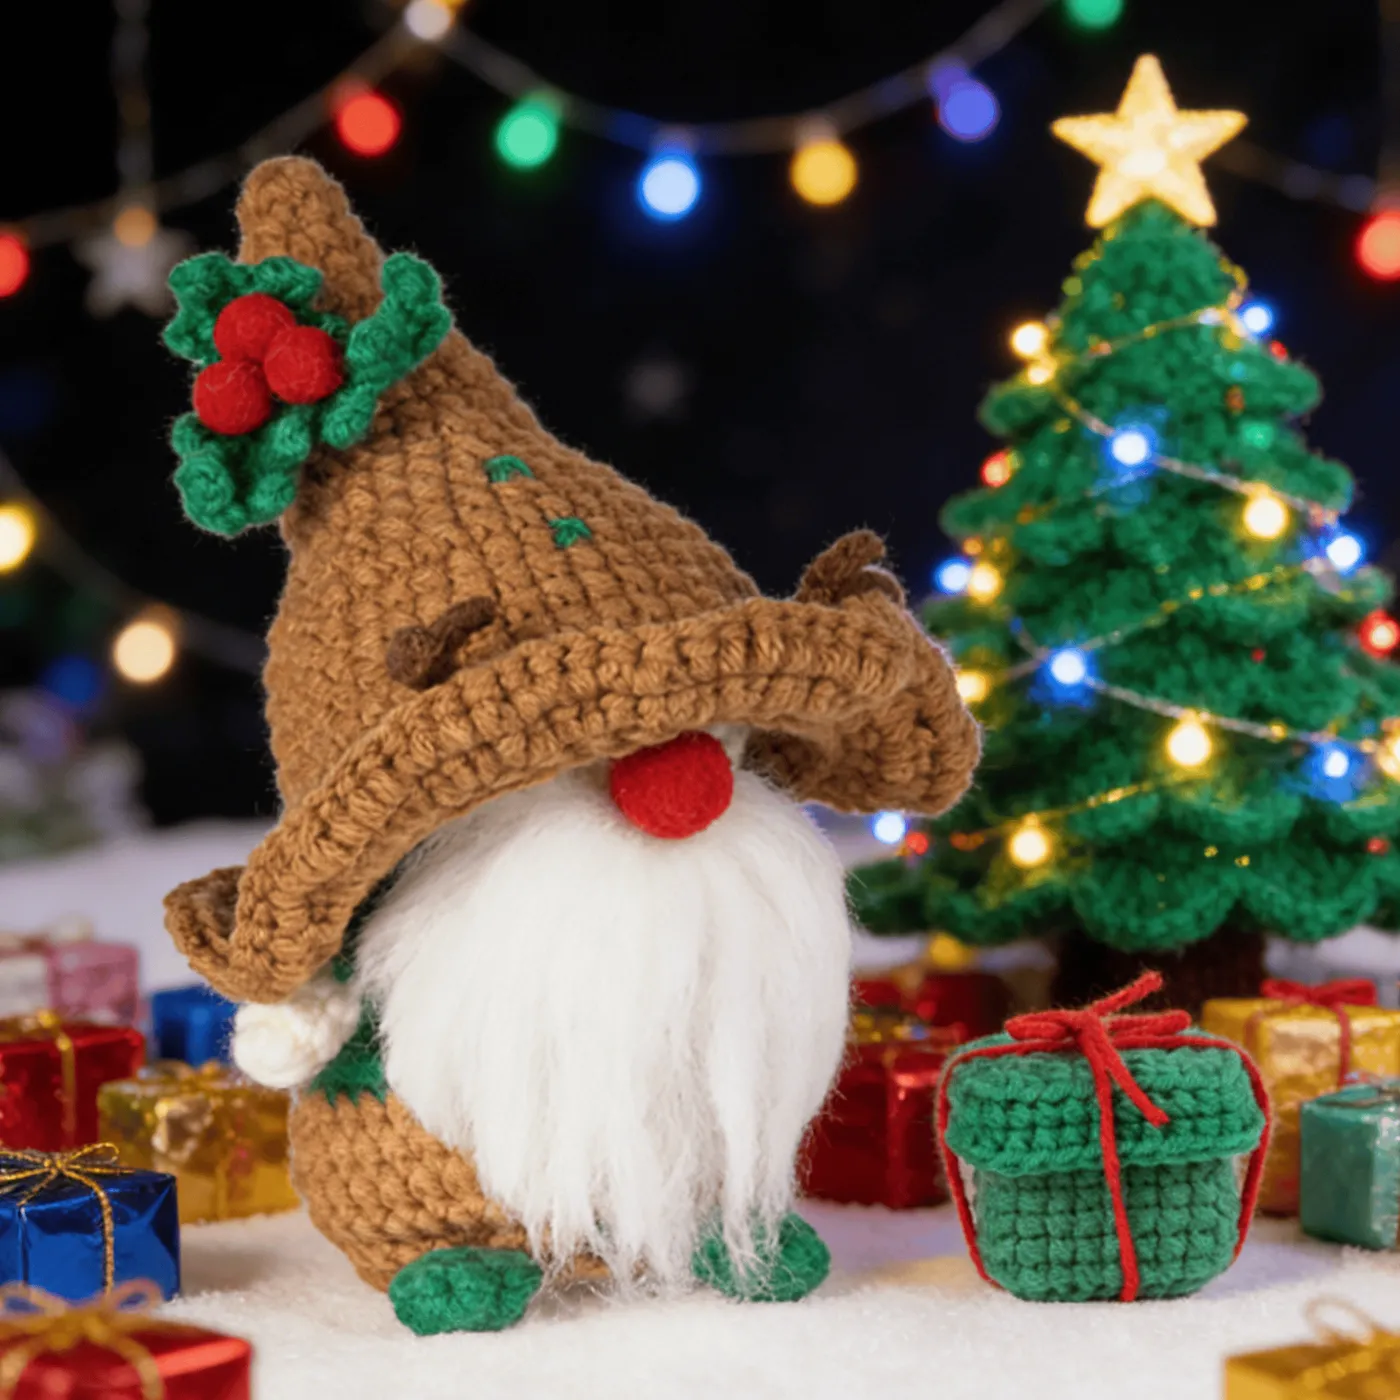
- Confirm your yarn weight — worsted cotton holds the gnome’s hat shape far better than acrylic.
- Test your hook against the pattern gauge; a half-size difference changes the finished height noticeably.
- Decide on a base first; a white faux-snow mat keeps the tiny wrapped gifts from sliding across the shelf.
- Budget three to four hours for the gnome, plus time for the crocheted tree if you make both.
Crocheted figures collect dust and pet hair like nothing else in your decor, and faux snow sheds across whatever it sits on. If this lives on a low shelf with a dog in the house, plan on a monthly rinse of the yarn and a quick vacuum pass. Those miniature foil-wrapped gifts are also a choking hazard for toddlers — keep the display above four feet, or glue the gifts down permanently.
17. An Eclectic Cluster of Twig Stars and Spiky Spheres
The variety is the star here, not any single ornament. Most handmade collections fail because everything matches — eighteen identical stars in a tidy row. This one mixes a twig star, a twig triangle, spiky painted spheres in contrasting color pairs, a tiny twig wreath, and one red-and-silver piece studded with pinecones. The eye keeps moving, which is exactly what you want when a collection spans a whole tree instead of one branch.
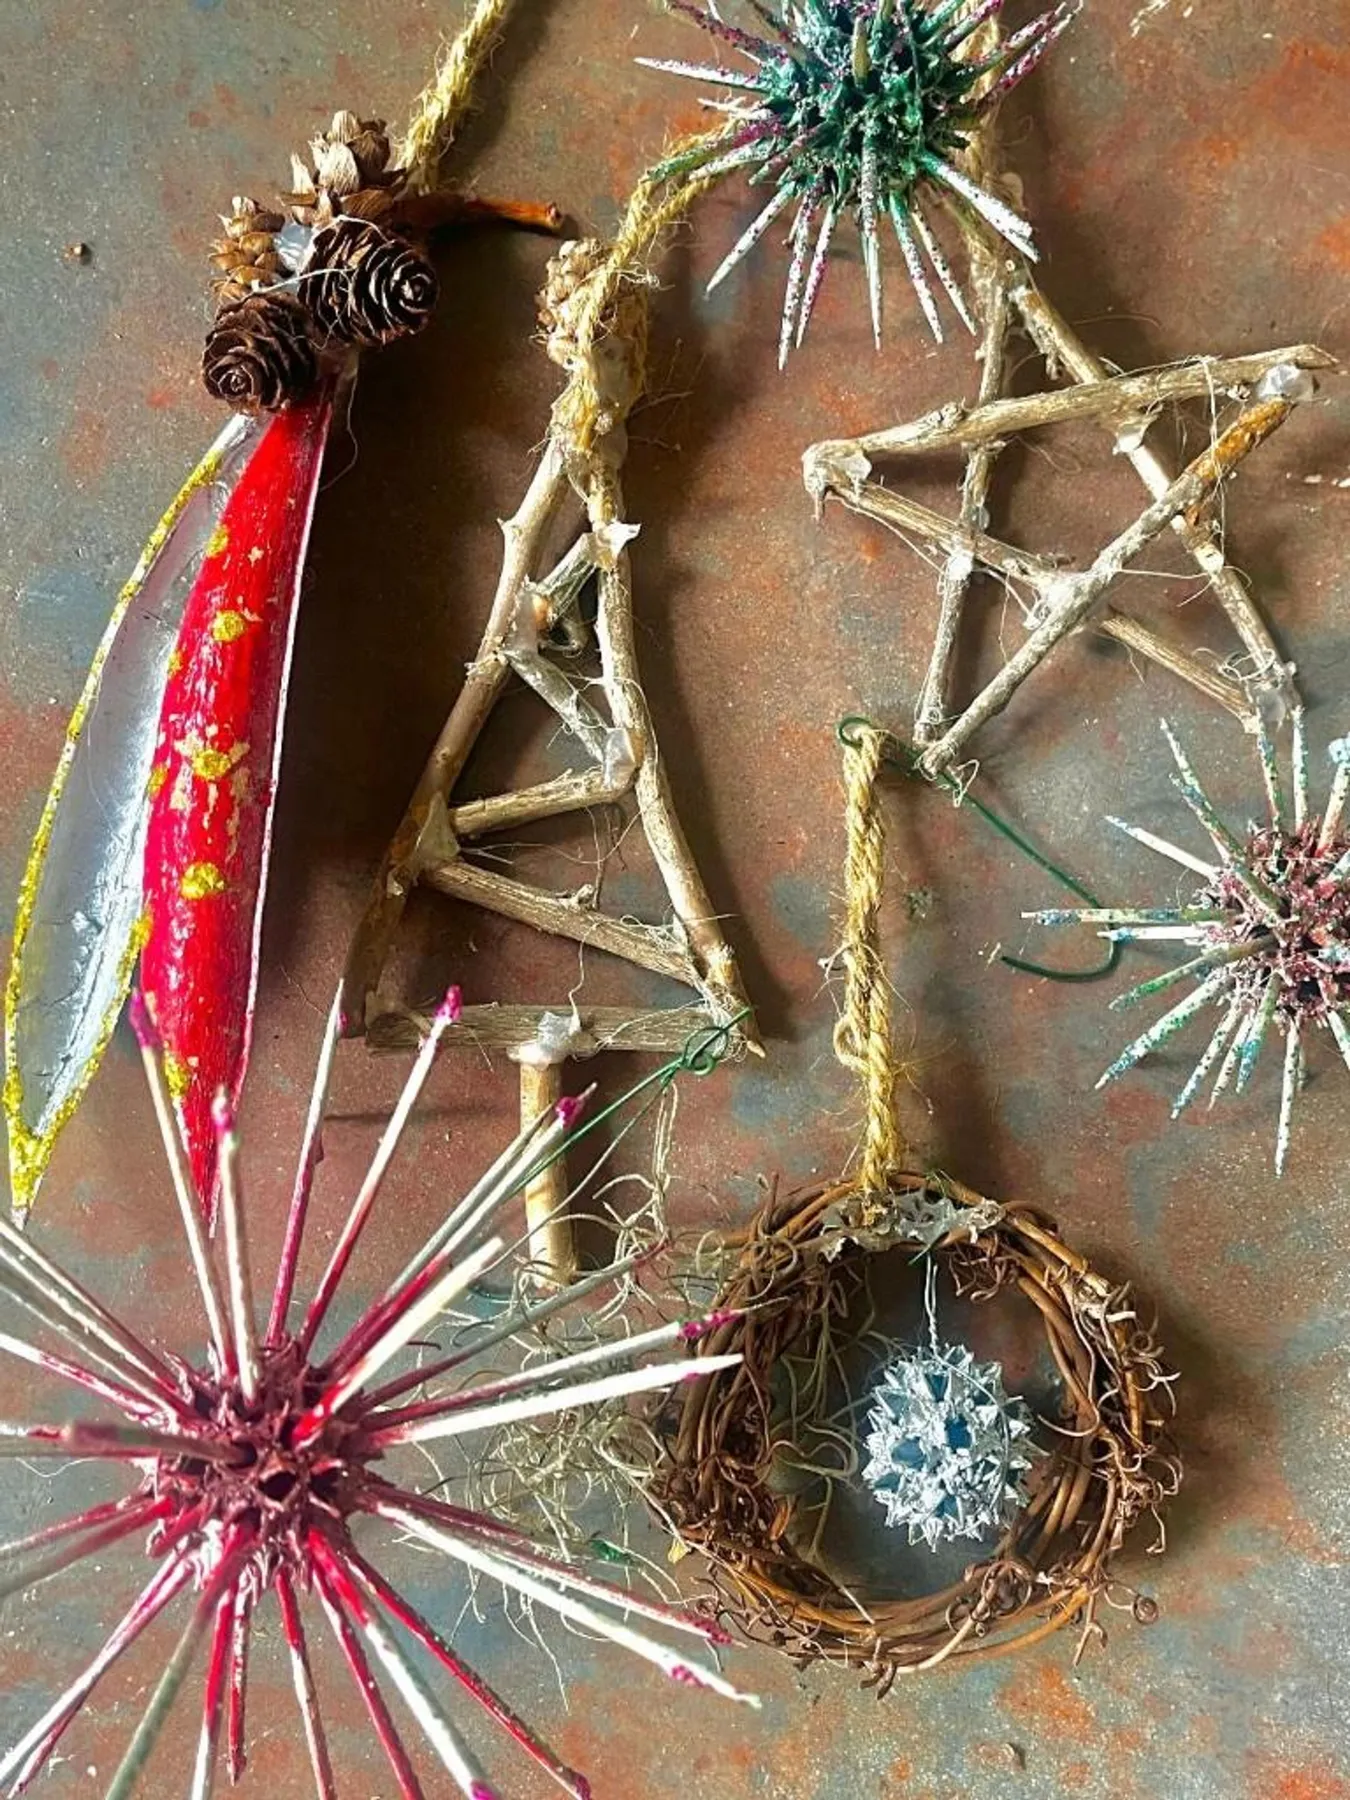
Roughly one in five of your ornaments should be a different shape category than the rest. If you have 20 round baubles, add four stars or wreaths. That ratio creates rhythm without tipping into chaos. Keep all your jute twine hangers at a consistent 3-inch loop length too, so everything hangs at the same depth — mismatched loops are the fastest way to make a handmade tree look messy.
18. A Crocheted Angel With Golden Wings and a Beaded Halo
The gold trim is what turns a white crocheted figure into something that looks expensive. Golden-yellow edging on the dress and wings echoes the warm fairy lights behind it, so the ornament feels lit even when it is not. The beaded halo adds a hard, shiny material to an otherwise soft piece, and that hardness-to-softness contrast is what makes it read as a figure rather than a plush toy propped on a branch.
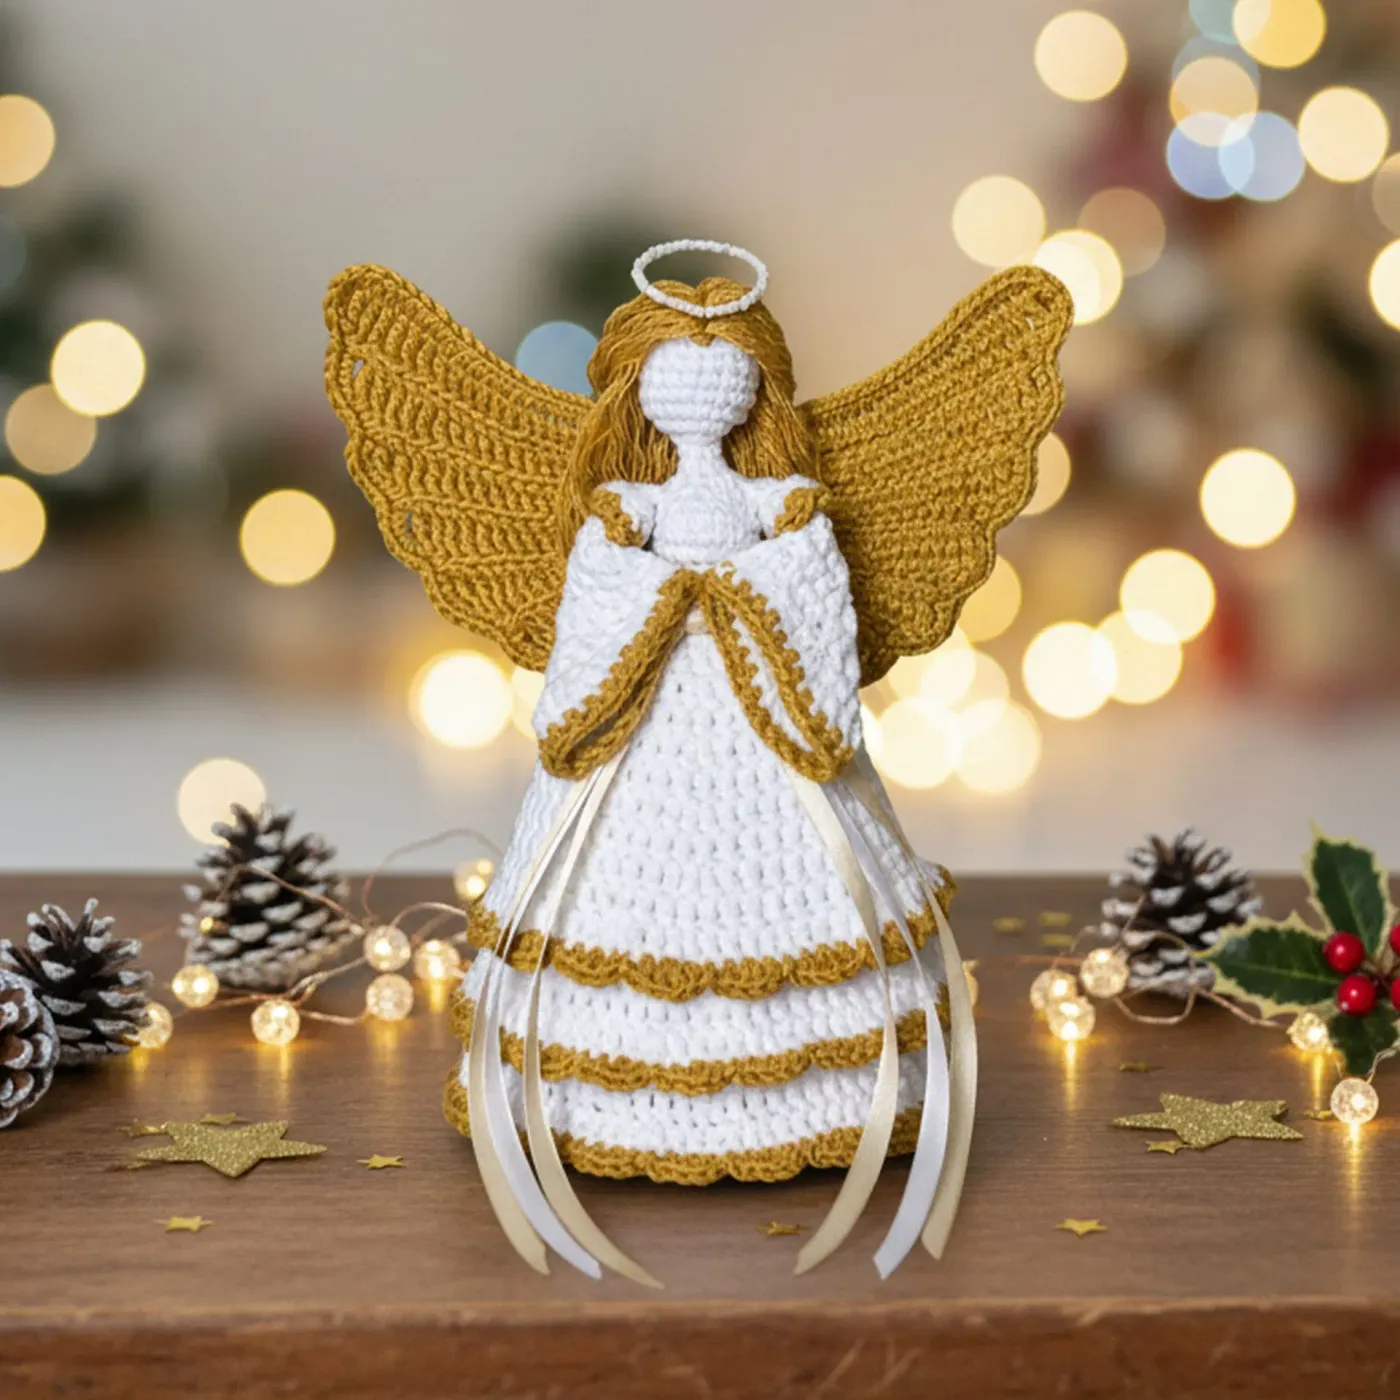
At 5 to 6 inches tall, this angel wants a real tree or a substantial mantel garland, not a tabletop display. Give it a front-facing branch at eye level with at least 6 inches of clear space around it. Trees under 4 feet should get one, centered. A room with a 10-foot tree can easily handle a pair flanking the topper, and the pinecones and glitter stars at the base repeat the same warm palette.
19. Marbled Stone-Look Ornaments on a Light Wood Tree
About 50% light wood, 30% marble-effect pastels, 20% gold. That light wood display tree is what keeps the pastel marble from looking like a nursery — without it, the pink and pale blue drift sweet fast. Swap the pastels for charcoal and cream marbling and you land in modern farmhouse territory with the identical proportions, plus a cream pillar candle at the base to warm it up.
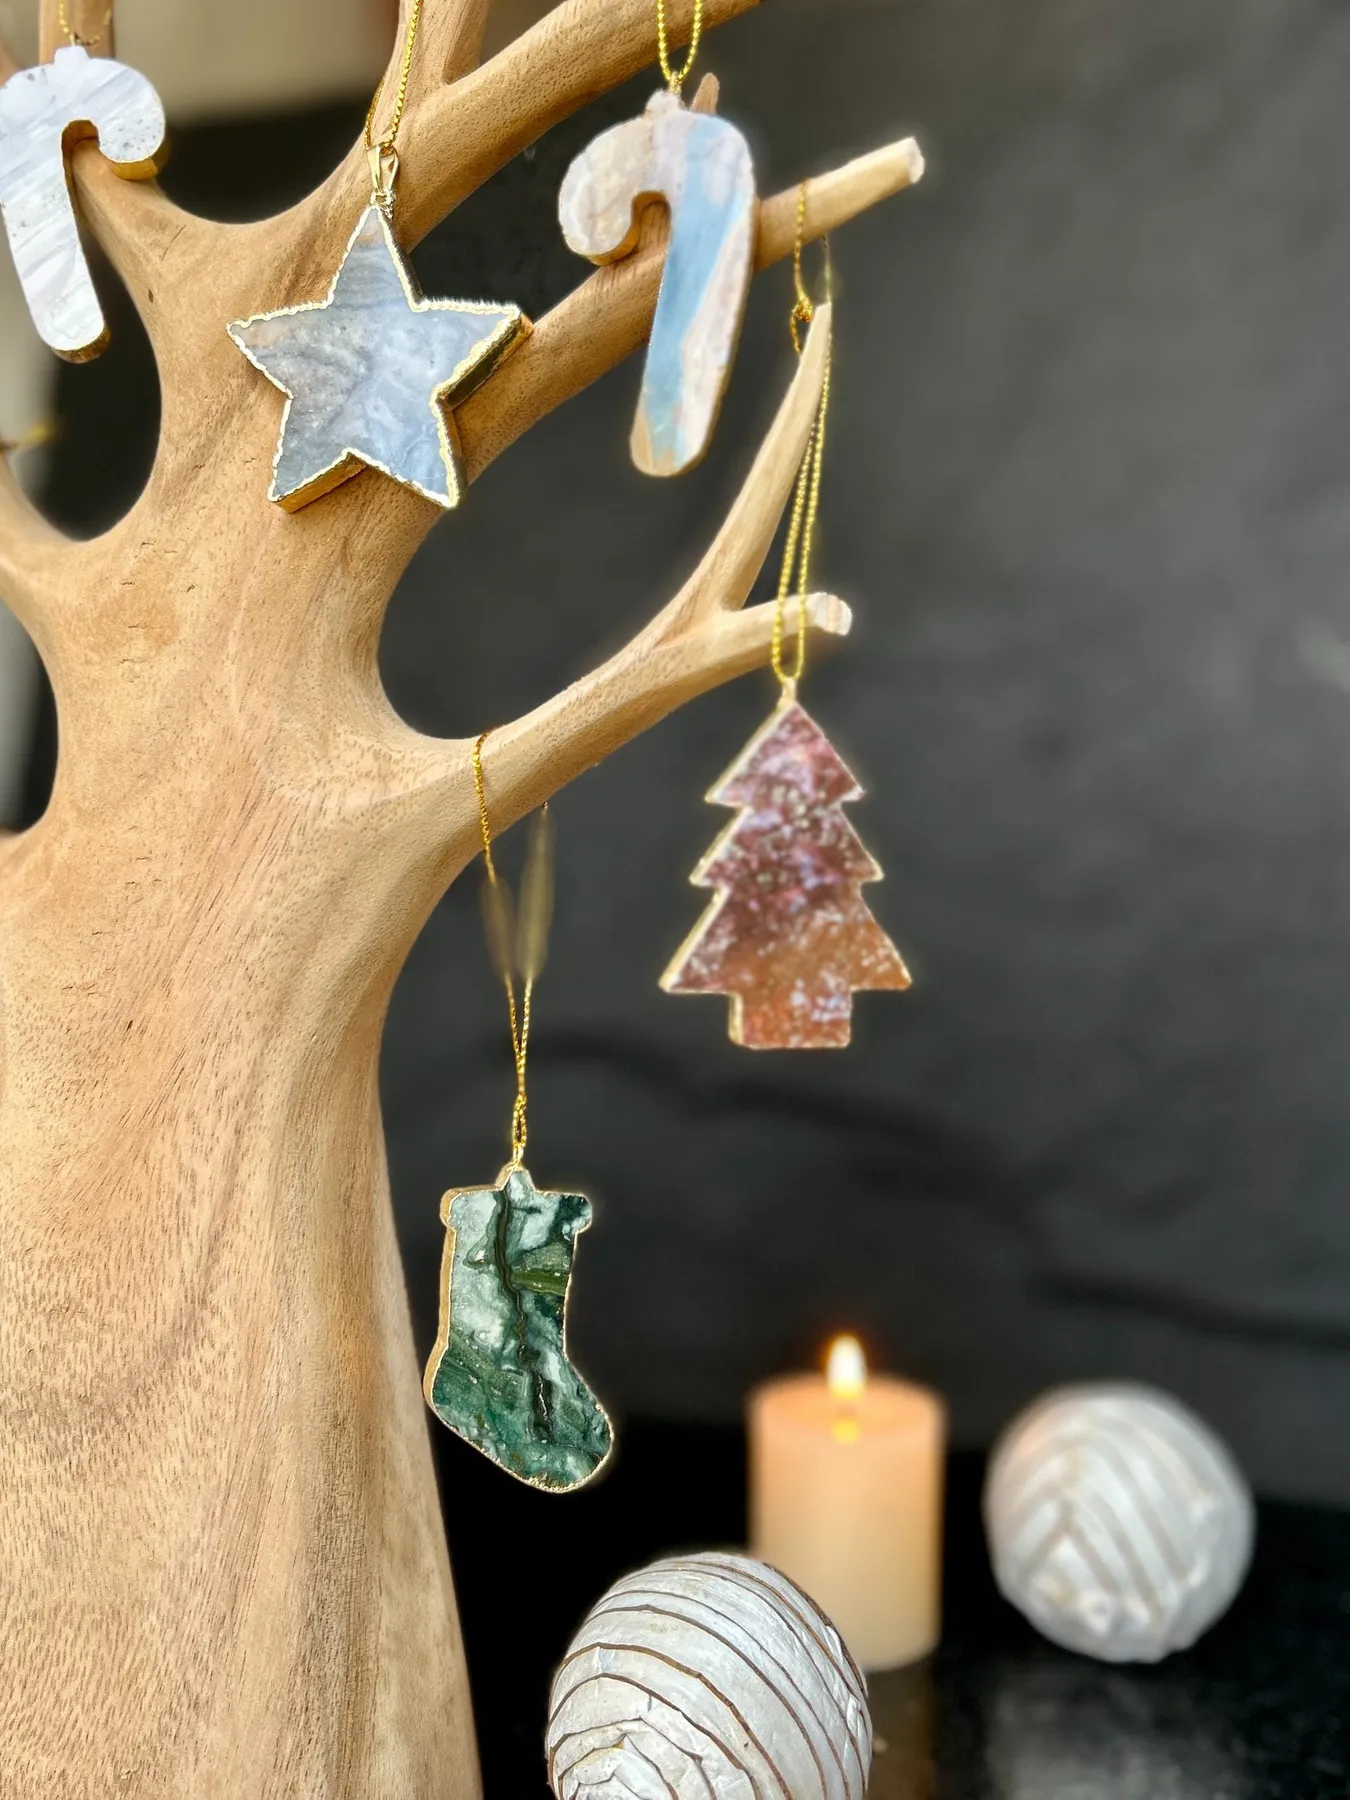
- Light wood display tree, 24-inch: $25–$45
- Clay or resin ornament blanks, set of 8: $10–$16
- Marbling paint or nail polish, three colors: $8–$14
- Gold metallic paint pen: $4–$6
- Gold chain or cord for hanging: $5–$8
Total: $52–$89. A dark twig branch in a weighted vase does the same job for under $10.
20. A Needle-Felted Surfer With a Tiny Blue Surfboard
Needle felting supplies run $30 to $50 to start, which is steep for a single ornament. Swap in air-dry clay or polymer at $8 a block: shape the body and board, paint the swim trunks with white trim, and skip the wool entirely. Facebook Marketplace regularly lists barely-used felting starter kits for $15, because the hobby has a famously high dropout rate — that is your best route if you want the real fuzzy texture.

Trunks and board first, body last:
- Cut two small rectangles of blue felt for the trunks and glue a white stripe along the hem.
- Shape the surfboard from a quarter-inch sheet of light blue felt, rounding the nose and tail.
- Needle-felt a loose oval for the torso, then stab in brown wool for the curly hair.
- Attach the trunks and board with a hidden stitch or a dot of tacky glue.
- Thread a loop through the top of the head and knot it tight.
About 90 minutes, mostly felting time. See Idea #24 for a no-sew version of the same handmade spirit.
21. A Lighted Glass Block Tied With Sheer Gold
Glass blocks get genuinely warm inside — warm-white LED strands are the only safe option, and the cord exit needs a clear path so nothing pinches or kinks. If yours sits on a wood mantel, add felt pads underneath; those flat glass edges will scratch a finished surface over a single season. Never use a strand with a cracked plug, and always unplug it before you move the block, bow and all.
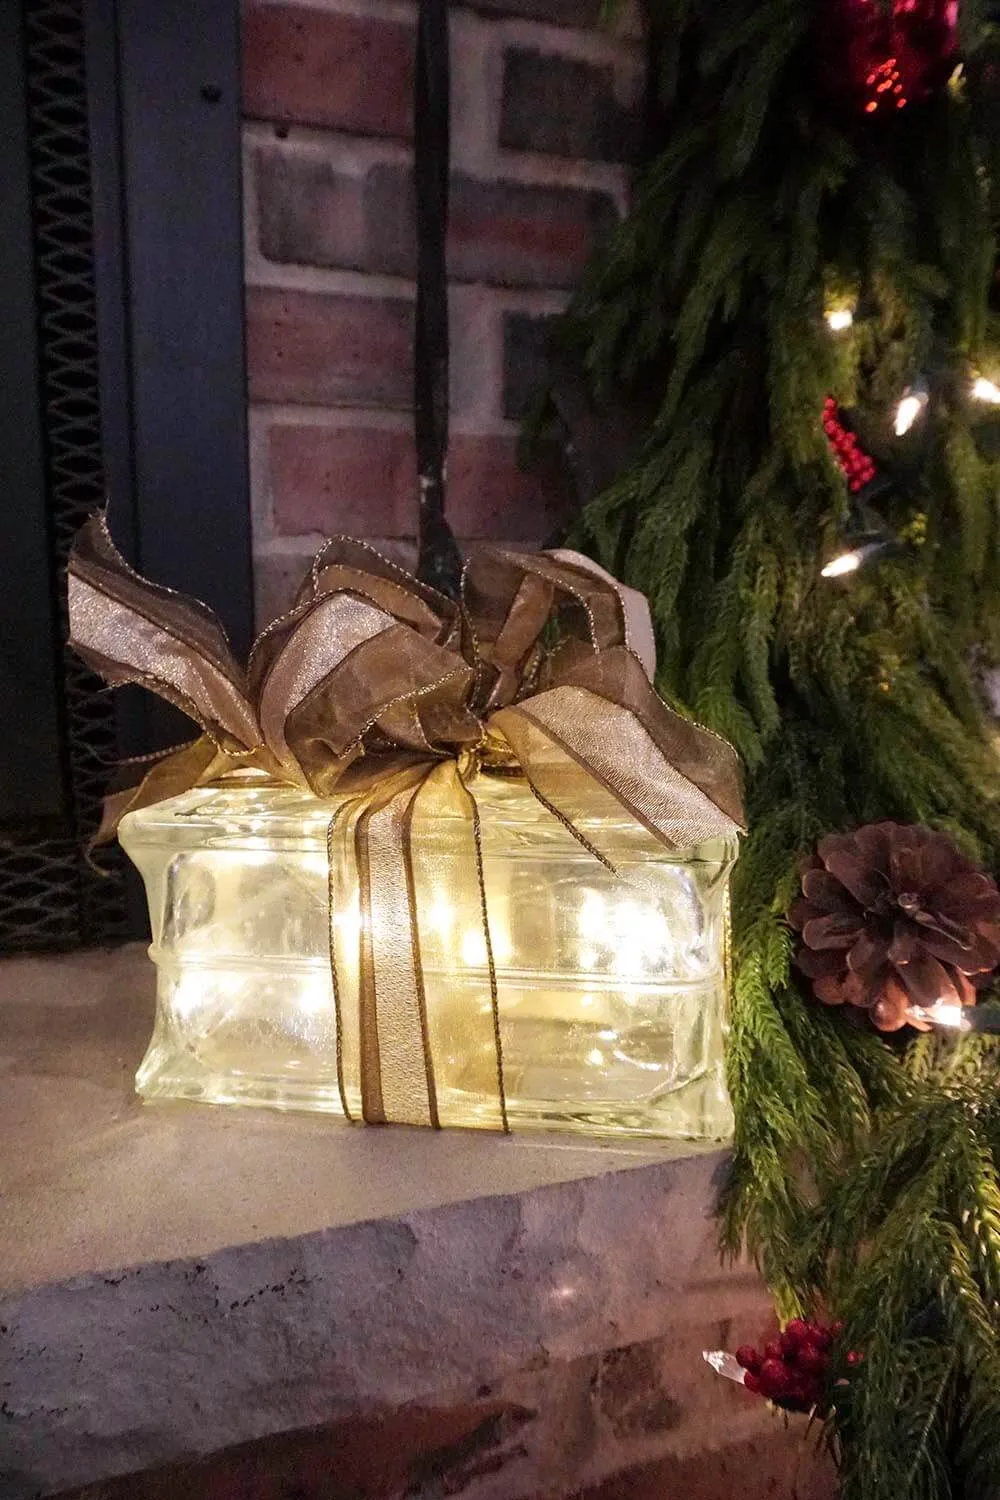
Lighted glass blocks are an 1980s craft resurging for a practical reason: LED fairy lights are now cheap, cool-running, and battery powered, which solves the old cord problem completely. The 2026 version is more restrained than the original — one sheer gold-and-brown ribbon, no decals, no painted snowmen. That quiet-nostalgia shift is showing up across holiday decor this year, especially in rooms with brick fireplaces and lots of natural greenery.
22. Folded Paper Ornaments Tucked Into Evergreen Sprays
Paper weight matters more than pattern. Use 65-lb cardstock, not copy paper — anything lighter collapses at the fold and the geometry goes soft. Score every fold line with a bone folder or the back of a butter knife before you crease, and the edges come out crisp. Folded ornaments also need a dab of glue at the inner join, or they slowly open over the season like a tired umbrella.
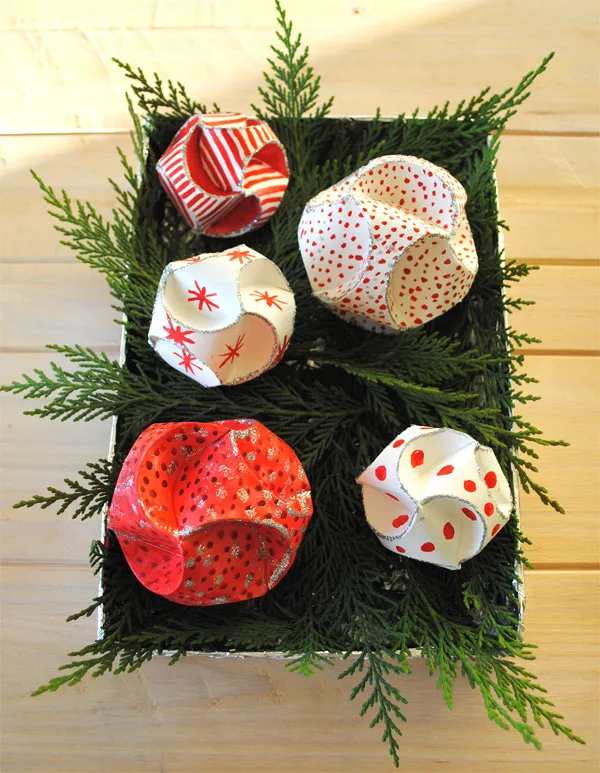
Nesting them in actual greenery instead of hanging them on the tree is the move that elevates this. Dark evergreen sprigs against red-and-white folded paper give you contrast in color and texture at the same time, and it turns five small ornaments into one composed display on a light wood tray. Without the greens you have five paper shapes in a bowl; with them, you have a centerpiece.
23. Burlap Tree Ornament With Cross-Stitch Red and Green
Burlap sheds. Expect loose fibers on the shelf for the first season and more every time you handle it, so a light coat of clear fabric stiffener is worth the ten minutes — it stops the fray at every cut edge. Cross-stitch threads also fade if they sit in direct sun through a window, so rotate the display or tuck these on an interior branch. Store flat, never compressed.
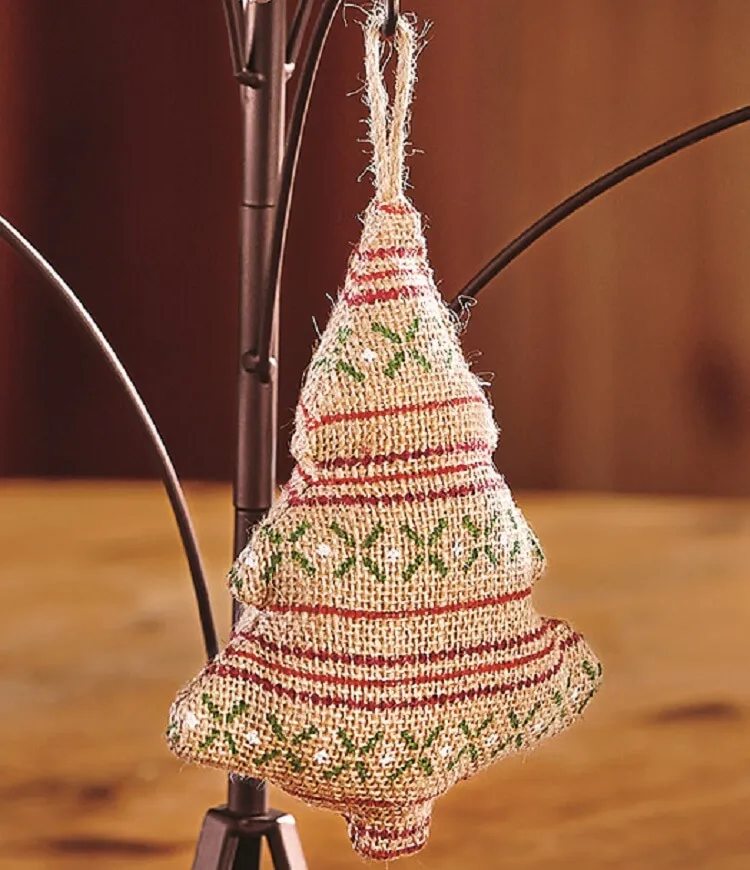
It is basically 60% natural burlap, 25% deep red stripe, 15% forest green cross-stitch. The burlap base does all the neutralizing work, which is why two strong colors can sit side by side without fighting. Want it softer? Keep the burlap and switch the stripes to cream and sage — same quiet-folk formula, just less Christmas-card bright. The twine loop should match the burlap’s warm brown exactly.
24. Dried Eucalyptus and White Blossoms in a Clear Sphere
These look best small — 2.5 to 3 inches across — because the fill is fine and delicate. They suit a tabletop display tree or a shallow glass bowl, and they are perfect for a 4-foot accent tree. If your main tree is 9 feet, use them as filler near the top where heavy ornaments feel like too much weight. For a sense of how mixed sizes hang together, Idea #29 shows a naturally varied collection on one branch.
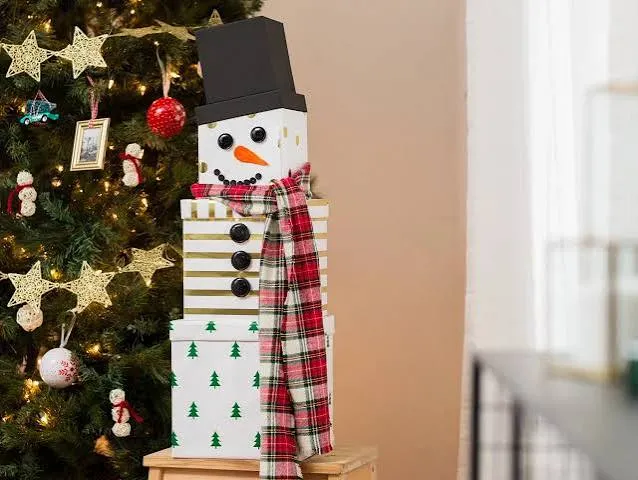
Clear fillable ornaments run $8 to $12 for six at Michaels, and after-Christmas clearance drops them to about $3. Dried eucalyptus is $5 a bunch at Trader Joe’s, and one bunch fills a dozen spheres. If you cannot find white blossoms, dried baby’s breath costs $4 and reads nearly identical at this scale. Total for six ornaments: under $15, plus a spool of narrow ribbon.
25. A Red Drum Display Piled With Ornaments and Candy Canes
Build the display in about an hour:
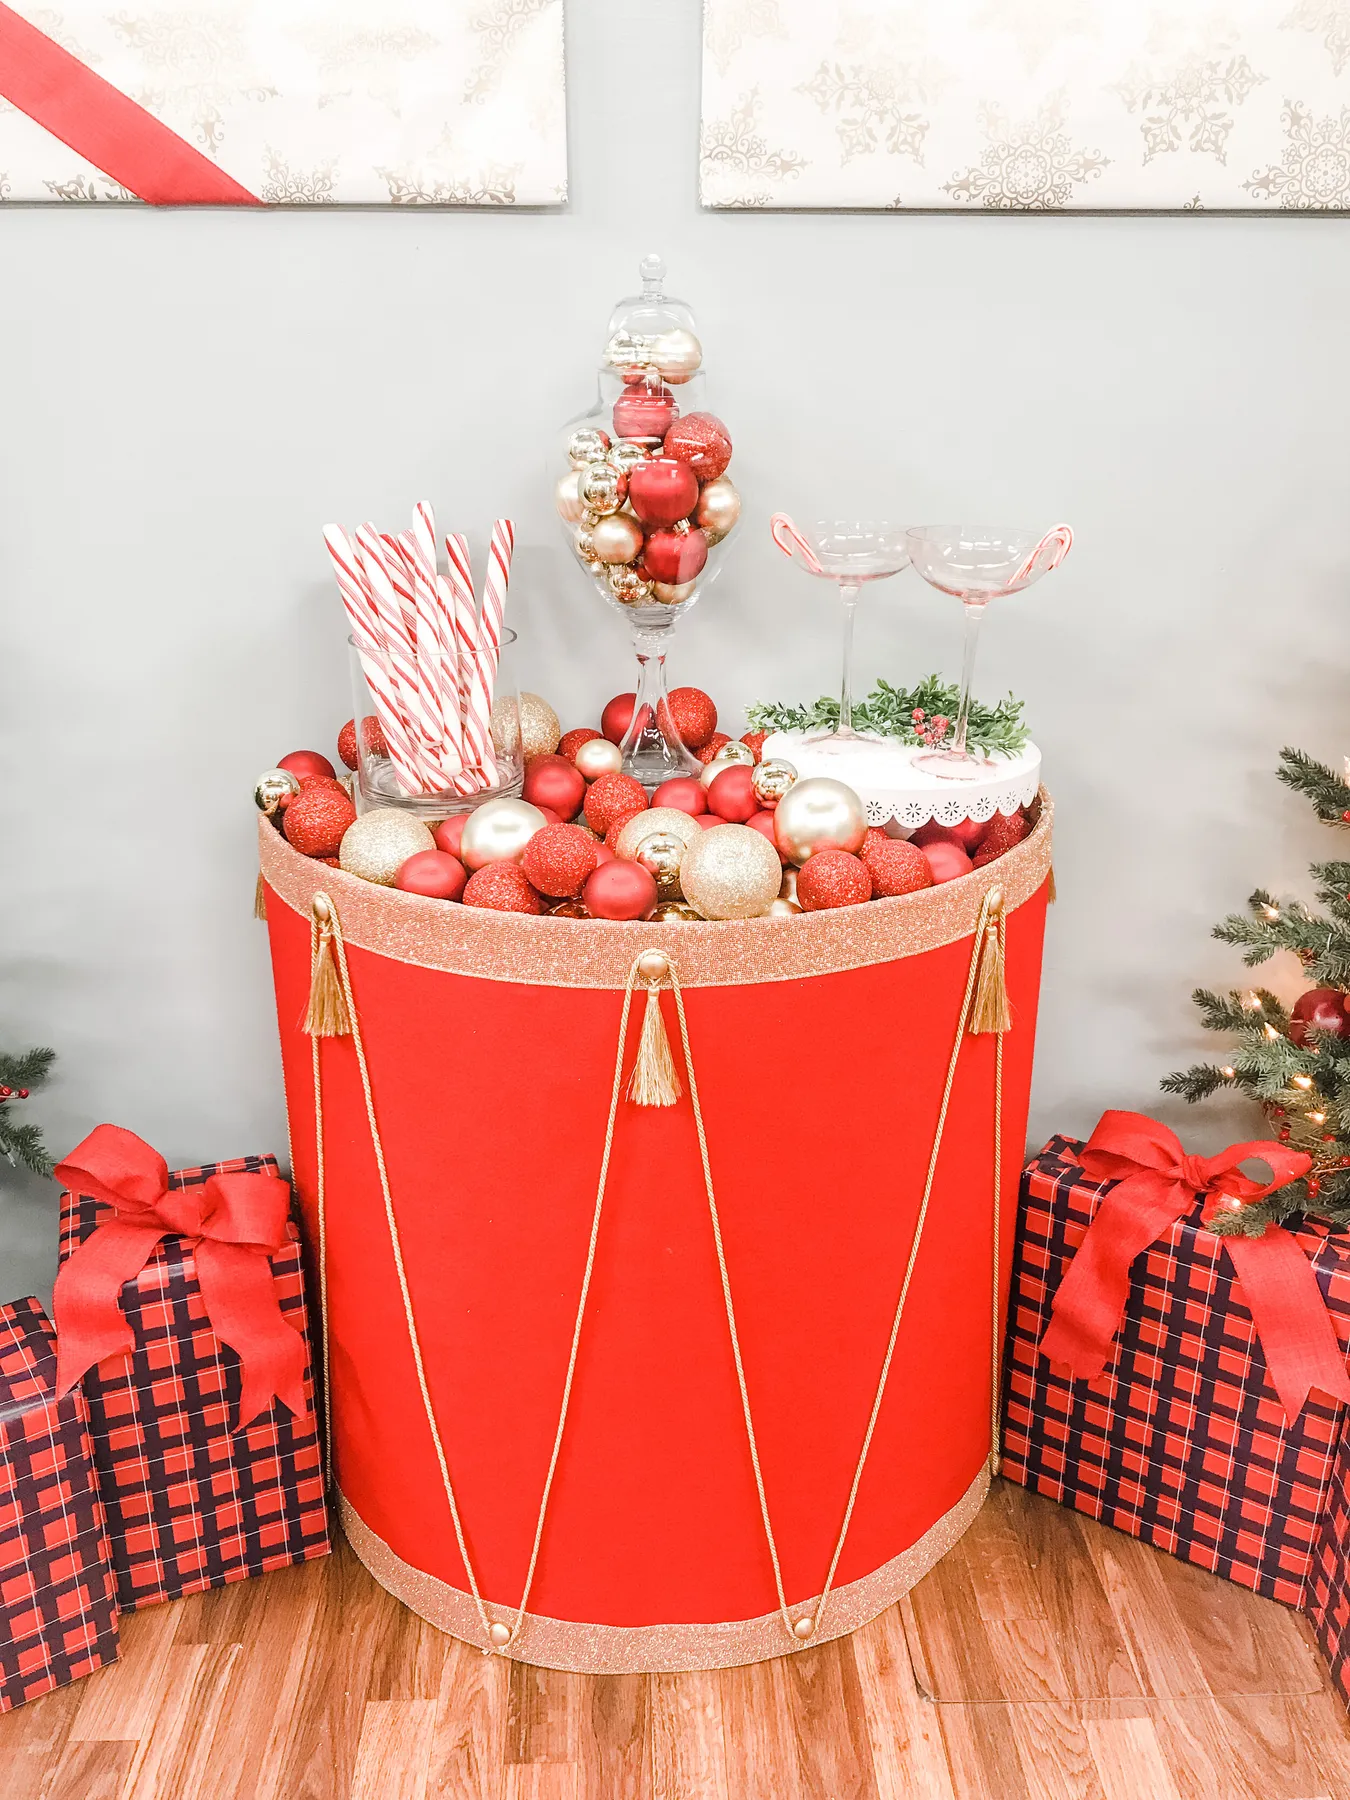
- Find a low drum, hat box, or round planter and paint it red; add a gold glitter band around the rim.
- Fill it two-thirds with crumpled kraft paper so the ornaments do not all sink to the bottom.
- Layer in red and gold spheres, tucking the taller pieces toward the back.
- Set two or three clear glass vessels on top and fill one with candy canes, one with loose ornaments.
- Tuck faux green branches with red berries into the gaps and finish with two plaid-wrapped boxes alongside.
- Drum or round planter: $15–$35
- Red and gold ornament sets: $20–$40
- Clear glass jars and vases: $10–$25
- Faux greenery and berry stems: $8–$18
- Gold glitter trim and ribbon: $5–$10
Total: $58–$128. Thrift stores almost always have clear glass apothecary jars for $3 to $5 — that is the cheapest third of this entire display.
26. A Fabric Elephant in Black and Bright Green
Black and bright green is a bold pairing, and it works here because the pattern is organic rather than geometric. Those curved motifs soften the high contrast, so the ornament reads playful instead of harsh. Hanging it on a dark green branch helps too — the elephant’s green echoes the tree, which lets the black shapes do all the popping, with a white glitter snowflake nearby for one bright interruption.
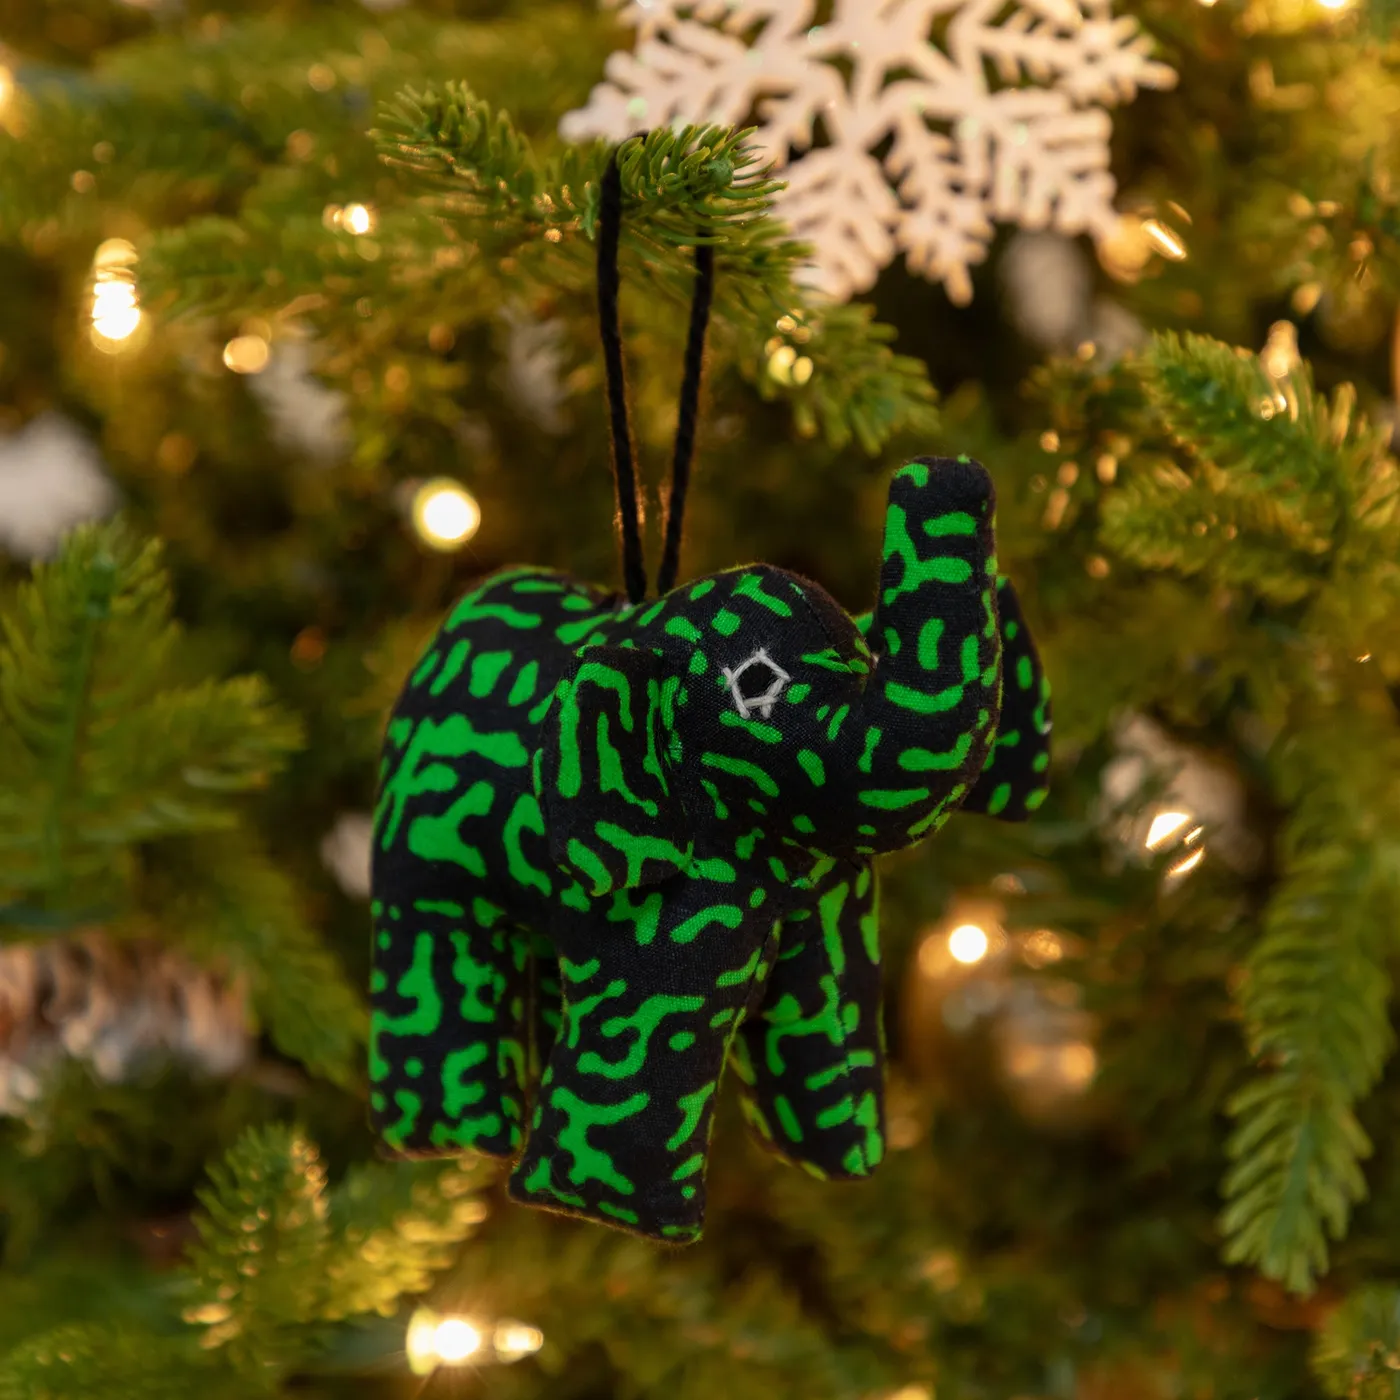
Stuff small fabric ornaments loosely, about 80% full. Overstuffed shapes lose their silhouette and end up looking like beanbags. If you are sewing a batch, cut your pattern an eighth of an inch larger than the finished size to account for seam allowance — new sewers routinely lose a quarter inch on every seam and end up with a mouse instead of an elephant.
27. Driftwood Branches Draped With Felt Sea Creatures
The driftwood structure is what makes this feel like an installation instead of a pile. Hanging a green octopus with smaller ones trailing behind, a blue whale, and a beige stingray from raw branches — layered with red berries, dried white foliage, and a few silver glass baubles — creates an entire ocean story in one corner. Remove the driftwood and you have three felt toys; keep it and you have a display with a clear point of view.
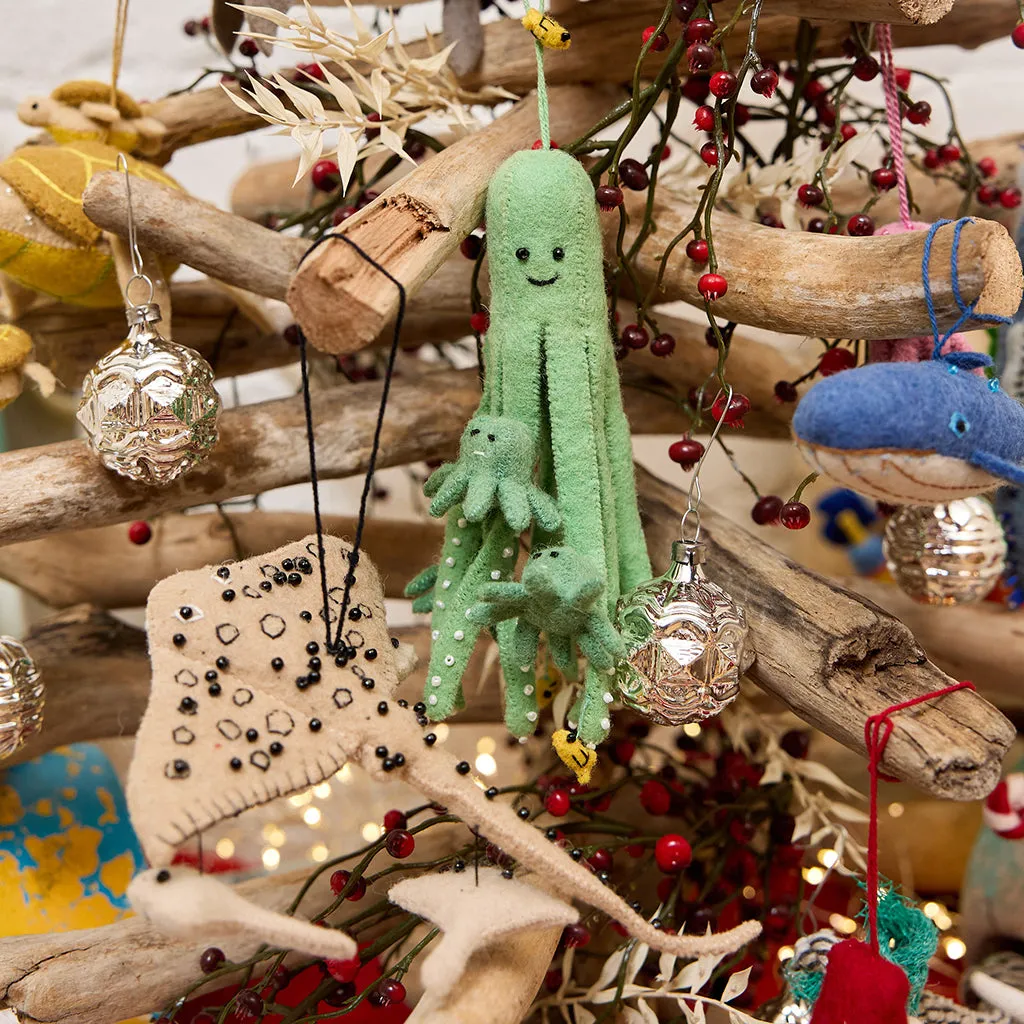
Themed ornament collections are booming on Pinterest because people want trees that say something about them — pets, hobbies, hometowns. Coastal and marine themes have grown especially fast as more families split the holidays between snowy and beachy homes. A small themed branch like this is a smarter entry point than redecorating an entire tree, and it travels better too.
28. Wood Slice Ornaments Suspended From a Barn Beam
Wood slices are the cheapest ornament blank around. Dollar stores sell 12-packs for $5, and anyone with a saw and a fallen branch can make them for free. Use acrylic paint pens at $6 for a set of six instead of brushes and pots, and twine instead of ribbon. Total for a dozen: about $12. Facebook Marketplace also lists boxed wood slice sets from abandoned craft projects for $3 to $5.
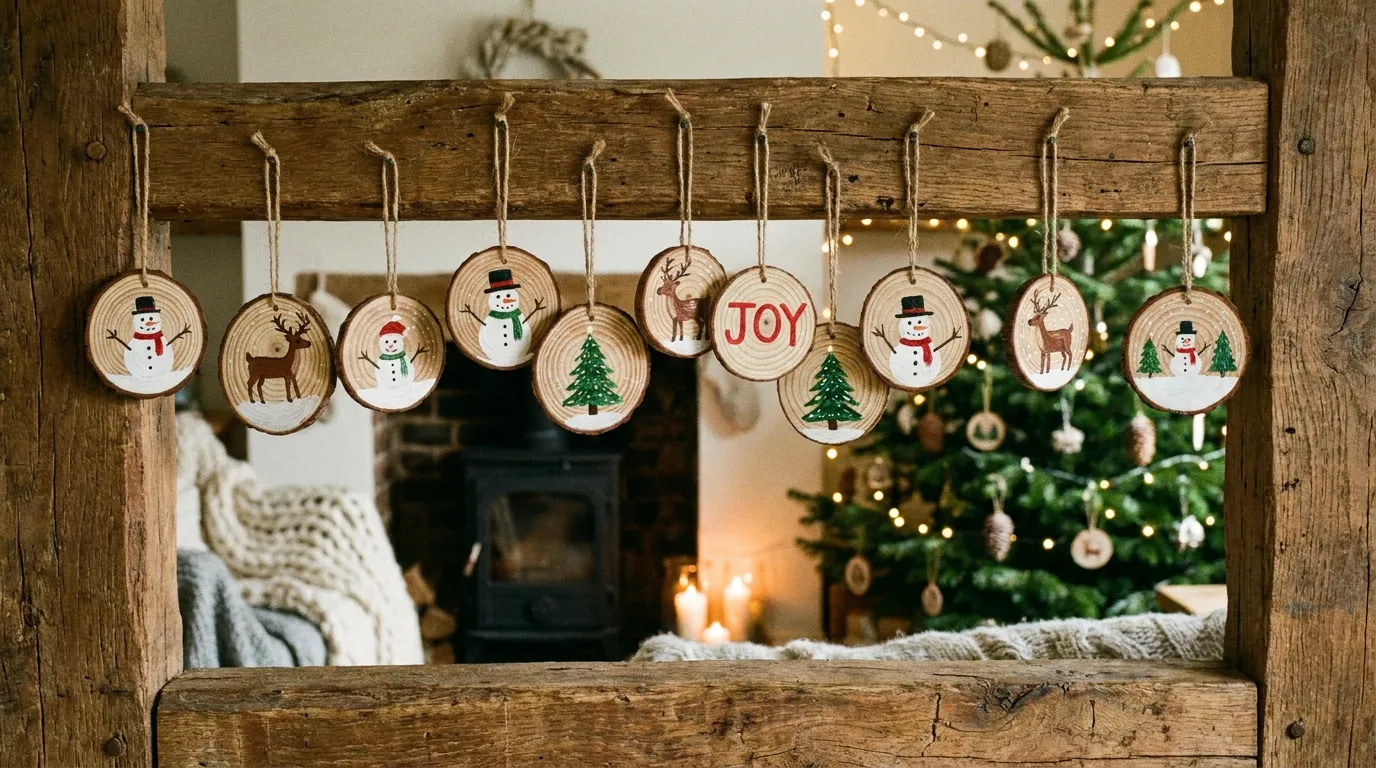
Two things to know before you hang them from a timber beam. Fresh-cut wood needs three to four weeks of drying or the slices crack as they lose moisture — and they will crack right through your painted snowman. Wood slices are also heavier than they look once painted and sealed, so use proper hooks near the beam rather than thin string. If you have a wood-burning stove in the room, keep the display a few feet away; soot dulls the paint fast.
29. A Cork Bark Branch Draped With Handmade Charms
A single cork bark branch works in almost any room — 18 to 24 inches is the sweet spot for a shelf or a mantel. Hang six to ten ornaments so each keeps about 2 inches of air around it. Working with a narrow console? Drop to 14 inches and four pieces. Compare with Idea #27, where a larger driftwood structure carries a full collection instead of a handful of charms.
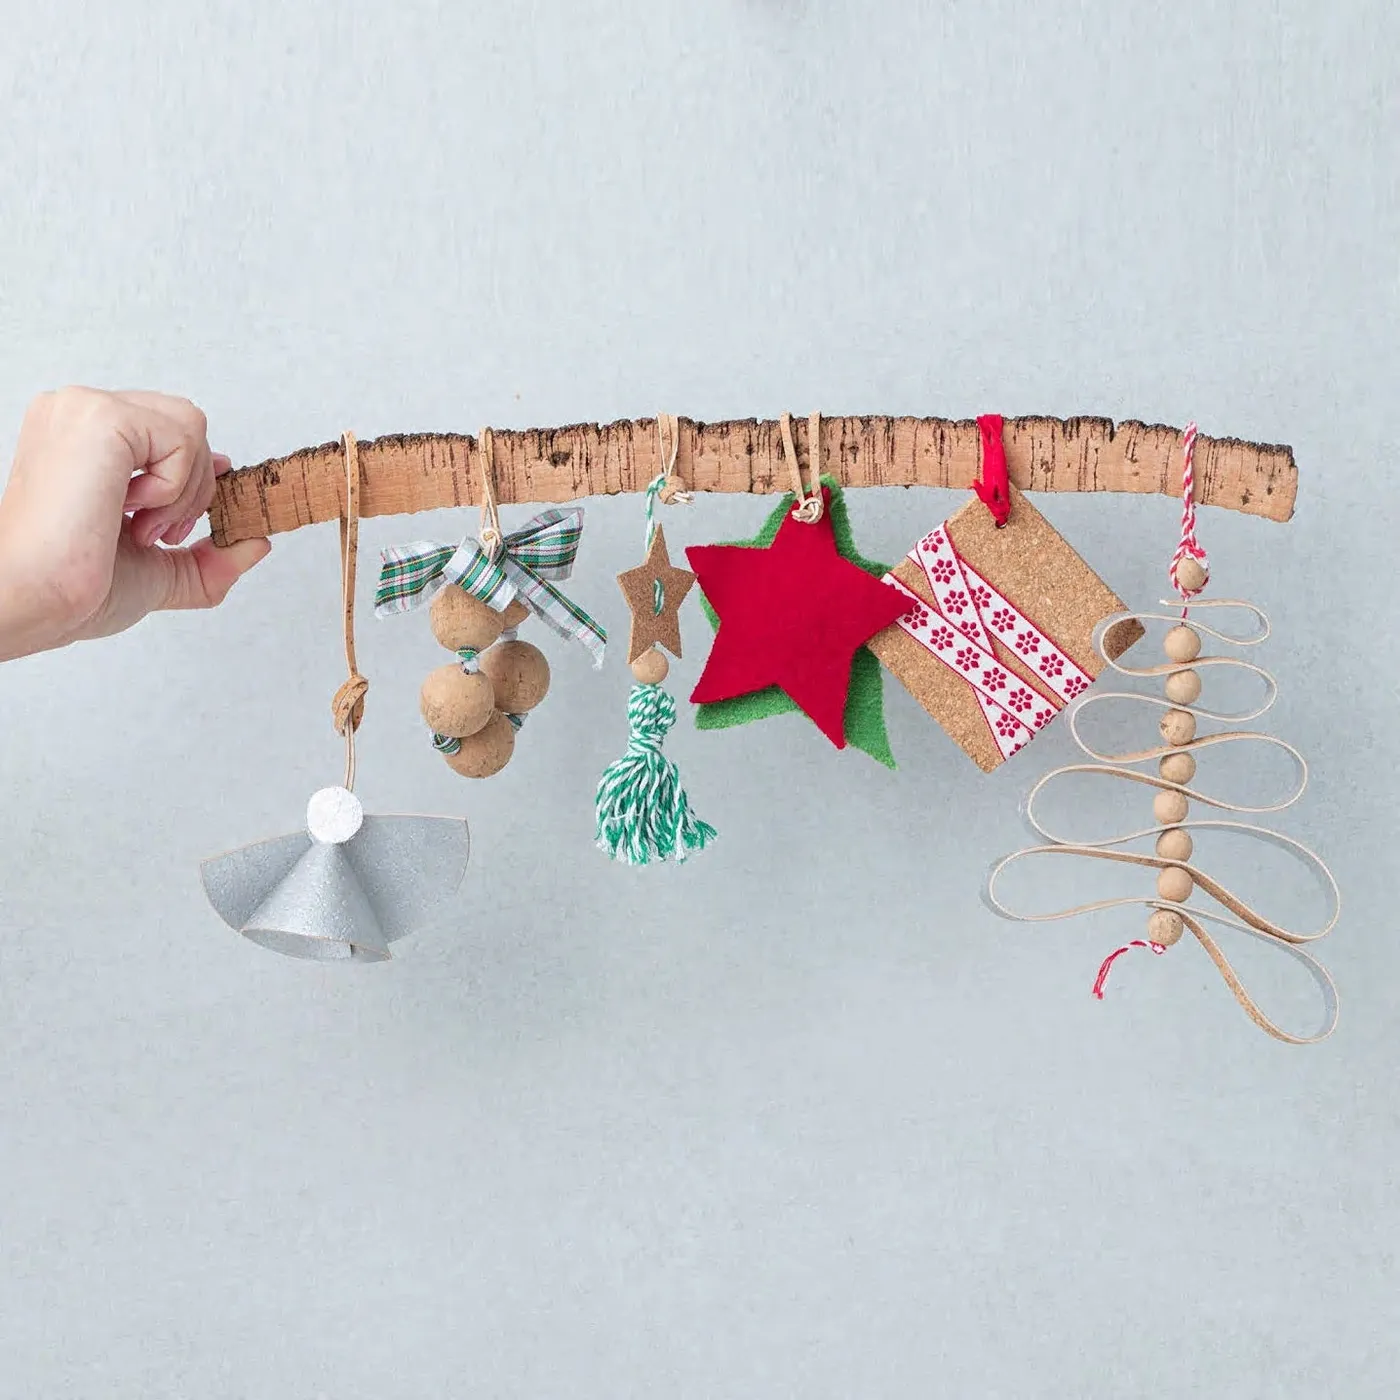
What ties these mismatched pieces together is material honesty. Felt stars, cork clusters, wood beads, and a silver paper angel all share a matte, natural finish, so they harmonize even though nothing actually matches. The twine loops and narrow ribbons repeat the same warm brown, acting like grout between tiles — invisible structure that makes a random collection feel completely intentional.
Let Your Tree Look Like You Actually Made It
None of these ornaments require a craft room, a Cricut, or a perfectly coordinated color scheme — just a glue gun, a free afternoon, and permission to let the rows be a little uneven. Start with the cheapest one on this list, see how it feels on the branch, and build from there.
📌 Pin your favorite idea now, and tag us when your 2026 tree is full of things you made yourself.