Most holiday trees look identical by the second week of December — which is exactly why the bent-top, lime-green, faintly mischievous ones keep stopping your thumb mid-scroll. We spent a few evenings combing Target, Walmart, and Etsy (plus a fair amount of marketplace hunting) to pull together 29 Grinch-inspired tree ideas spanning roughly $3 for a single ornament to $665 for a fully dressed corner.
Inside you’ll find whimsical lime-green styling, flocked maximalism, classic red-and-gold, and miniature countertop trees that fit where a full-size one never will — all built from pieces you can actually buy or make. Bent tops and bright green are having a real moment in 2026 because they let people be funny about Christmas again without abandoning the traditional palette. And stay until the end — we break down the most common mistakes that can ruin these looks.
Some links in this post are affiliate links, which means we may earn a small commission at no extra cost to you. 📌 Save this to Pinterest for later — you’ll want to revisit these ideas.
1. Lime Green Sequins Against a Deep Blue Front Door
Hang the wreath so its outer edge lands about two-thirds of the way across the door width — on a standard 36-inch door that’s roughly a 24-inch wreath. Smaller floats, larger swallows the hardware. This one mixes blue and silver blooms with pinecones and a single bell that echoes the gold handle below. Same rule applies to the door hanger in Idea #16: get the scale right, then worry about color.
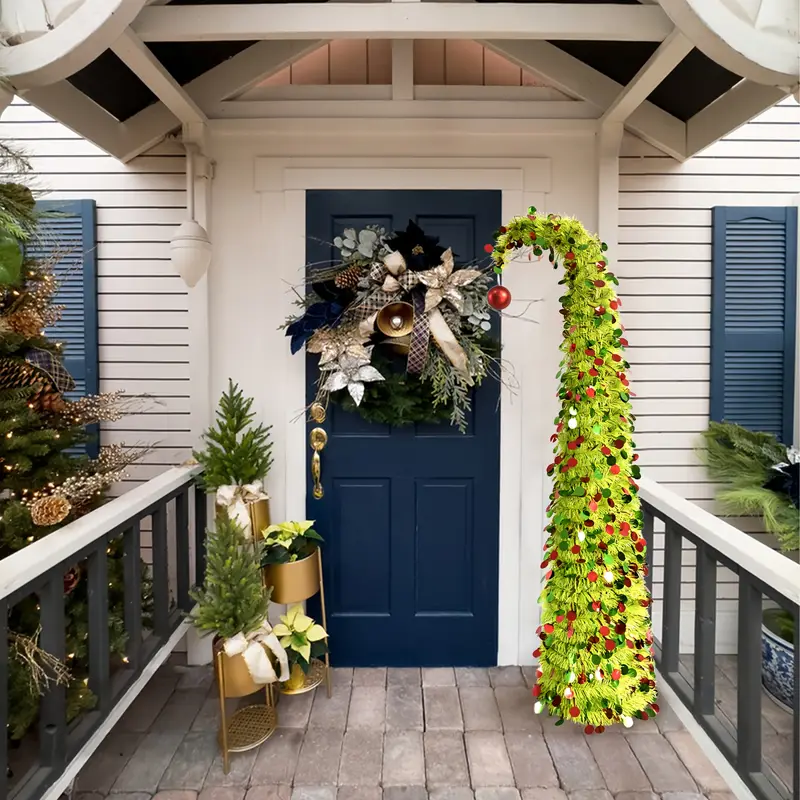
Lime green is a loud color, and this porch still reads elegant because every loud element sits against deep navy and warm gold. The dark blue door gives those sequins something serious to argue with. Notice the repetition too: one tall curved tree, three small evergreens staggered on a gold tiered stand, then a single white poinsettia. Same shape at three scales, one metal finish, zero competition.
2. The Curved Sequin Tree With Plaid Pillows and a Plush Santa
Take away the bend and you have a very green tree. The curve is the entire trick — it’s what makes this read as a Grinch tree instead of a tree that happens to be lime. There’s no star up there either; the tip just arcs over and holds nothing but sequins. If you buy one thing for this look, buy the bend, then let the plaid and striped pillows and the plush Santa do the rest.
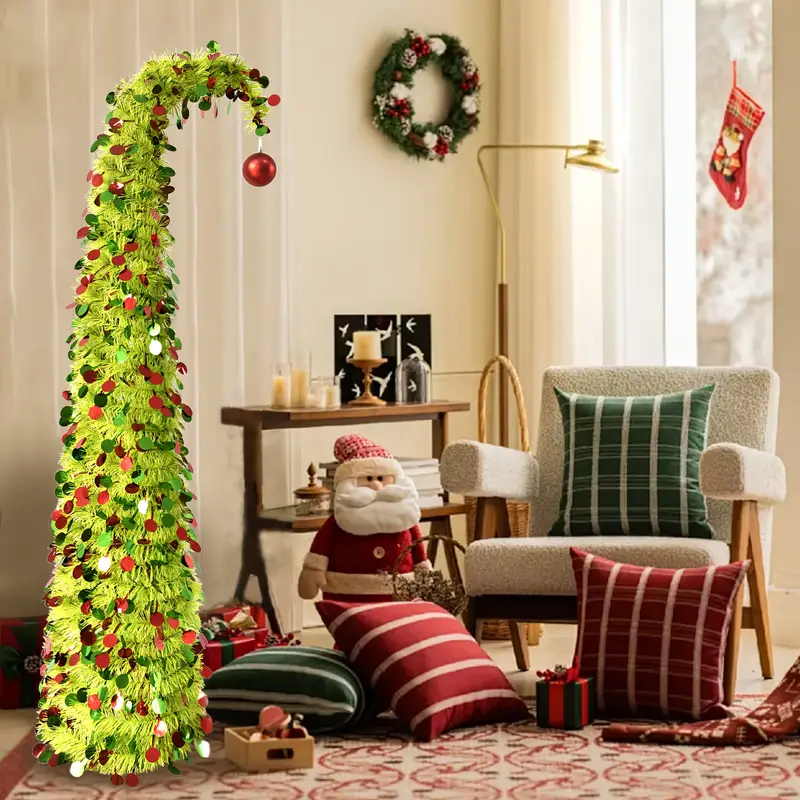
This setup wants a living room wall at least 10 feet long, because the curved top needs air above and beside it or it just looks broken. Ceilings of 8 feet or higher work; anything lower and the arc crowds a fan or light fixture. Working with a smaller footprint? Compare Idea #8, where the same curve lands against a wood-paneled wall in about half the space.
3. Warm Fairy Lights, Teardrop Ornaments, and One Golden Snowflake
- Artificial tree, 7.5 ft: $180–$400
- Warm white fairy lights, 600+ count: $25–$60
- Red and orange teardrop ornaments, set of 40: $40–$90
- Statement pieces — golden snowflake, wooden train, tiny house: $15–$45 each
- Tree collar or skirt: $30–$70
- Total: roughly $290–$665
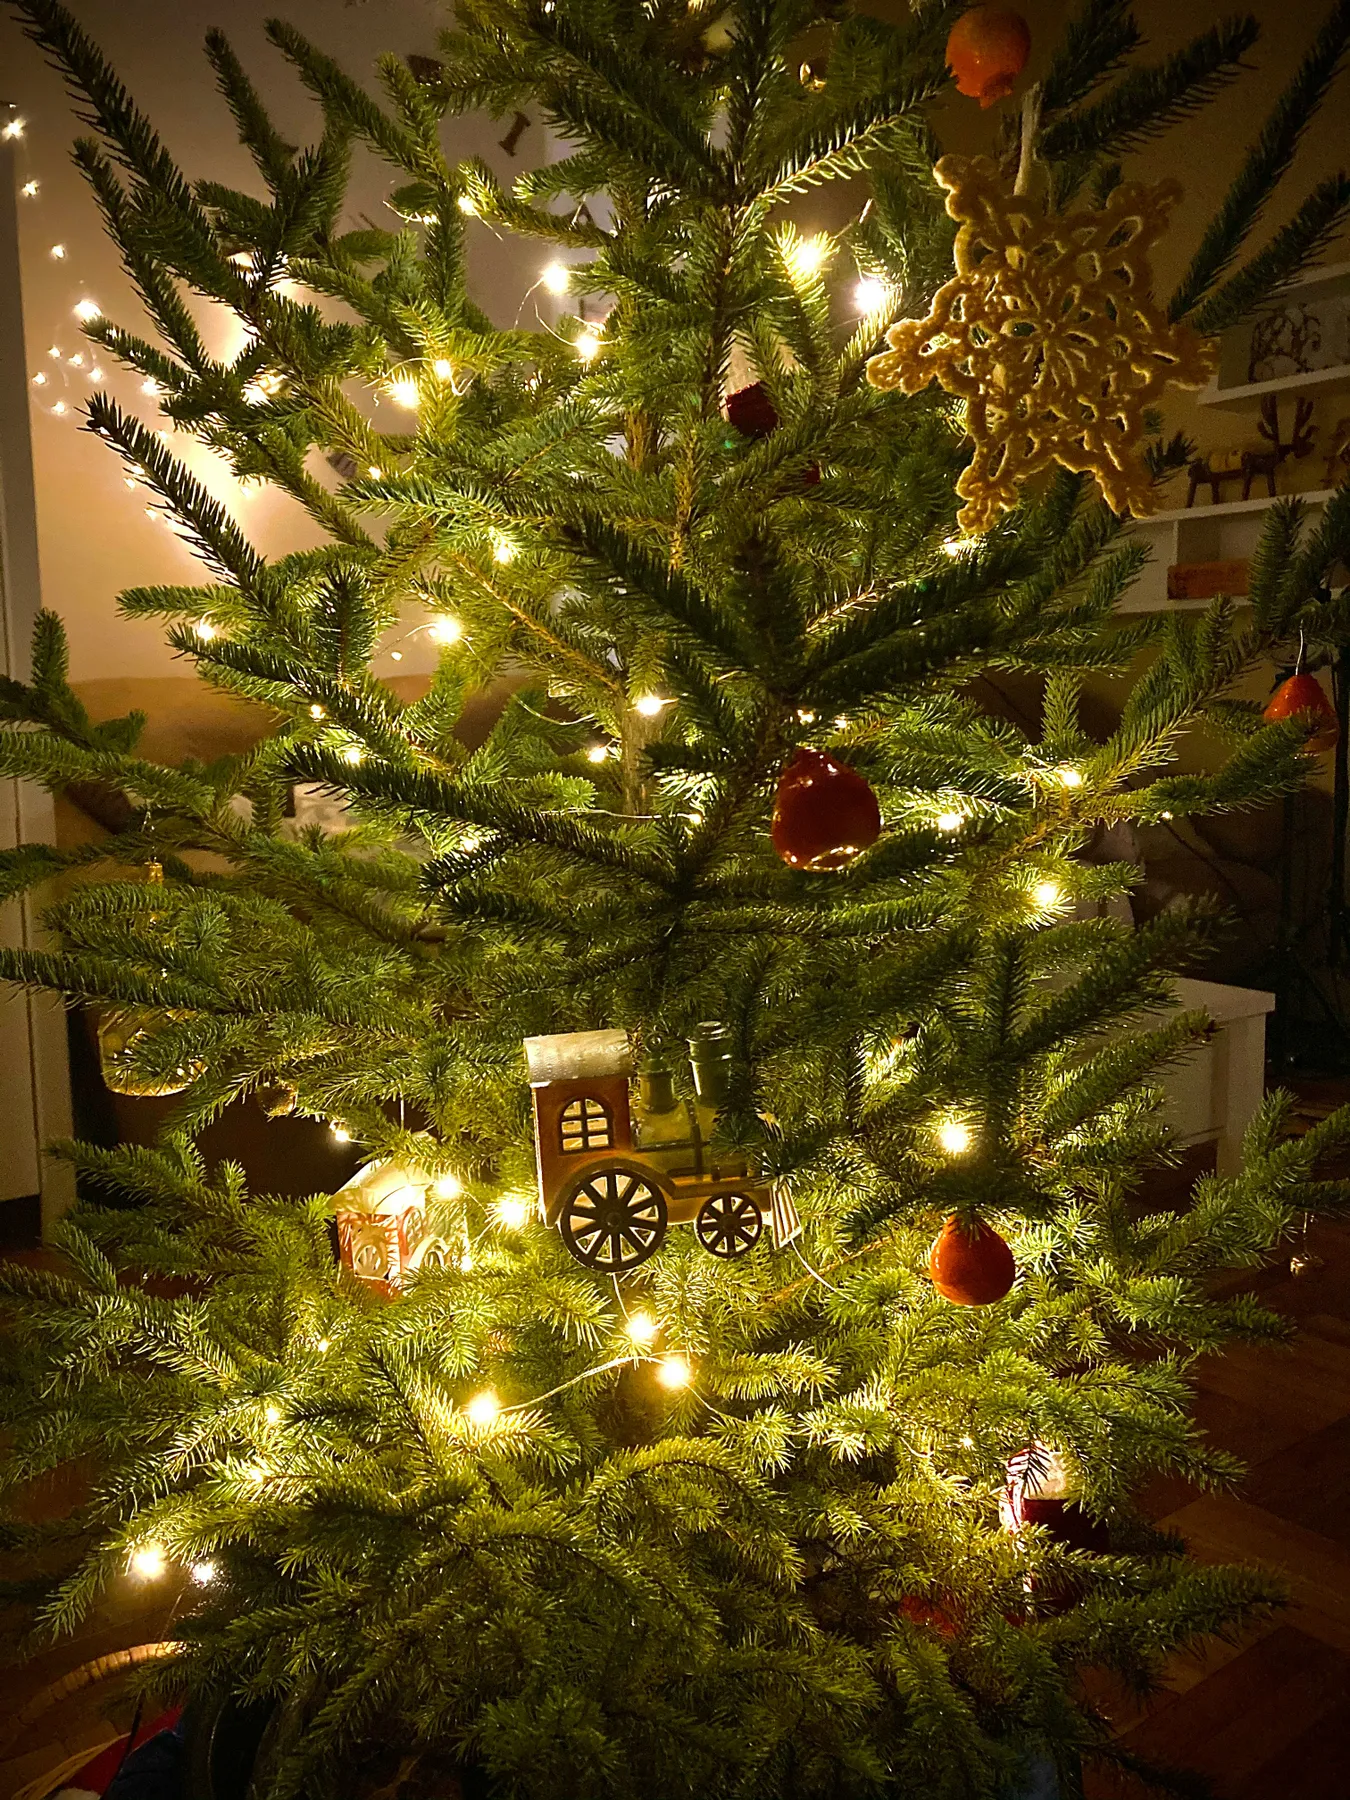
Budget alternative: a 6-foot tree with 300 warm bulbs and half the ornaments lands near $150 and reads almost identically once the lights are on.
Warm white lights on a deep green tree are the most forgiving pairing in holiday decorating, which is why those red and orange teardrops look vintage rather than garish. The single oversized golden snowflake does the heavy lifting — one large-scale element beats twenty small ones every time. A wooden train and a tiny red-and-white house sit low in the branches, right where a kid’s eye lands.
4. A Bent-Top Pre-Lit Tree Dotted With Star-Shaped Lights
Multicolor lights on a lime-leaning green tree can go two ways, and star-shaped bulb covers are usually the deciding factor — they turn scattered color into a pattern the eye can follow. Buy covers in one shape, not four. Space them 12 to 15 inches apart on a 7-foot tree so the stars read as rhythm rather than confetti.

Honest talk about pre-lit multicolor: those tiny bulbs fight every photo you take in that room after dark. Lime green plus red plus blue plus amber is a lot of voices at once. If you love it, keep it — just know your tree will look loud on a phone and moodier in person. Warm white photographs truer and makes ornaments easier to see.
5. Lime Green Faux Fur Stockings on a Dark Wood Mantel
Count the proportions: roughly 65% white paneling and dark wood, 25% lime green, 10% gold and red combined. That ratio is why four neon-adjacent stockings don’t overwhelm the room — the wall is doing most of the talking. Swap lime for cobalt or hot pink and the formula still holds, as long as the embroidered letters and those tiny Santa hats stay in one metallic finish.

Boutique faux fur stockings run $25–$45 each, which adds up fast for a family of five. Target and Walmart carry plain lime stockings for $8–$14 in season, and a pack of iron-on gold letters costs about $5 at a craft store. Four stockings, under $70 instead of $180. The fairy lights overhead are the same story — a $12 strand reads identical after dark. See Idea #17 for the same green-and-gold pairing at counter scale.
6. The Bending Tree With a Silver Star on a Window Seat
Want the bent top without buying a specialty tree?
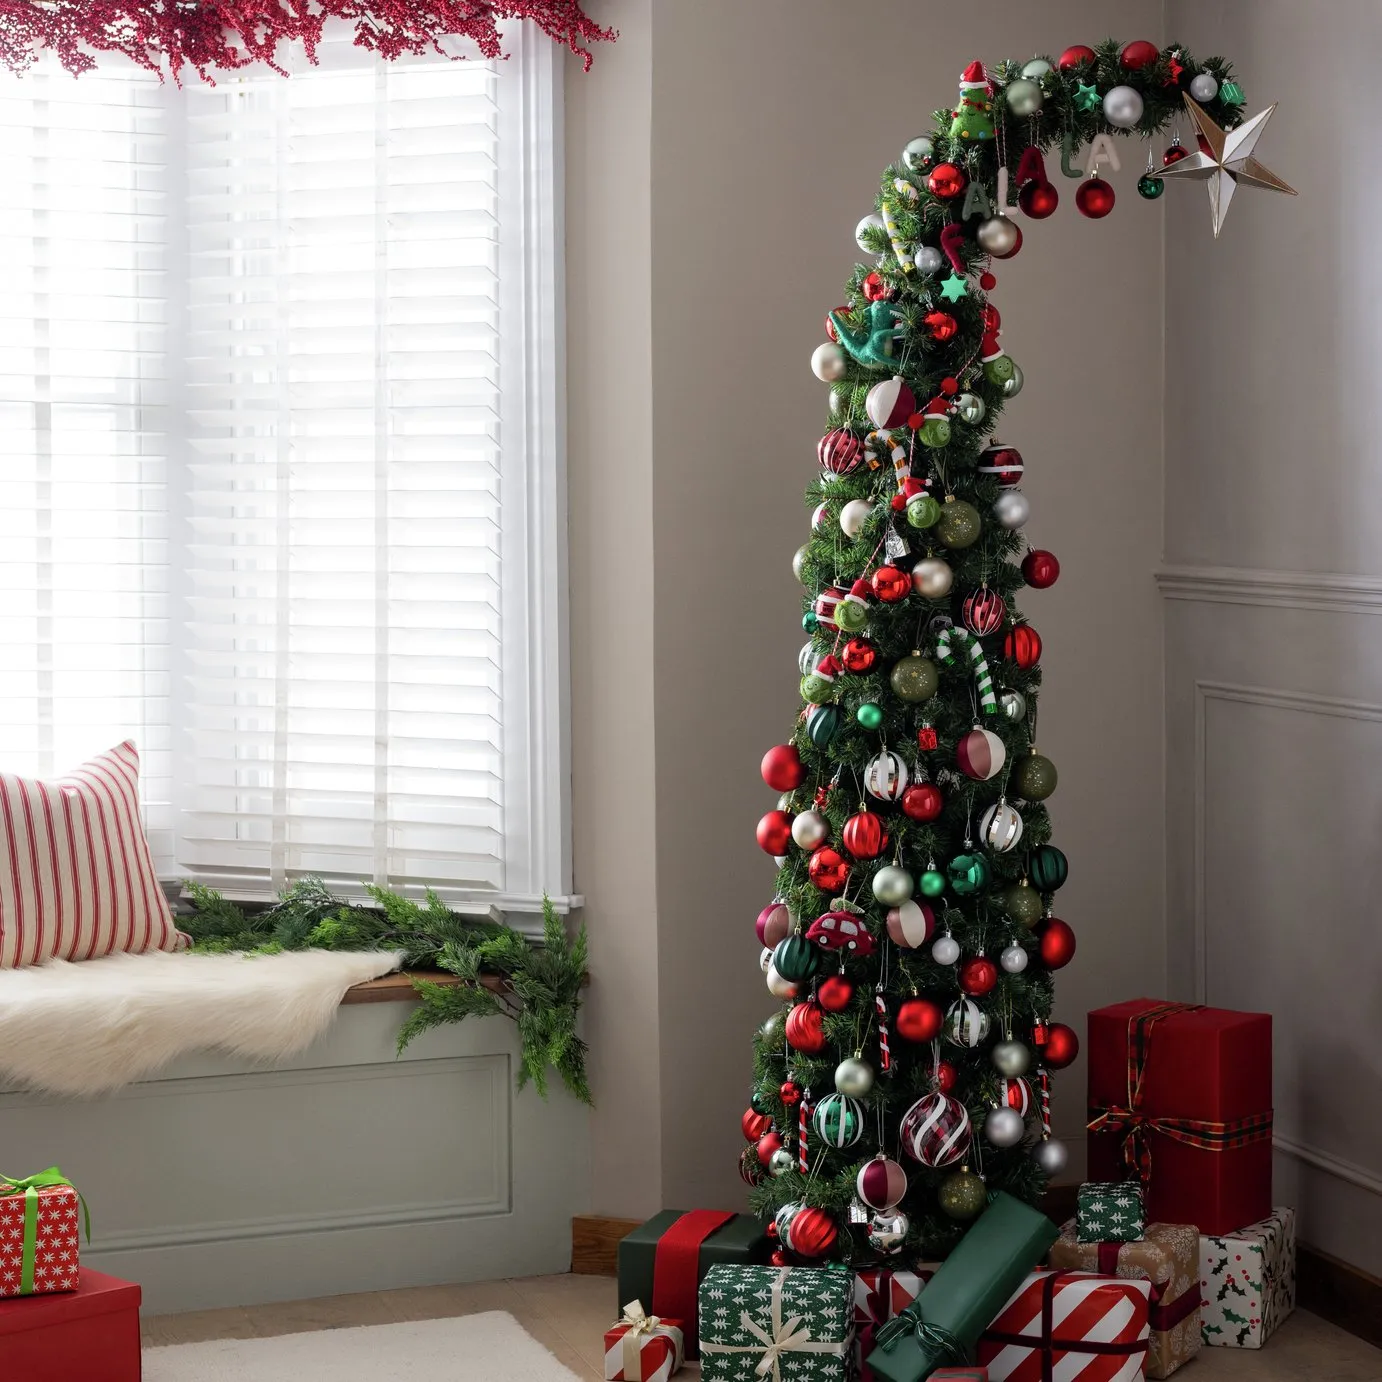
- Assemble your tree and leave the top two sections off.
- Bend the wire at the top of the third section by hand — go slow.
- Secure it with florist wire to a bamboo stake tucked inside the branches.
- Hang only your lightest ornaments on the curve; glass balls will drag it down.
- Add the topper last, and keep it under 8 ounces.
About 25 minutes and roughly $6 in wire and stakes.
The silver star perched on that bent tip is what sells the whole thing as intentional rather than damaged. A star on a straight tree is a cliché; a star on a toppling tip reads like a joke you’re in on. The window seat below, layered with a faux fur throw and a red berry garland, keeps the corner from feeling like a display. Build the bend first, then decorate outward.
7. A Flocked Tree Packed With Santa, Elf, and Snowman Figurines
Flocked trees went from tacky to default over the last few seasons, and the reason is simple: faux snow makes a room look warmer and dimmer without you changing a single bulb. Add the current appetite for character figurines tucked into branches, and you get what designers are calling Whoville maximalism. It has staying power because it’s built from collected pieces rather than one matching set.
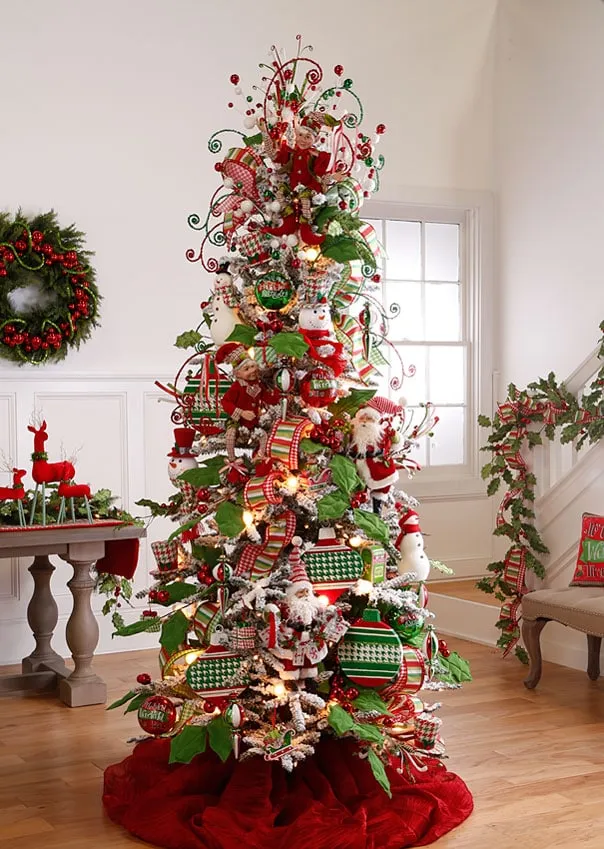
The structure here is a grid. Red and green patterned ribbon winds the tree in wide horizontal bands, and the Santas, elves, and snowmen sit inside those bands like objects on shelves. Without the ribbon you’d just have a pile; with it, the eye knows where to stop. The patterned ornaments repeat the ribbon’s colors, so the whole tree reads as three colors even though it holds dozens of objects.
8. Curved Lime Green Tree Against a Textured Wood Panel Wall
If your tree is loud, your wall should be quiet — and a textured wood panel does that better than paint because it absorbs the bounce. Line the tree up so the curve points toward the room’s main seating, not the wall. And pay attention to that flat square base: a round skirt under a curved tree adds a second shape you don’t need. A slim collar keeps the silhouette clean.
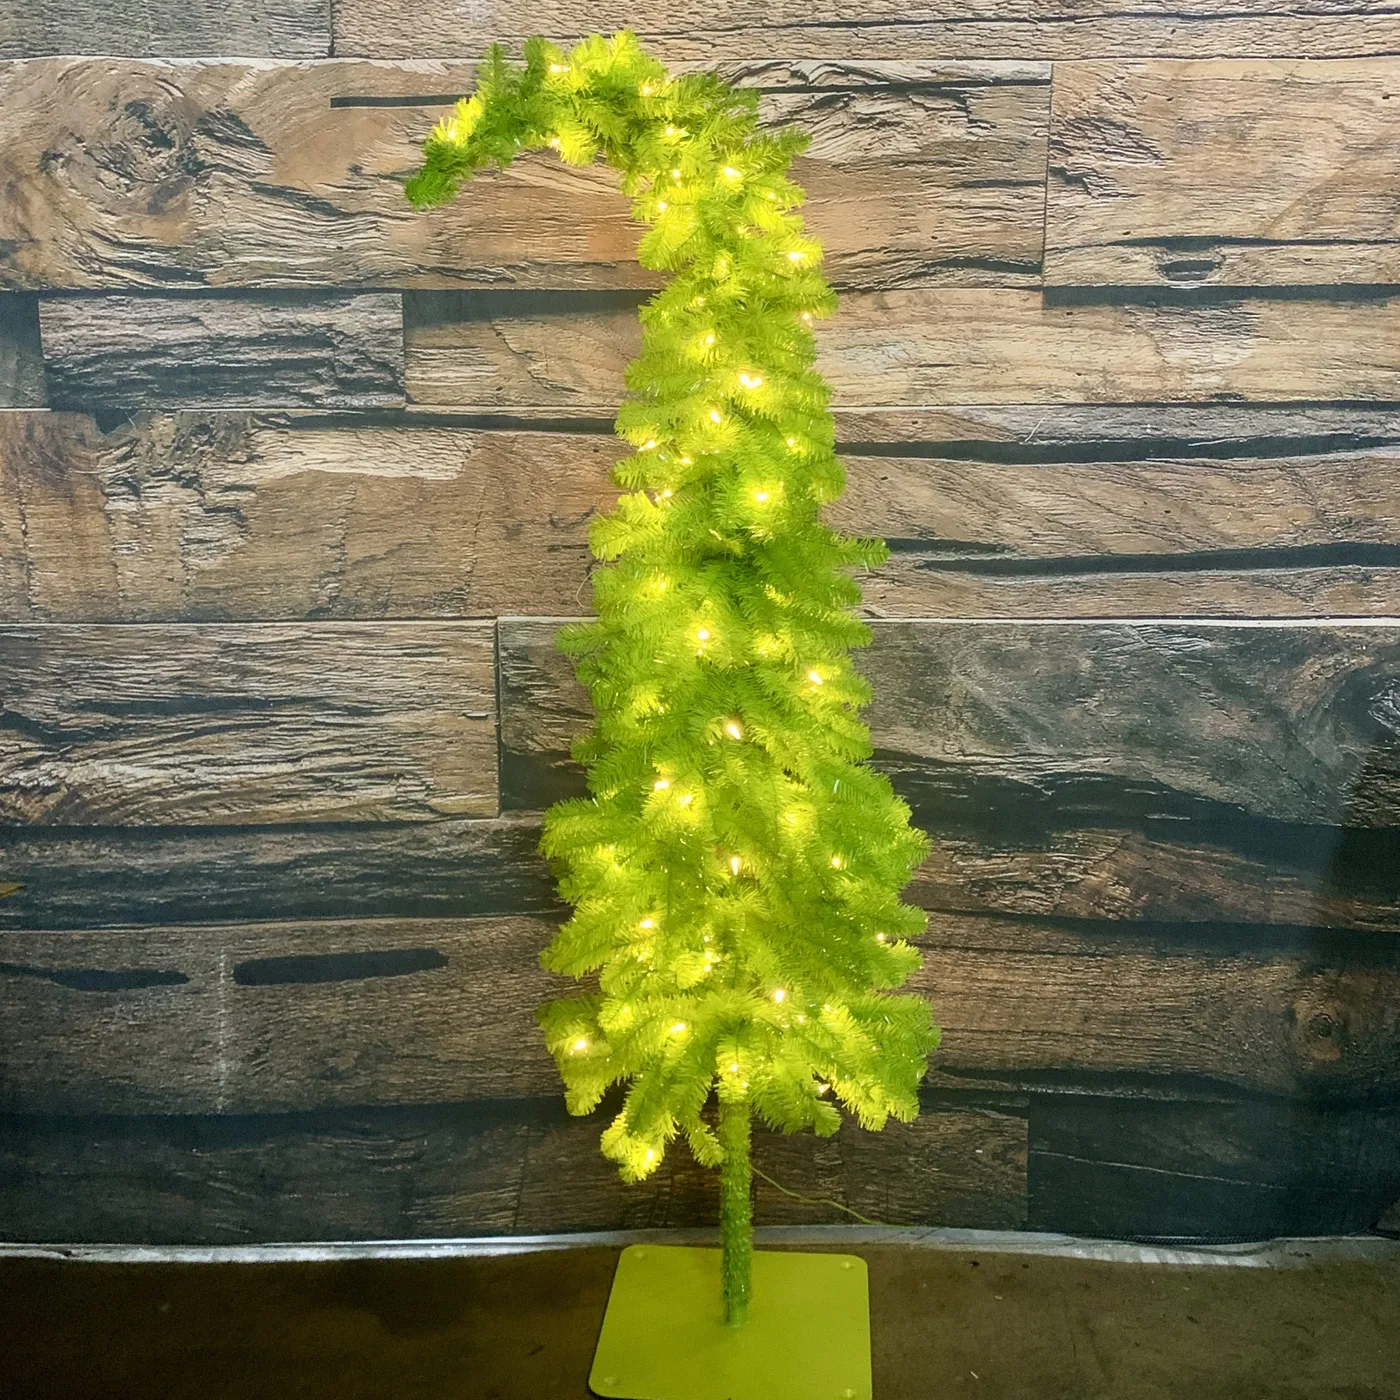
This is the small-space version of the full corner tree. It works in rooms from about 8 by 10 feet because the footprint is narrow and the curve occupies vertical space instead of floor space. It’s a direct answer to Idea #2, which needs a wider wall to breathe. If your ceiling is under 8 feet, look at Idea #17 instead — the miniature route.
9. Red, Gold, and White Classic With a Berry Tree Topper
Do the math on this one: the green tree itself is about half the visual mass, red takes another quarter through ornaments and ribbons, and gold and white split the remainder. That’s why it looks classic instead of like a Christmas-store display. Keep those proportions and you can shift the palette — swap gold for copper and it turns rustic, swap white for silver and it turns glam.
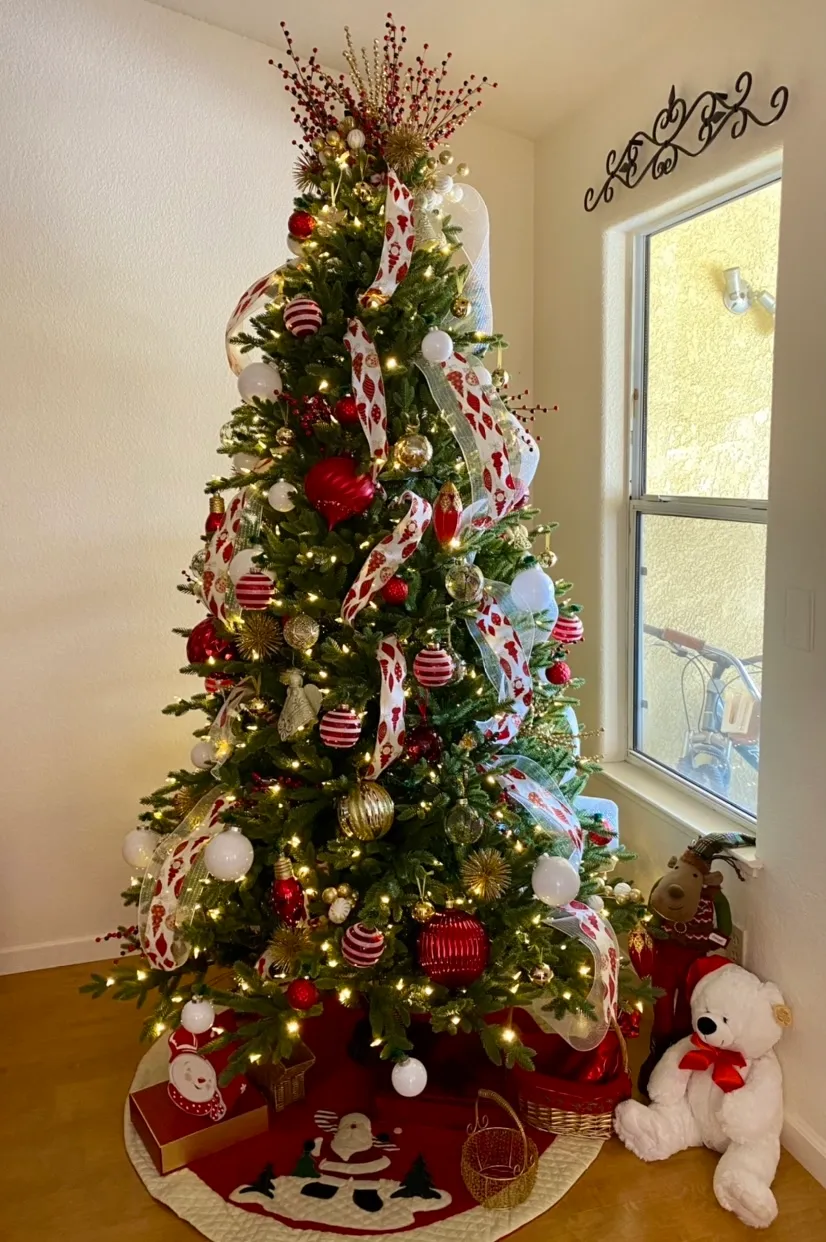
Everything here collects dust, and fast. Flocked branches shed for the first couple of seasons and hate being crushed in storage, so keep the original box if you can. Plush figures like the teddy bear and reindeer need a lint roller before they go back up each year. Budget an hour and a half every January for careful packing — it’s the difference between five years of use and fifteen.
10. A Bent-Tip Tree With a Snowman Hanging Off the Curve
A small bent-top tree with red and gold balls is the cheapest Grinch look you can build. Dollar Tree and Walmart sell 4-foot bent trees for $25–$40 during the season, though you usually shape the bend yourself. A 30-pack of red balls runs about $10, gold about $8, and the little snowman on the tip is a thrift-store find for $3. Total, under $60.
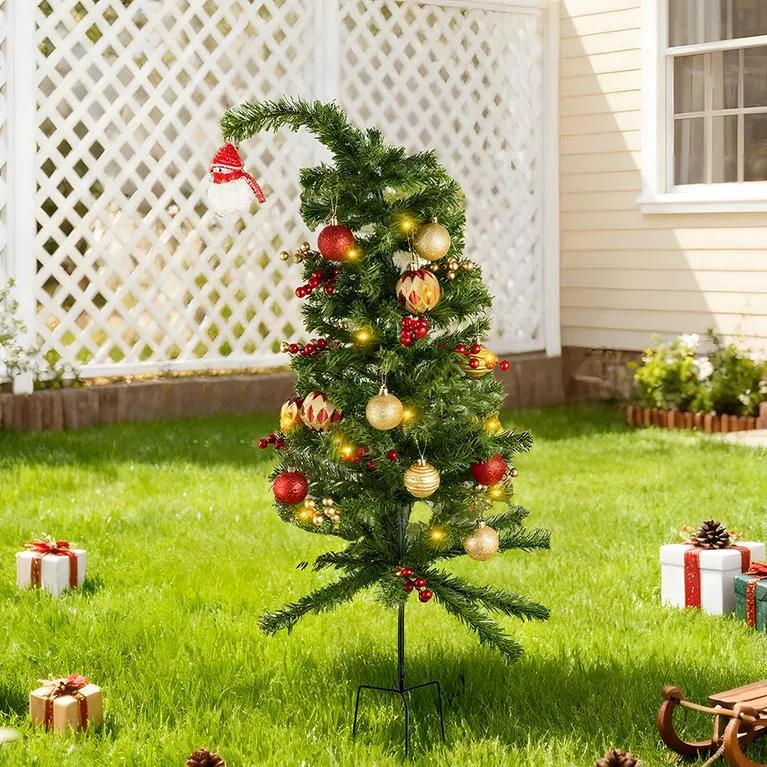
The snowman hung off that curved tip is the best decision on this tree. It gives the bend a job — the tip isn’t just a quirk, it’s a hook. Without him the tree looks like it got squashed in shipping; with him it looks designed. Add red berry clusters and warm yellow string lights and you’ve got a whole personality for the price of one ornament.
11. Teal Mesh Ribbon and Lime Bows on a Flocked Tree
Teal, lime, and silver work on a flocked tree because the white base cools everything down — the same palette on a plain green tree would turn neon. Look at how the layers are built: wide teal mesh ribbon first, then lime bows, then small ornaments filling the gaps. Texture does the work a fourth color usually does, and the green sequin skirt finishes the job at the floor.
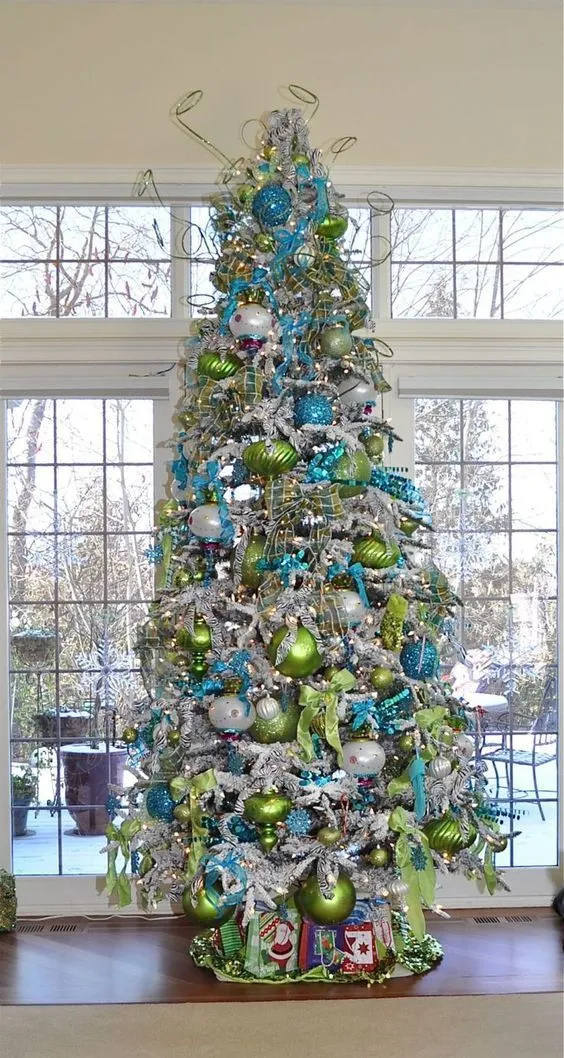
Mesh ribbon is the fastest way to make a tree look expensive. Work it in loose horizontal S-curves every 10 to 12 inches, not spirals — spirals read as a candy cane. A 7-foot tree takes roughly three 10-yard rolls. Pin each curve with a single green floral wire so nothing sags by December 20th.
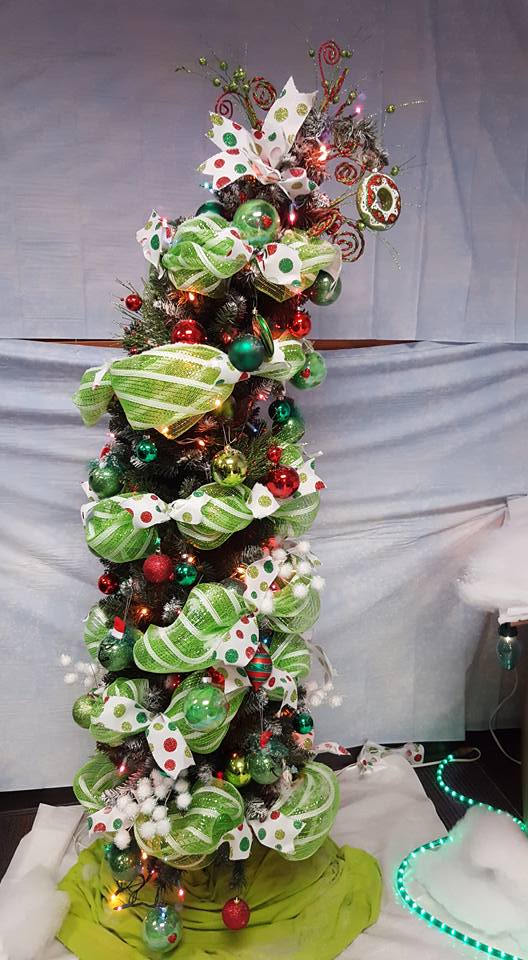
12. Green Mesh Bows and White Polka Dot Ribbon, Played Big
Make the oversized striped mesh bows yourself:
- Cut 24 inches of 10-inch-wide striped mesh.
- Pinch the middle and twist twice to form two loops.
- Wrap a 6-inch strip of matching mesh around the pinch.
- Fluff the loops outward, then trim the tails on a diagonal.
- Attach with floral wire, never hot glue.
Roughly 5 minutes per bow and about $1.50 each.
Strip the palette down and the formula is simple: deep green dominates at about 70%, red takes 20%, and white polka dots plus gold glitter handle the last 10%. That tiny white percentage is why the tree doesn’t look flat — polka dots read as texture from ten feet away. Swap the dots for silver snowflakes and the same ratios give you a completely different tree.
13. Bent-Top Tree Styled Against a Distressed Off-White Dresser
This arrangement wants a corner with at least 4 feet of clearance on both sides and a ceiling above 8 feet, since the downhill bend plus a topper needs headroom. A 6-by-8-foot rug under the base anchors it; anything smaller and the dresser starts to feel disconnected. Short on floor space? Idea #8 solves the same problem vertically.
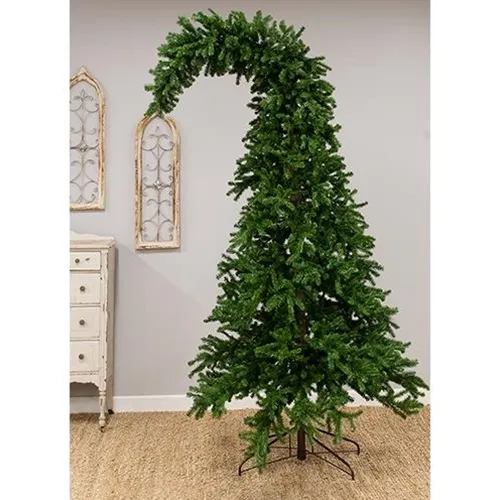
Bent-top trees are top-heavy, and a cat will discover that before you do. Use a wide weighted base or a sandbag tucked inside a skirt, and keep the curve out of walkways. One more thing: if that distressed dresser is the only element giving this corner structure, moving it later will leave the tree looking like an afterthought. Test the corner without the furniture first.
14. A Grinch, Cindy Lou, and Max Figurine Worth Displaying
The detail that makes this figurine worth owning is Cindy Lou’s pink dress. Everything else is green, white, red, and that textured light-green tree — the small hit of pink is the only warm note on the base, and it’s where your eye lands first. When you place it, put it where the pink catches light: a console at eye level, not the bottom of a bookshelf.
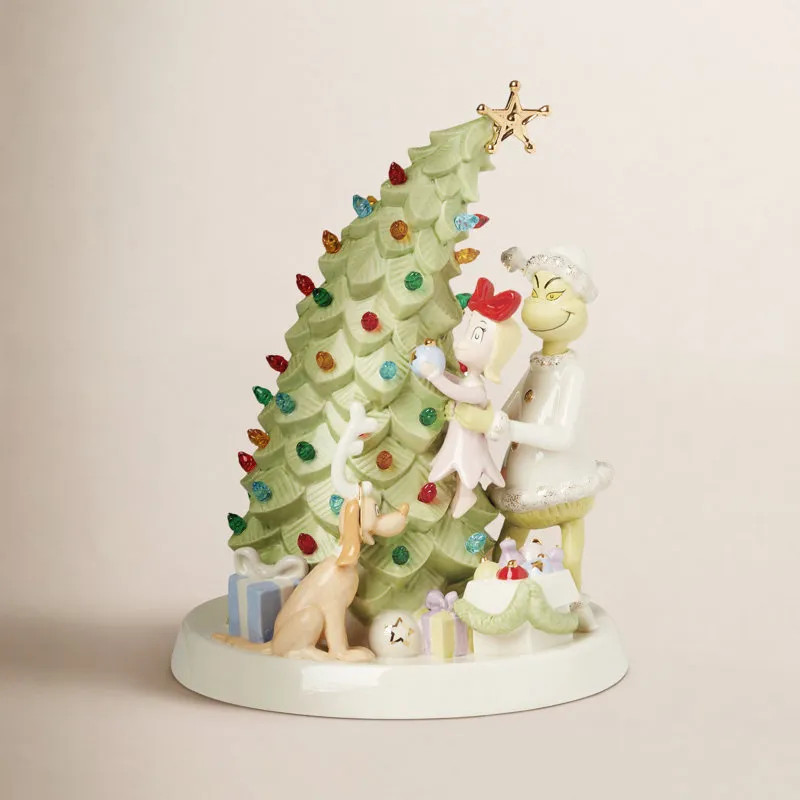
Hand-painted character figurines are quietly having a comeback. Where the 2010s were about minimalist ceramic trees, 2026 shoppers are buying narrative pieces — scenes with people in them. Credit the collective appetite for nostalgia, plus the fact that a figurine is a $40 collectible instead of a $400 purchase. It’s also the easiest way to nod at the theme without turning your living room green.
15. The Grinch Arm Reaching for a Merry Grinchmas Ornament
The plush arm only works if it looks like it’s reaching through the branches, which means anchoring it at an angle rather than straight down. Wire the cuff to a branch two inches behind the arm so the furry sleeve disappears into needles. Place it around chest height on a 7-foot tree — higher and it reads like a Halloween prop, lower and kids will pull it off.

You can build this whole corner for around $35. A green knit glove from a dollar store plus a strip of white faux fur from a craft store becomes the arm — about $8 total. Search for a “Merry Grinchmas” ornament on Etsy and you’ll find versions for $10–$15, or print the text on cardstock and back it with red felt. Jingle bells with black stars run about a dollar each.
16. A Grinch Hand Door Hanger With a Plaid Bow
Assembling this door hanger takes about 20 minutes:
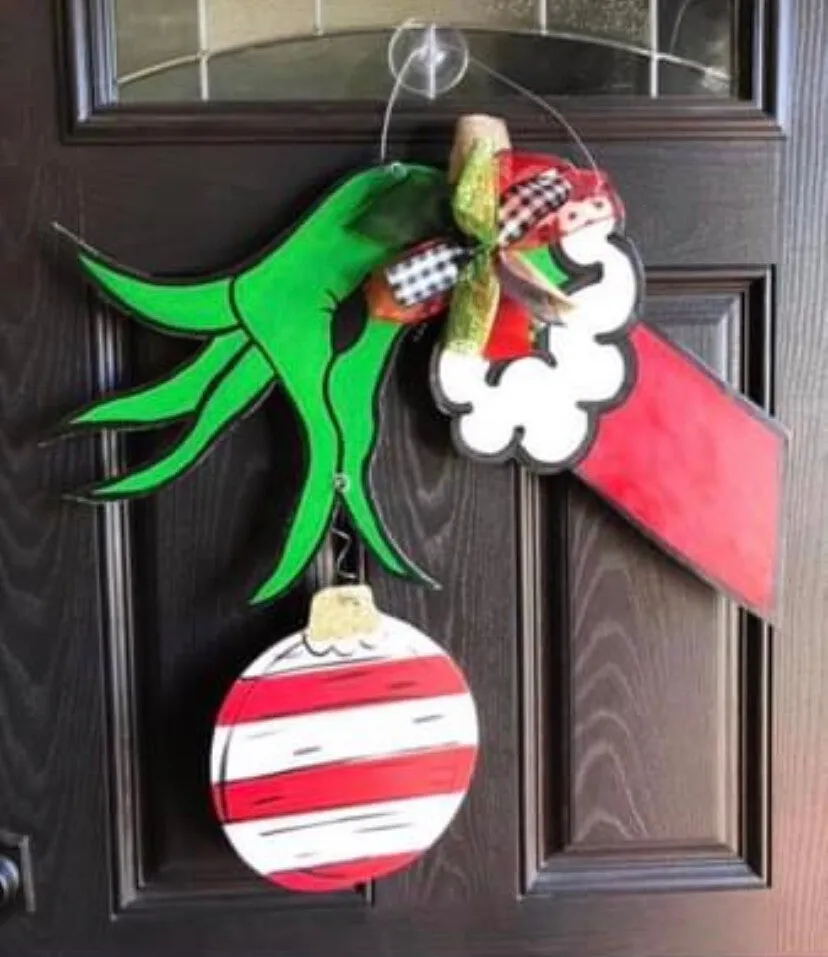
- Cut the green hand and red stocking from stiff felt or 3mm foam board.
- Glue the stocking behind the hand so the fingers overlap the cuff.
- Tie the plaid bow separately — don’t glue it flat.
- Add the red-and-white striped ball at the wrist.
- Thread a wire loop through the back and hang from a suction cup.
Materials run $15–$25.
Suction cups hold beautifully on glass and fail on textured or cold doors — dry winter air is their enemy. If your door is paneled or painted, use an over-the-door hanger instead, or a magnetic hook if the door is steel. Check the hanger every couple of weeks in January; that’s when they quietly let go at 2 a.m.
- Measure the door — hand plus stocking shouldn’t cover more than a third of its height.
- Check the surface: suction cups need smooth, non-porous material.
- Confirm the door still closes with the hanger in place.
- Decide on bow color before you cut any felt.
17. Mini Pre-Lit Tree on a Console With White Wrapped Gifts
- Mini pre-lit tree, 2–3 ft: $25–$60
- Red and gold skirt with faux fur trim: $18–$40
- Extra warm white string lights: $8–$15
- White gift boxes with ribbon, set of 6: $15–$30
- Total: $66–$145

Budget route: a dollar-store tree, a fabric remnant for the skirt, and gifts wrapped in kraft paper with red ribbon — under $40 all in.
This is console-scale decorating, and it only works on a surface between 30 and 48 inches wide with the tree under 3 feet. Any taller and the proportions flip. It’s the answer for entryways and narrow hallways where Idea #13 simply won’t fit, and it pairs nicely with the potted minis in Idea #26 if you want the look spread across two surfaces.
18. An Aqua Tinsel Tree Sitting on the Kitchen Counter
Tinsel works in a kitchen for a practical reason: it bounces daylight from the window and makes a small counter tree read twice its size. The eclectic mix of checkered balls and clear spheres only survives because the tinsel is one solid color — aqua holds the chaos together. The red polka-dot box underneath is doing more than storage duty; it’s the base.
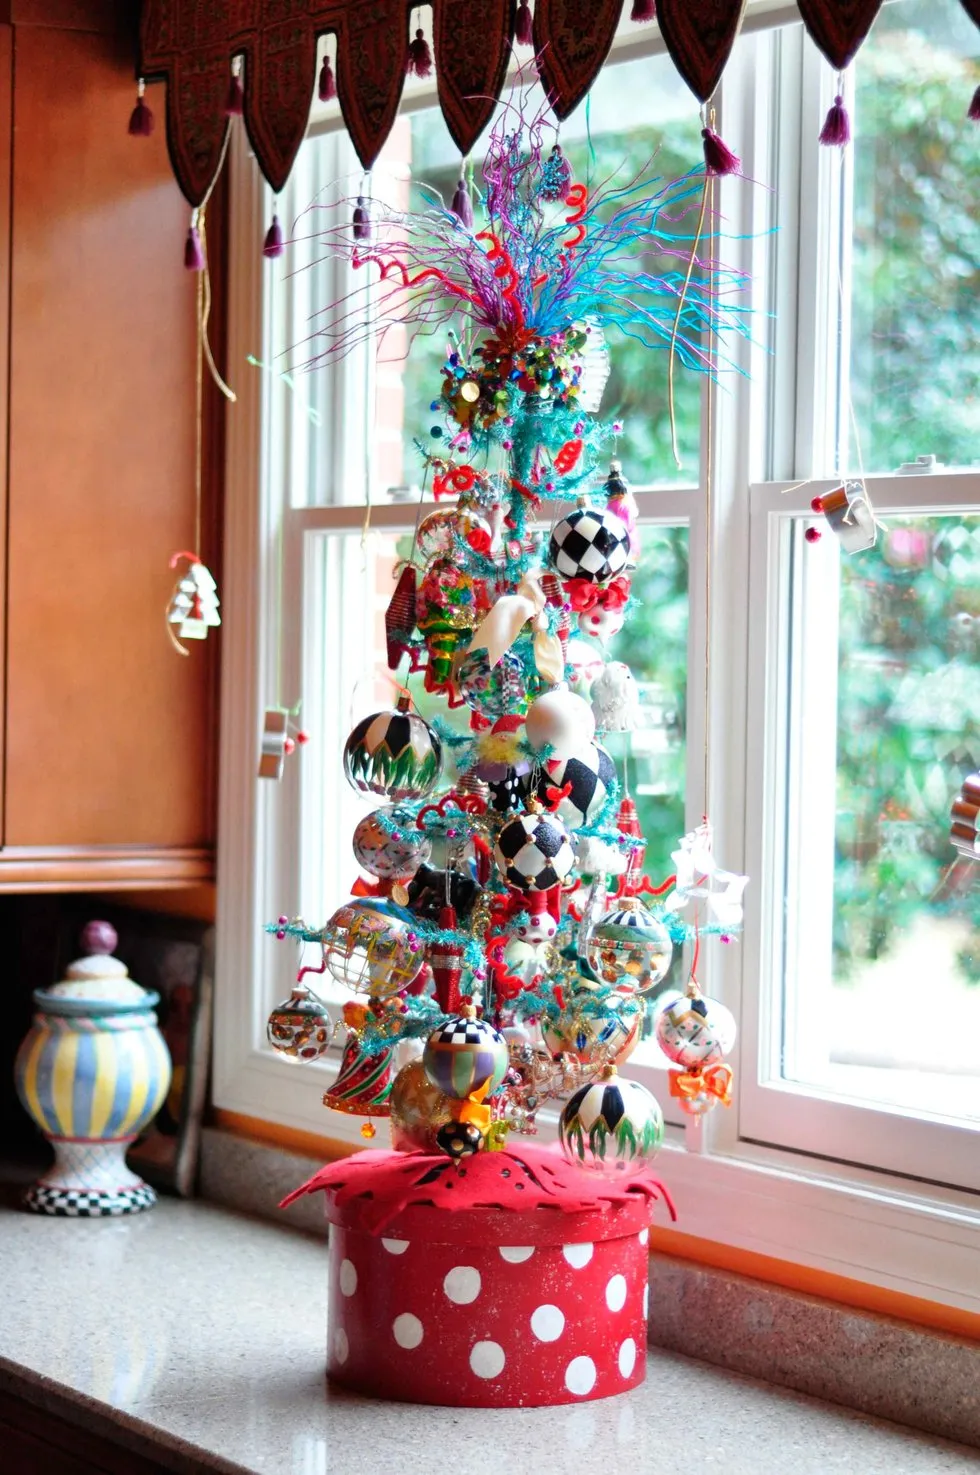
Roughly 50% aqua tinsel, 25% red from the base and ornament hits, 25% everything else. That last quarter is the fun part and also the part that gets out of hand — cap it at five colors total, topper included. Swap aqua for hot pink and the same ratios give you a completely different, equally playful tree.
19. Character Ornaments and Glass Baubles, Zero Restraint
Figural ornaments — little animals, trucks, Santas on skis — are the fastest-growing category in holiday decor right now, and vintage Shiny Brite-style glass is fetching real money at estate sales. The appeal is generational: your grandmother’s tree had them, and a plain ball feels anonymous by comparison. Buy them one at a time rather than in sets, and the tree takes on a story.

Crowd control for a tree like this: one figural ornament for every ten round baubles, and keep the figurines in the front third of the tree where they can actually be seen. Figurals hung deep in the branches are wasted, and they’re usually the ones that break. Warm white lights only, so the characters stay the stars.
20. Fuzzy Green Picks With Red Glitter Curled Tips
Picks like these are the cheapest way to make a tree look styled. Use three to five on a 7-footer, always at outer branch tips, angled slightly downward so the red curl points at the viewer. Cluster two together on one branch for weight. Making your own is simple: wrap a 12-inch chenille stem in green boa trim and cap it with a red glitter mini ornament — about $4 and ten minutes each.
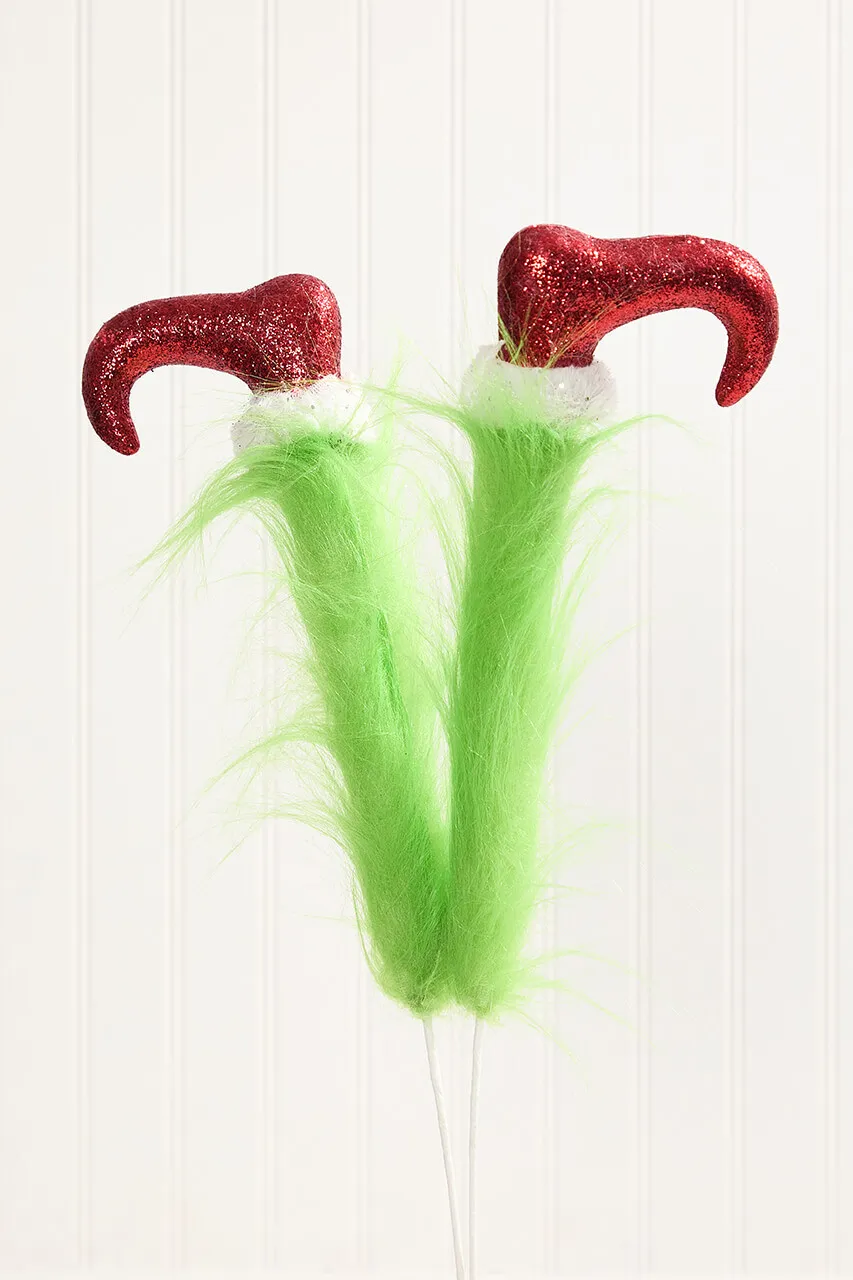
Here’s what these picks actually do: they repeat the tree’s bend in miniature. A curved top plus a dozen curled tips means the eye reads “whimsical” before it reads “green.” Remove them and the same tree looks ordinary. That repetition of one shape at two scales is the entire idea — which is also why the fuzzy texture matters more than getting the exact shade of red.
21. Grinch in a Santa Suit, Tree in Arms
- Hand-painted resin figurine, 8–12 in: $45–$120
- Carved wooden display base or riser: $20–$55
- Small wrapped gift boxes, set of 4: $10–$22
- Loose ornaments to scatter at the base: $8–$18
- Total: $83–$215

Budget version: a mass-market painted figure at $25–$40 on a thrifted wooden tray, roughly $35 total.
If $120 for a figurine sounds absurd — fair. Big-box stores and online marketplaces carry painted versions of the Grinch-and-tree pose for $25–$40 every November. Facebook Marketplace and estate sales turn up carved wooden bases for under $10. Or skip the figurine entirely: a small tree propped in a vintage Santa suit collar with a gold star gets the joke for $30.
22. The Ribbed Striped Glass Ornament That Does the Heavy Lifting
This one ornament contains a whole palette: deep red, teal, lime, and white, separated by hairline gold. Use it as your formula. If a tree carries a stripe pattern across 70% of its look, solid ornaments in those exact colors at 20%, and gold at 10%, you get cohesion without matching sets. Change the stripe colors and the whole tree follows — that’s how one thrifted ornament becomes a plan.
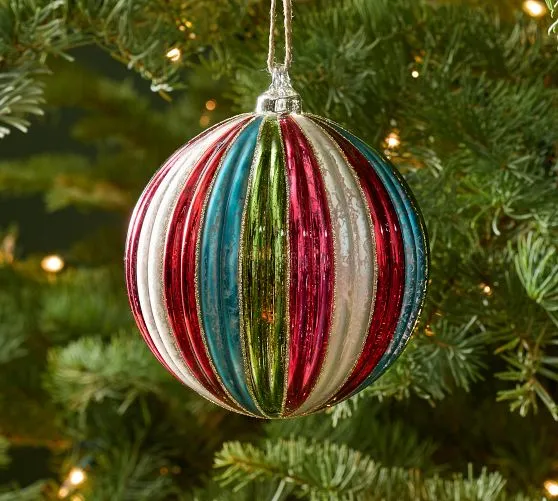
Two details make this read as expensive: the vertical ribbing, which catches light in stripes instead of one flat shine, and the gold glitter lines, which separate colors that would otherwise muddy together at a distance. Cheap multicolor ornaments blur into brown from across the room. Thin metallic separators prevent that, which is why this one stays crisp even on a crowded tree.
23. Arched Evergreen Branches Hung With Oversized Red Balls
Big red balls need space. On an arched branch like this, keep ornaments 8 to 10 inches apart and hang them on the underside of the curve so they dangle rather than sit. Anything closer and the arch becomes a red blur. Use oversized ornaments here too — 4-inch and up. Small balls on a wide arch look like crumbs.
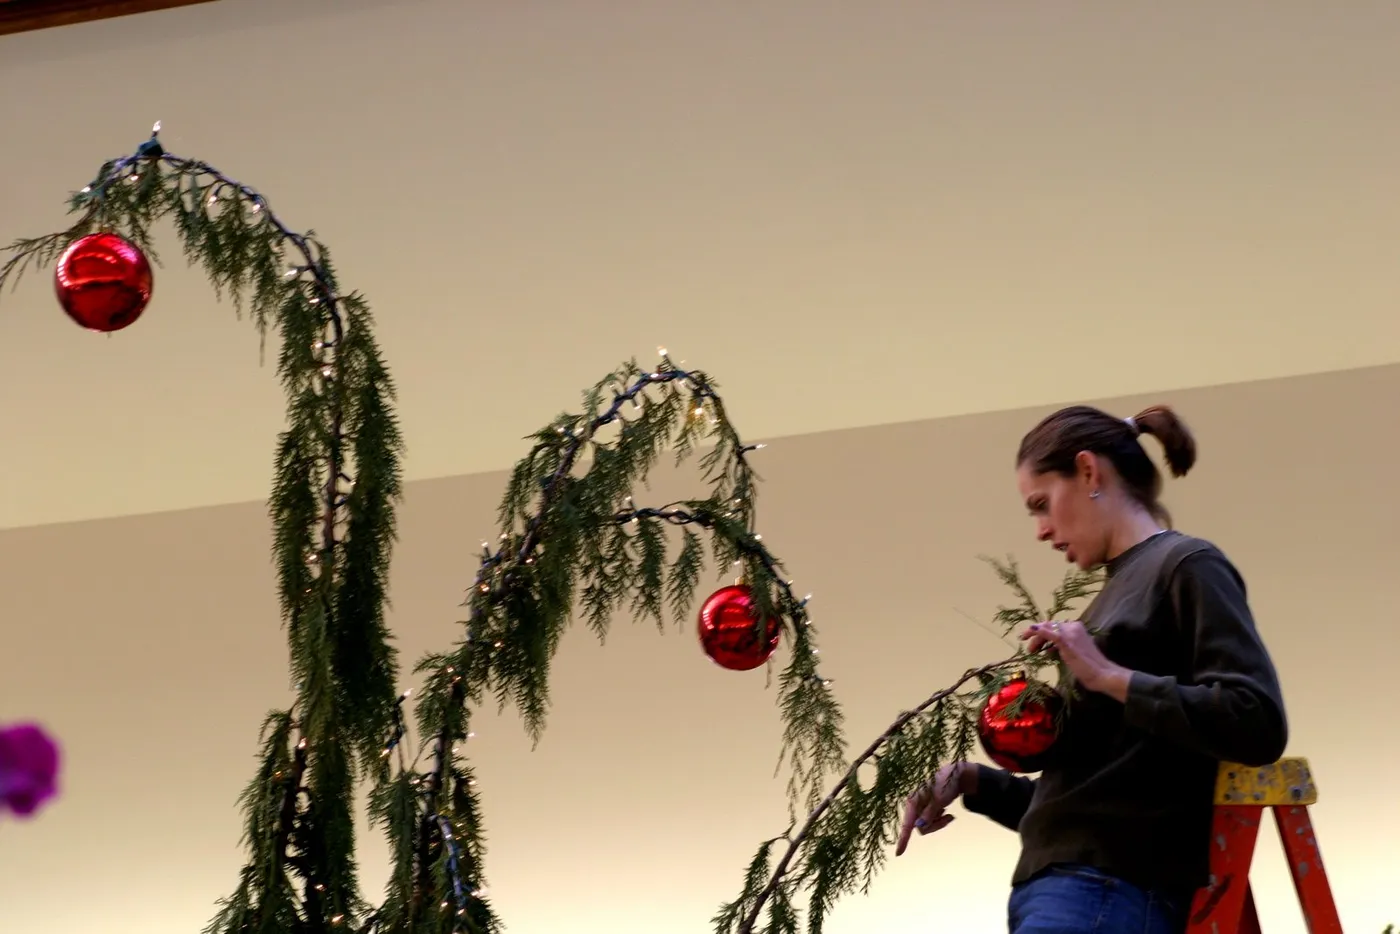
Building the arch:
- Bend a 10-foot length of heavy floral wire into the curve you want.
- Attach faux evergreen garland with zip ties every 6 inches.
- Weave warm white string lights along the underside.
- Hang large ornaments on the downward face, 8–10 inches apart.
- Anchor both ends to a wall stud or a sturdy hook.
About an hour, and $60–$90 in materials.
24. A Green Alien in a Santa Hat — Yes, Really
Novelty ornaments are the ones guests photograph and the ones you’ll argue about. Two practical notes: this alien is almost certainly resin or plastic, which makes it safe at toddler height, unlike the glossy glass balls hanging beside it. And anything wrapped in string lights should hang near an outlet-adjacent strand, because threading lights through an ornament from a branch across the tree never looks right.

Silly pieces like this belong on a tree with a job — a 4-to-6-foot tree in a kids’ room, playroom, or hallway. Give it a spot below 4 feet where the intended audience can actually reach it. On a formal 9-foot living room tree, the alien reads as a mistake. See Idea #19 for how character ornaments hold their own in a main room.
25. A Welcome to Whoville Mesh Wreath With Fuzzy Grinch Limbs
The sign does the work here. Without “Welcome to Whoville!” this is a green wreath with fuzzy limbs; with it, the whole front door has a premise. If you build one, budget for the sign first — that’s the piece you can’t improvise. Everything else, from the arms and legs to the peppermint swirls to the patterned bows, is just decoration hanging off that one line.
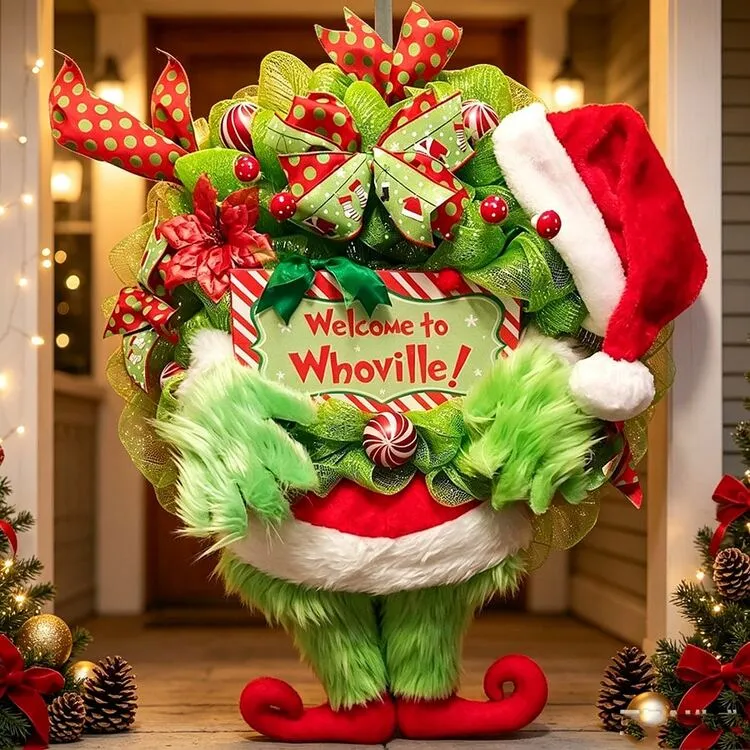
Finished deco mesh wreaths sell for $75–$150 on handmade marketplaces. Building your own runs about $35: a wire wreath form ($5), two rolls of green deco mesh ($16), a printed sign on cardstock ($4), and a bag of bows, berries, and peppermints from a dollar store ($10). Two evenings and a lot of hot glue, and it’s yours.
26. Two Tiny Potted Plants Dressed in Tinsel and Baubles
If those pots hold living plants, remember the garland has to come off every time you water — tinsel and beaded strands don’t survive a watering can. Use a plastic nursery pot inside the decorative one and lift the whole thing out. Skip anything that sits against wet soil; the wire will rust and the baubles will stain. Faux plants let you skip this entirely, and at this scale nobody can tell.
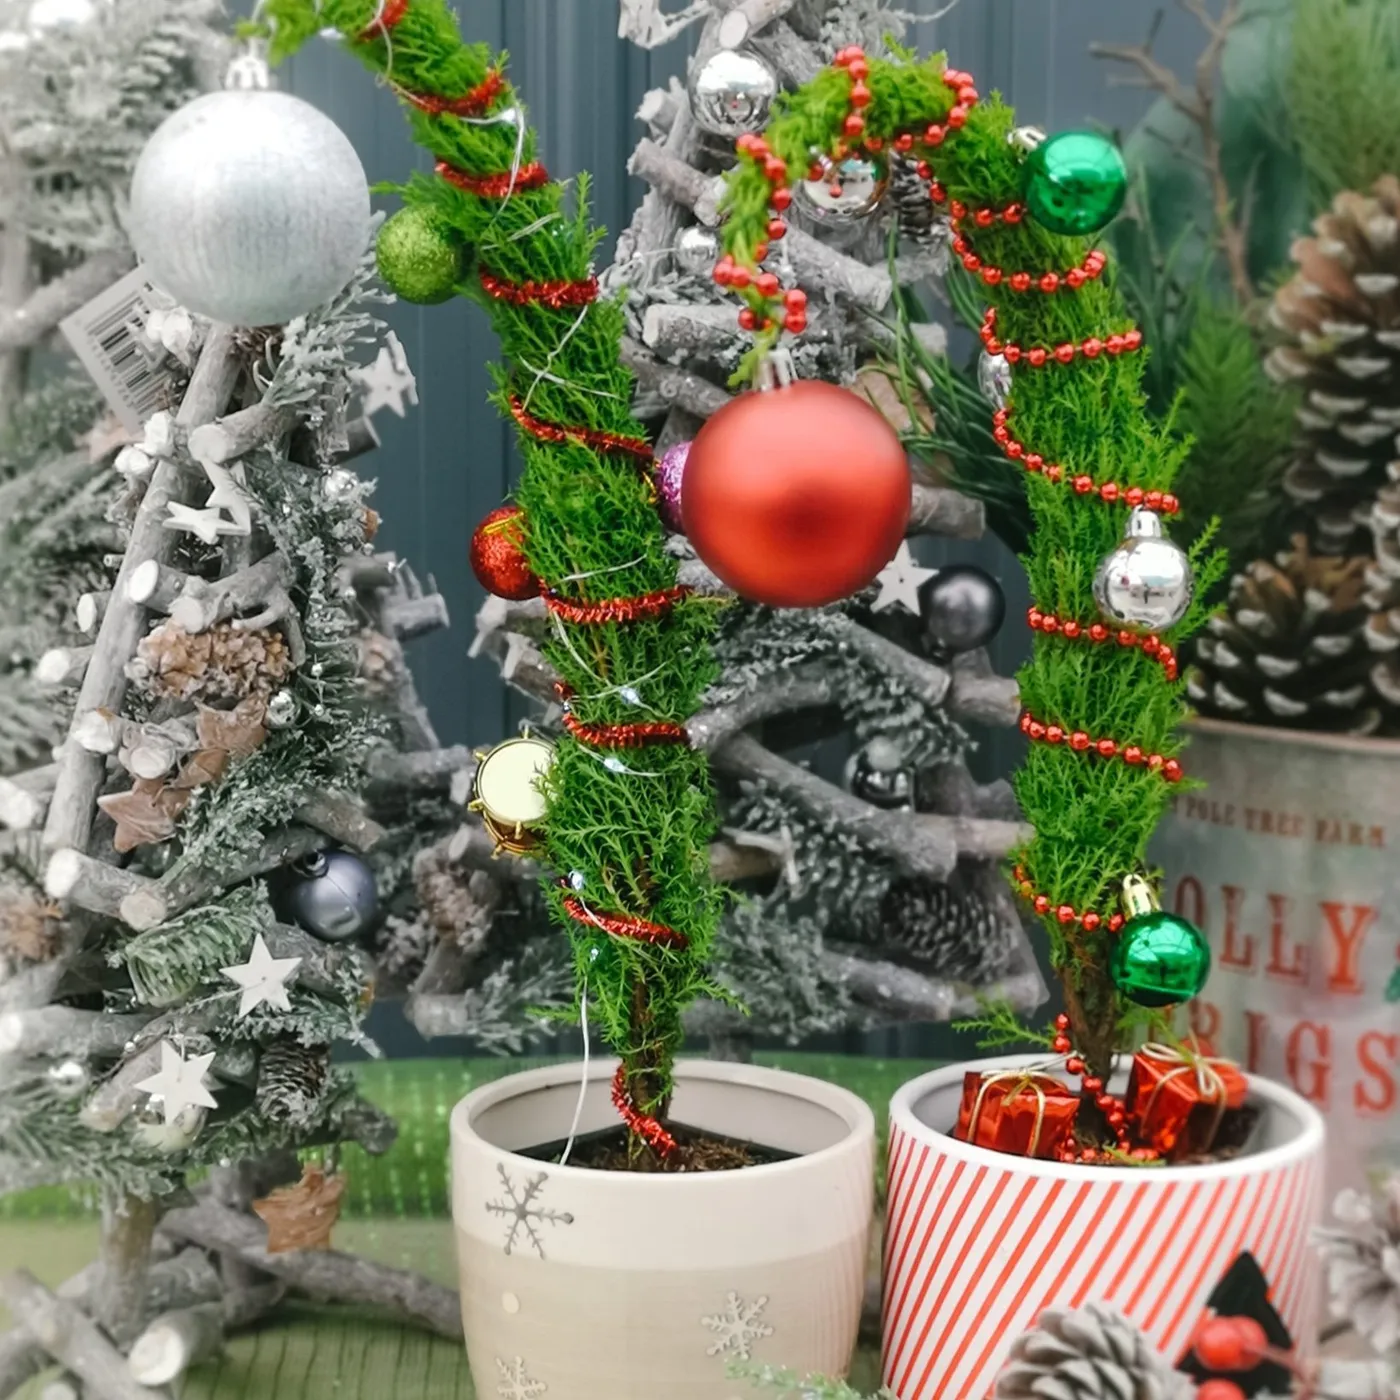
Dressing a mini plant:
- Set the plant in the decorative pot with a nursery liner.
- Wind beaded garland from the base upward, one loose loop per inch.
- Add five to seven small baubles on wire hooks.
- Finish with a single tinsel pick at the crown.
About 15 minutes per plant and $12 in supplies.
27. Grinch and Max by the Fireplace With a Red Armchair
Small figurines work in big rooms when they’re placed at the edge of a light source. Here, the Grinch and Max sit at the near end of the mantel, close enough to the fire that the green catches the glow. Move them two feet away and the same figurines go flat. That’s the whole difference between a collection and a display.

If that’s a real fire, everything within three feet needs to be non-flammable or well clear — garlands, ribbon, and plush characters are all fuel. Keep mantel candles unlit whenever the fire is going, and put a screen in front of the grate. If the fireplace is purely decorative, ignore all of this and enjoy the aesthetics.
28. Red and Silver Layers With Sheer Ribbon and Berries
Red dominates at roughly 55%, silver and white split 25%, and the green tree shows through the remaining 20%. The sheer red ribbon matters more than any single ornament — it softens the hard shine of glitter and glass, which is what separates this from a department store display. Clusters of red berries add depth without adding another color.

After years of muted sage and terracotta holidays, rich red and silver is swinging back hard for 2026 — call it the pendulum moving away from quiet luxury and toward shine. The difference this time is restraint: fewer colors, more texture, sheer ribbon instead of wide satin. That combination photographs beautifully, which is a big part of why it keeps spreading.
29. The Yellow Flower Fairy That Steals the Whole Tree
- Check whether your tree is lit from the inside or outside — this ornament needs side light.
- Confirm the weight; wired petals are light but fragile.
- Pick a height: eye level or slightly above, never the bottom third.
- Have a small repair kit ready — fabric petals fray.
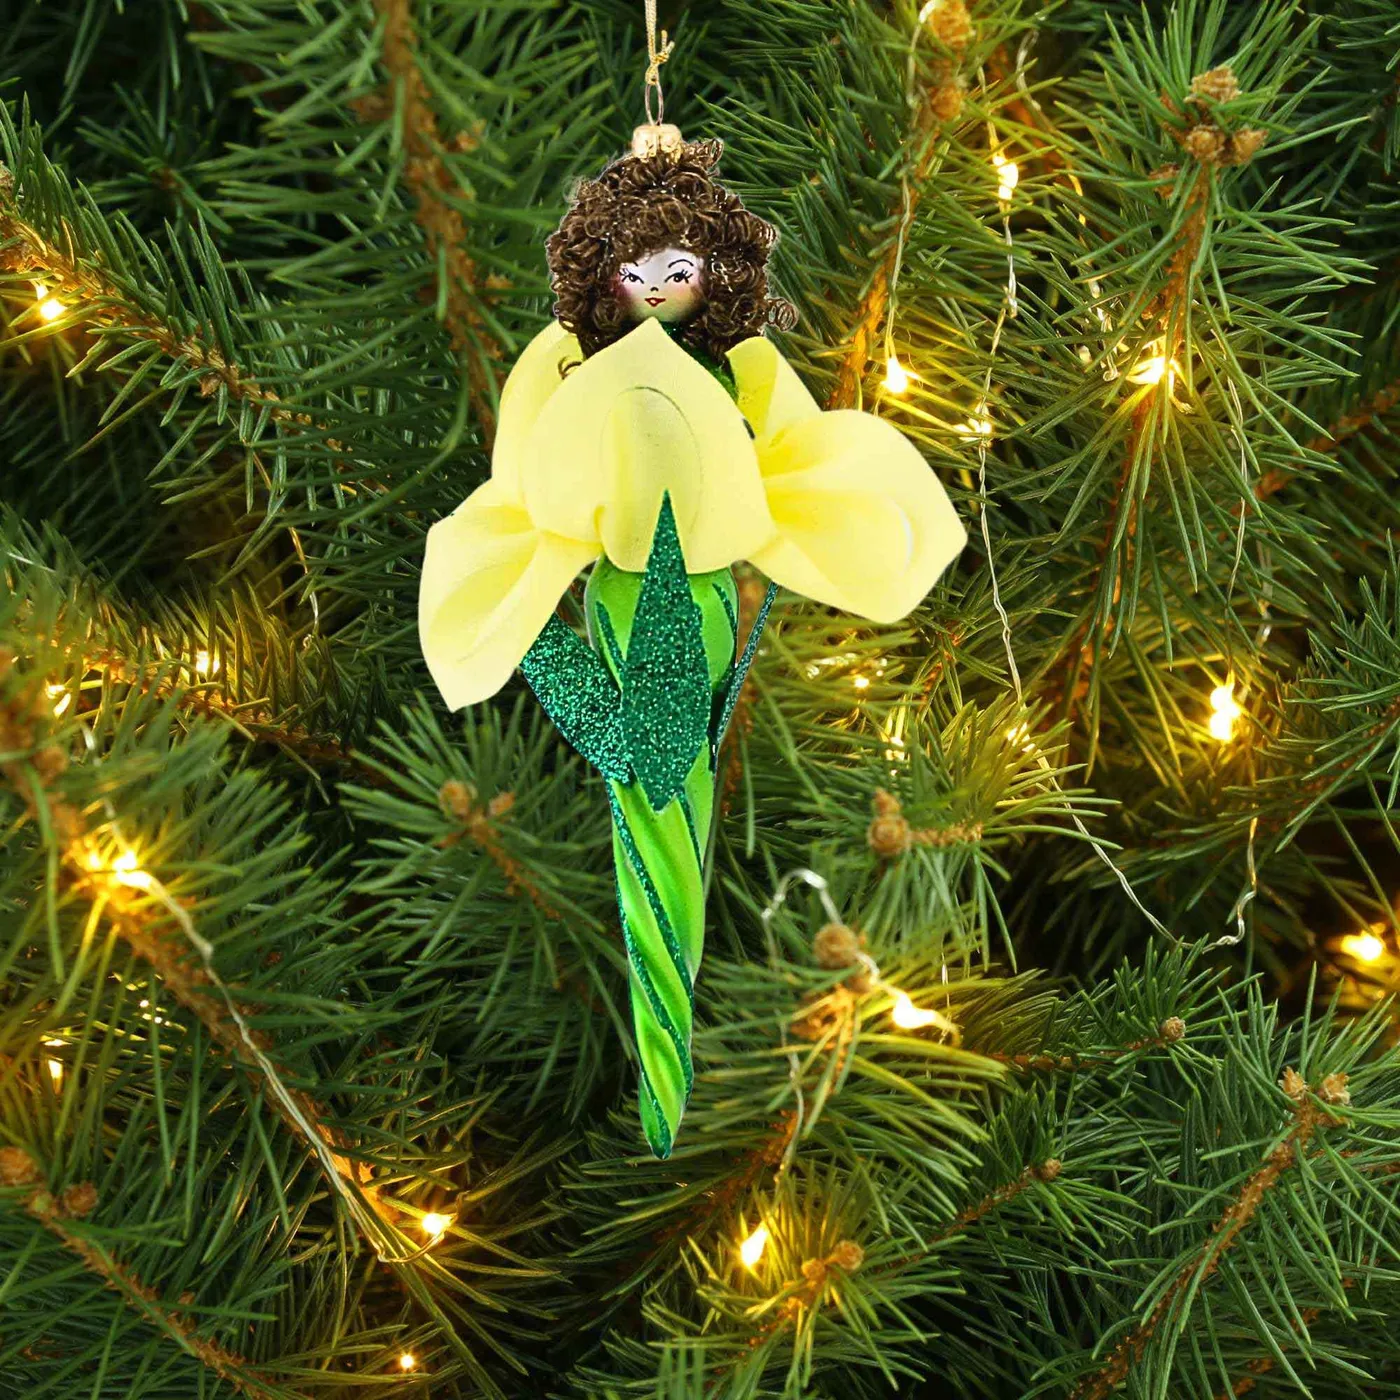
Ornaments with fabric and doll hair should hang where nobody brushes past them. That rules out the back half of the tree and the walkway side. Aim for a branch about two-thirds of the way up, on the side facing your seating. And keep it to one per tree; two flower fairies and the magic turns into a theme.
Fabric petals fade, and near a window they’ll do it in a single season — yellow goes first. Keep this one out of direct sun and store it in tissue rather than a plastic bag so the glitter stem doesn’t shed onto everything else. Hand-stitched versions can be spot-cleaned with a barely damp cloth; anything wetter bleeds dye into the petals.
Whoville Doesn’t Build Itself — Start With One Bend
You don’t need a warehouse of matching ornaments to get this look — you need one decision, whether that’s a bent tip, a lime green stocking, or a plush arm reaching through the branches, and then the patience to layer outward from there. Pick the idea that fits the room you actually have, start with the piece you can’t fake, and let the rest arrive a little at a time. 📌 Pin your favorite version now so it’s waiting for you next November.