DIY advent calendars for adults are having a serious moment on Pinterest right now — and once you see what people are building for 2026, the drugstore chocolate version starts to look a little sad.
We dug through Etsy’s handmade felt pockets, Target’s $12 kraft paper bags, and IKEA’s plain wooden blanks to find the ones actually worth your December. Everything here runs from about $12 to $295, so there’s a version for a studio apartment and a version for someone with a mantel and a glue gun.
Inside you’ll find 33 ideas across four moods — rustic farmhouse, vintage nostalgic, minimal Scandinavian, and full-on whimsical felt. Budget and luxury takes sit side by side, and each idea is shoppable with direct product links so you’re not hunting for the exact drawer knob at 11pm on December 1.
What’s driving 2026? Reusable. People are done buying cardboard that hits the bin on the 26th — they want something they can refill, restyle, and keep.
📌 Save this to Pinterest for later — you’ll want to revisit these ideas.
1. Felt Santa Pocket Calendar That Takes Over the Wall
- Felt calendar blank with 24 pockets — $35–$75
- Applique felt sheets in white, forest green, and gold — $12–$22
- Two strands of warm-white string lights — $16–$28
- Oatmeal chunky-knit throw — $40–$95
- Red and white baubles, set of 24 — $18–$35
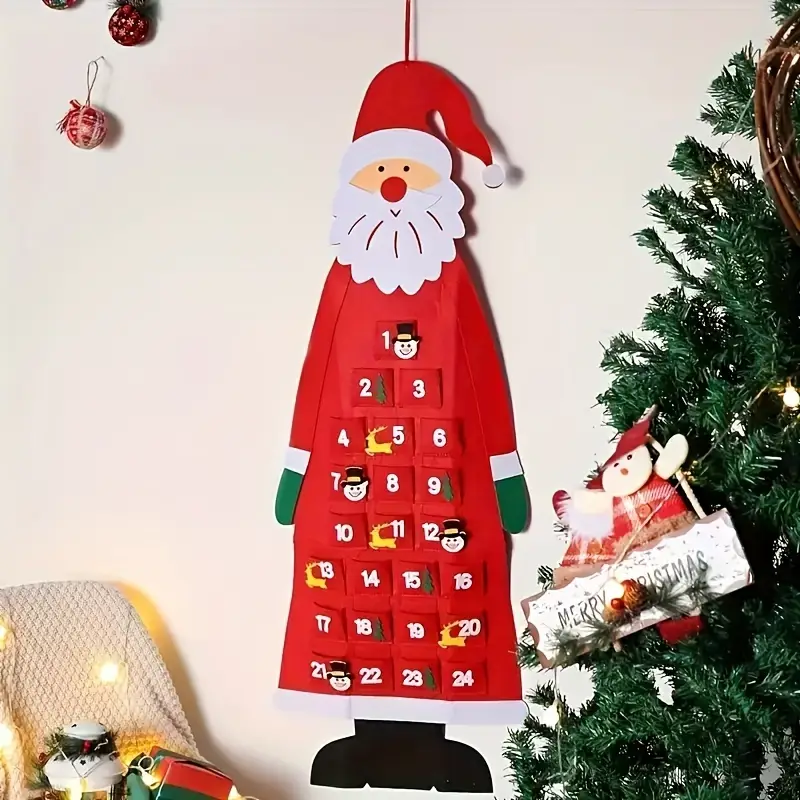
Total: roughly $120–$255, and the lights and throw come back out every year. Budget alternative: cut the pockets from two $3 craft-felt sheets and skip the knit throw entirely — a thrifted cream blanket gets you 80% of the cozy for about $12.
Hang the Santa by his top edge so the first pocket lands 58 to 62 inches off the floor, roughly eye level. Any higher and adults have to reach over their heads to drop in a chocolate, which is exactly why nobody touches it after December 4. If your wall runs tall and empty, mount a low bench or console underneath instead of floating the calendar in the middle of bare drywall — the console gives the eye somewhere to land.
2. Gray Metal Buckets on a Rustic Board, Village Below
It is the buckets. Twenty-five small gray metal pails, numbered in gold, hanging off a dark wooden board — swap them for paper envelopes and the whole piece collapses into a craft-fair project. Metal gives you a soft shine where the light catches the rim, and that tiny glint is what makes a wall of identical containers feel deliberate instead of dutiful. If you upgrade one thing on this build, upgrade the buckets.
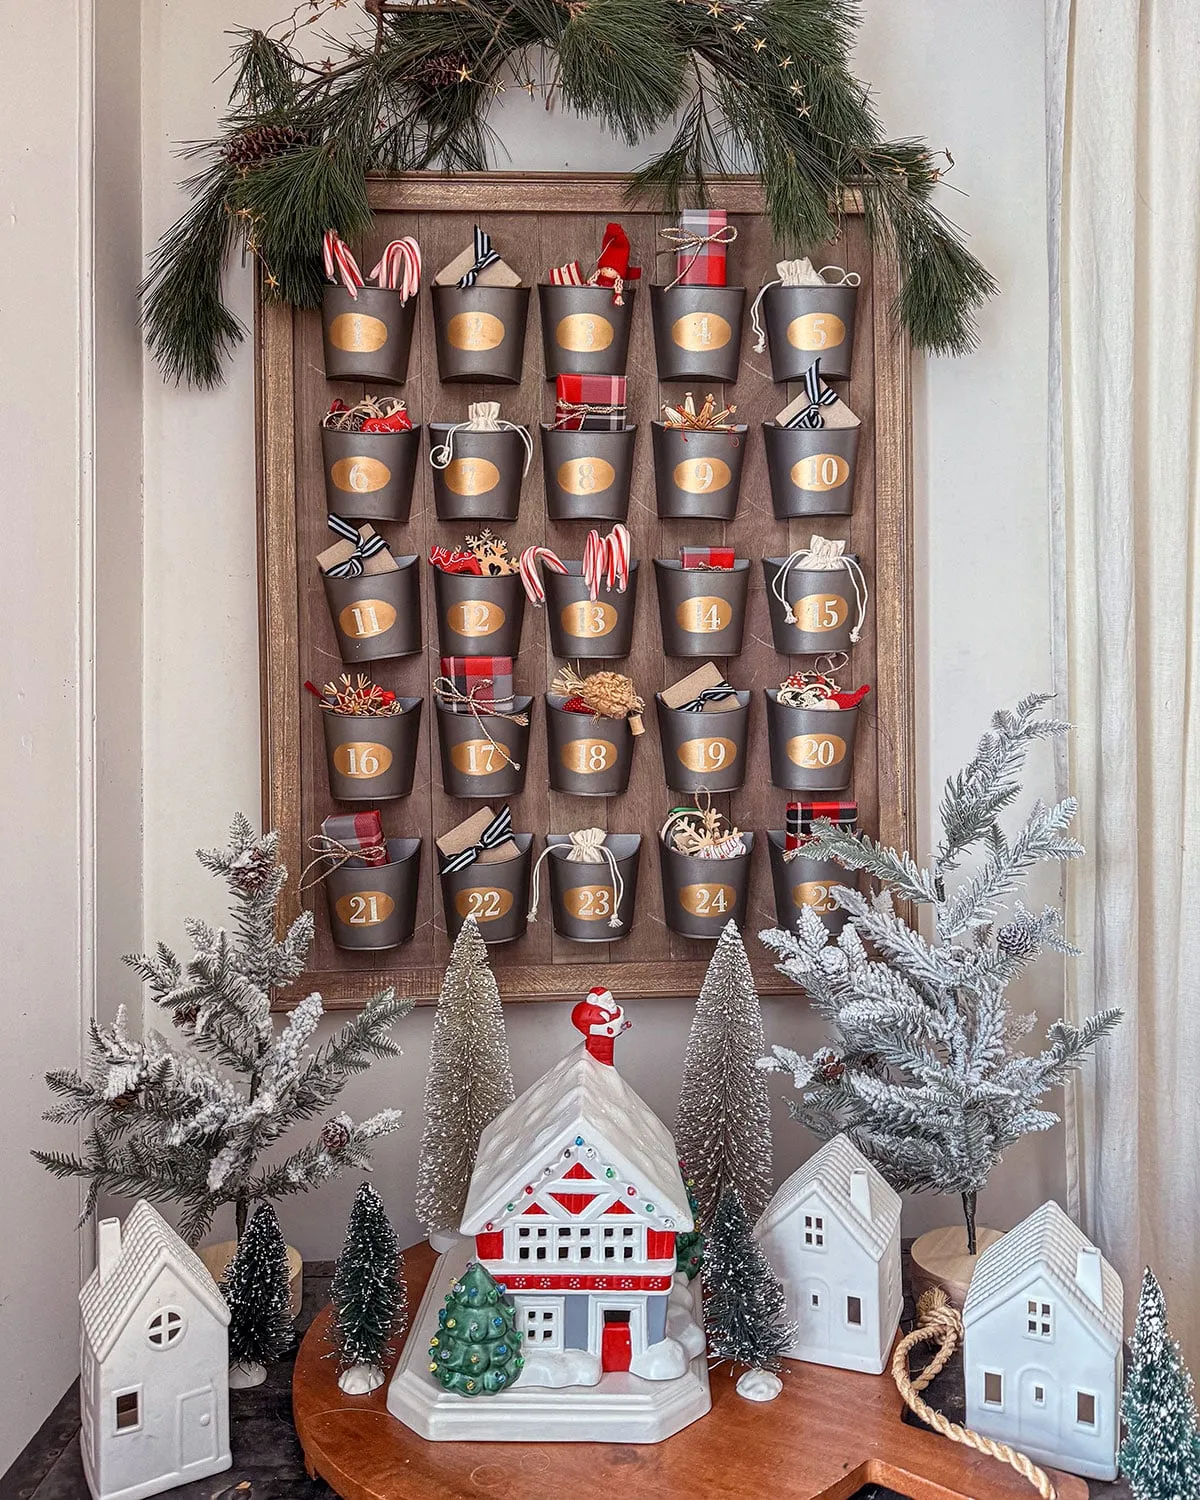
Galvanized favor buckets show up at craft stores for about $1.25 each, which puts 25 of them near $30 — less than a third of the boutique version. The board can be a $12 pine shelf from a hardware store, stained with a sample pot you already own, and you can number the buckets with a gold paint pen or a $6 sheet of vinyl numbers. Add a $10 pine garland with star lights across the top and set the little ceramic village on a thrifted cake stand underneath. Whole thing: about $60.
3. Two Carved Wooden Village Calendars Lit From Inside
Those glowing village calendars look magical in photos and slightly less magical when the internal bulb is a cheap incandescent running hot enough to warm the whole drawer column. If yours takes a replaceable bulb, swap it for a warm-white LED the day you unbox it — LED runs cool and won’t fade the painted miniature church on top. Also budget for dust: 24 tiny drawers plus a rooftop of mini fir trees means a soft brush and five minutes, twice a season, or the whole thing greys out by January.
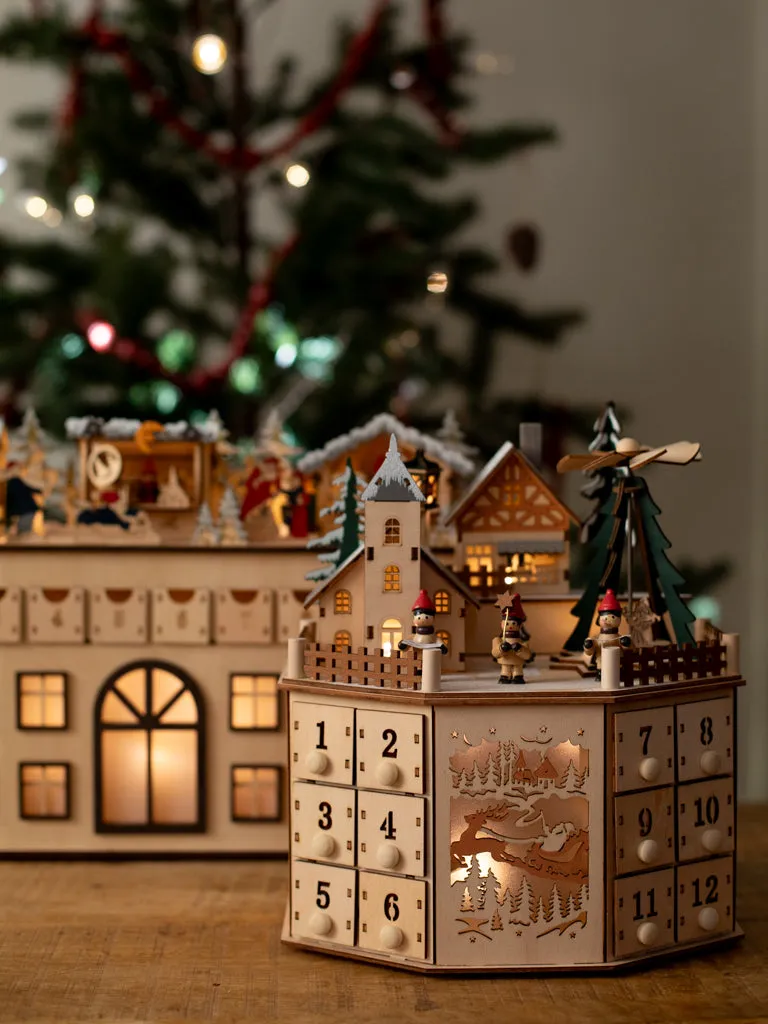
Adding warm light to a hollow wooden calendar you already own takes about 40 minutes and $14.
- Flip the calendar over and check for a removable back panel; most flat-packed versions have one.
- Measure the interior width and buy a 1-meter warm-white micro LED strip on USB or battery.
- Stick the strip along the inside top edge, facing down, so light pools instead of glaring.
- Drill a 6mm hole in the bottom corner and feed the cable through.
- Reattach the panel, load the drawers, and check nothing catches the strip when it slides.
4. A Wooden Train Advent Calendar With Numbered Drawers
The formula is roughly 60% light natural wood, 25% red and green accents, and 15% soft white. It works because the wood does the heavy lifting and the color arrives in small doses — a painted knob, a roof, a tiny tree. Swap the red for mustard and the green for dusty blue and you get a completely different, more modern calendar. Swap the wood for matte black and it turns graphic. Keep the ratios and you can’t really go wrong.
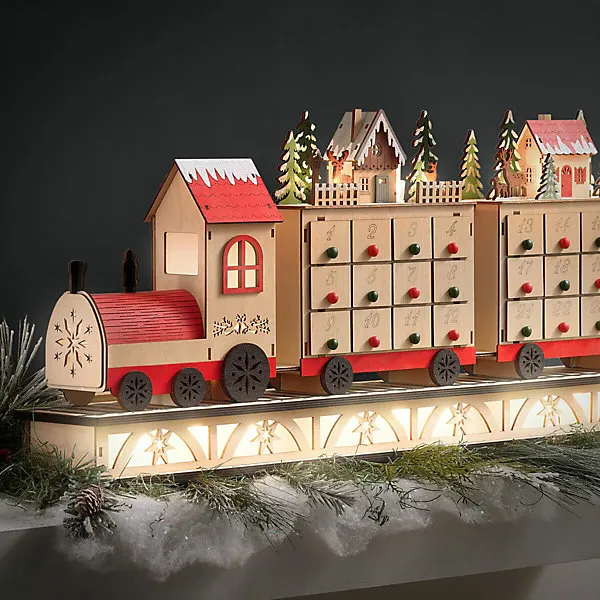
Three things are doing the work. Repetition — twenty-four identical drawers read as a pattern, which is why your eye settles instead of skittering. Scale contrast — the miniature houses riding the train cars are dwarfed by the drawers beneath, and that gap is what makes the miniatures feel charming rather than cluttered. And grounding — the illuminated base plus faux snow anchors the whole piece so it doesn’t float on the table.
- Keep the base clear of anything taller than 3 inches so the train silhouette still reads.
- Use one pinecone and one sprig — more greenery muddies the pale wood.
- Angle the train slightly instead of facing it dead-on, so the drawer fronts catch a shadow line.
5. White Tags and Vintage Ornaments on an Old Cabinet
Nostalgia is the loudest thing in holiday decor right now, and it isn’t the kitschy kind — it’s the find-the-object-that-already-has-forty-years-on-it kind. Thrifted cabinets, faded brass hooks, tiny ornaments that don’t match because they were never meant to: this look is everywhere on Pinterest because it photographs like a story instead of a catalog. The upside for you is that it’s genuinely cheaper to build than a new one, since the best pieces are already sitting in estate sales. It also has real staying power, because nostalgic decor doesn’t date the way a color trend does.
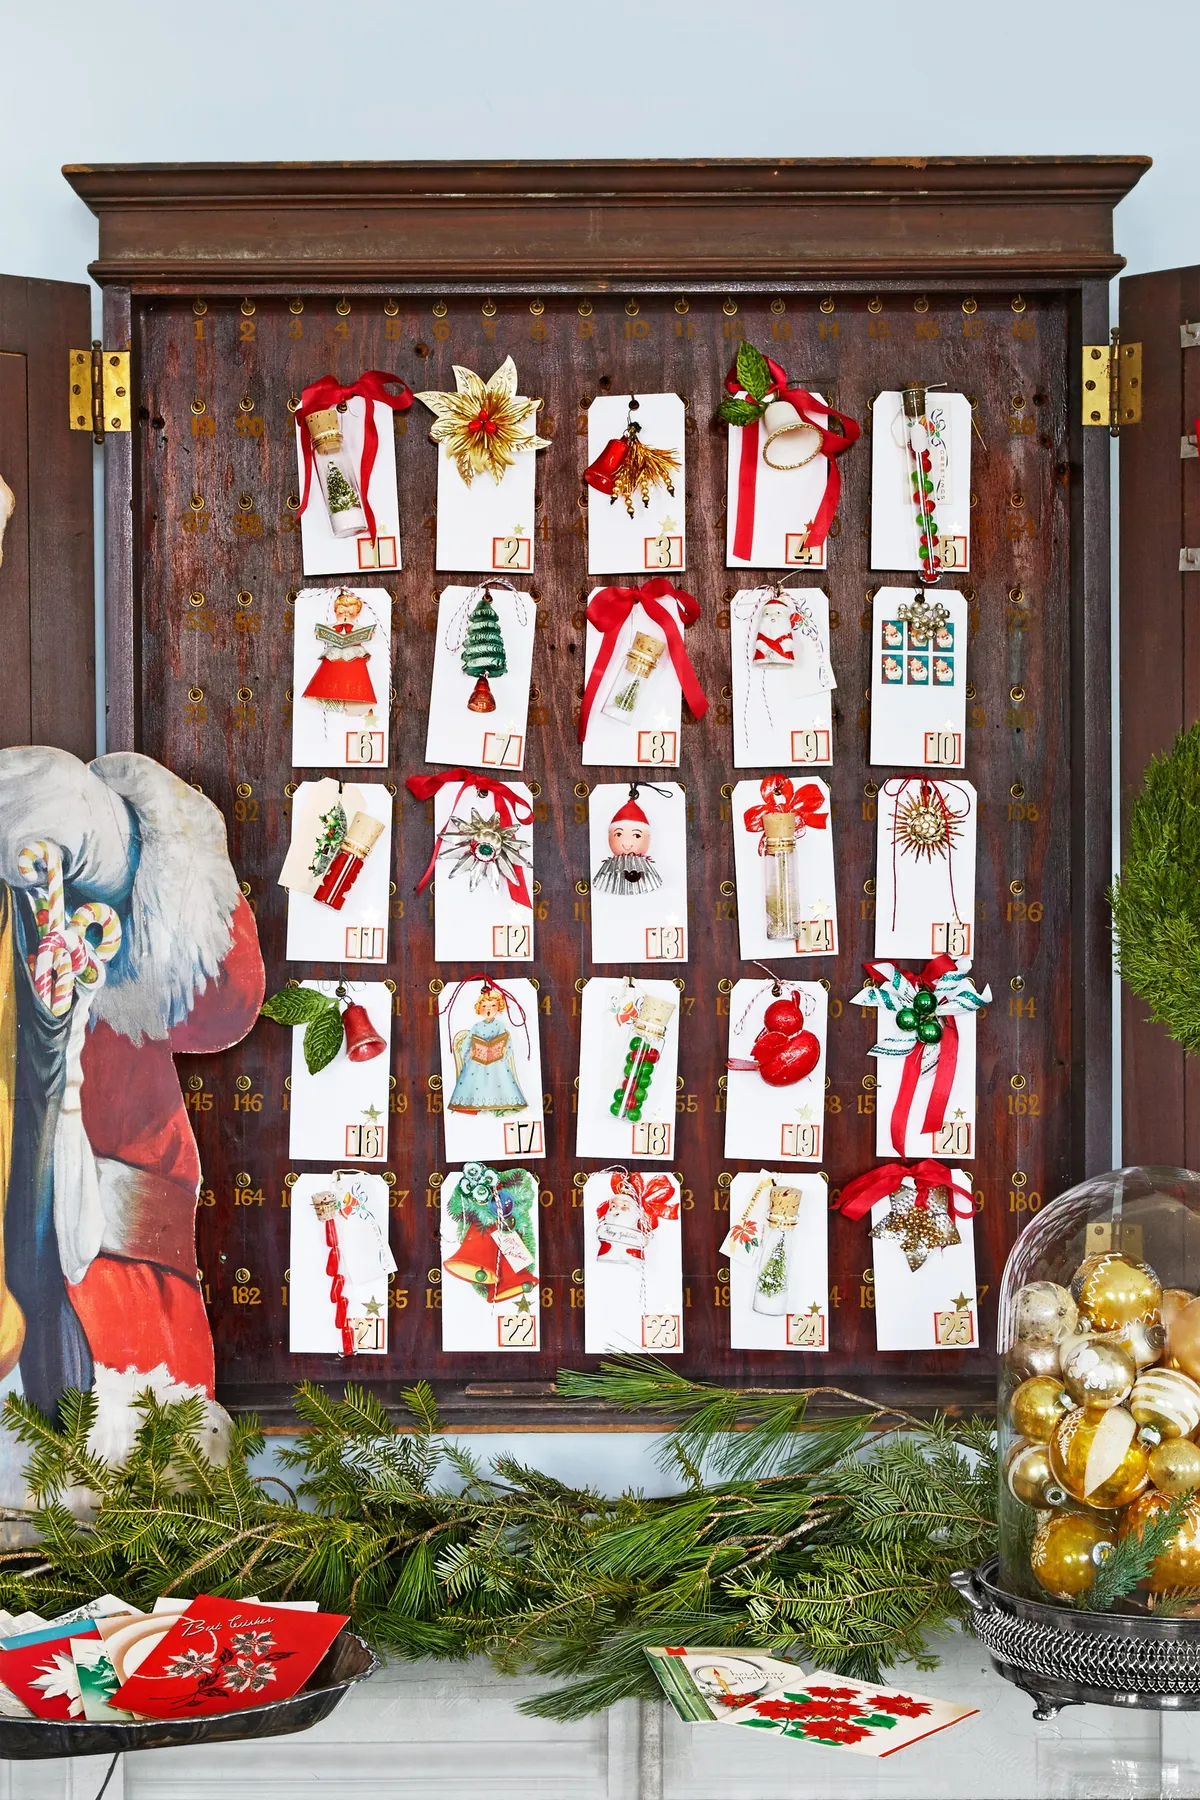
This one needs wall. Plan on at least 30 inches of horizontal run for the cabinet itself, plus 12 inches of clear surface below for the fresh evergreen branches and the glass cloche. Ceiling height barely matters — the piece is short and wide, so it suits a low 8-foot room better than a tall stairwell. Working with a narrow hallway or a small apartment instead? Skip to Idea #19, where the entire calendar hangs from a single branch.
6. A House-Shaped Calendar Stuffed With Gin and Honey
Food in an advent calendar is lovely until the drawer sits three feet from a radiator. Chocolate blooms — that chalky white film — above 75°F, and mini jars of honey or gin don’t love temperature swings either. Keep the whole calendar on an interior wall away from heat vents, and if you’re filling it more than a week ahead, stash the perishables in a zip bag in the pantry and load the drawers the night of December 1. Nobody has ever complained about a late-loaded drawer. Plenty of people have complained about melted truffles.
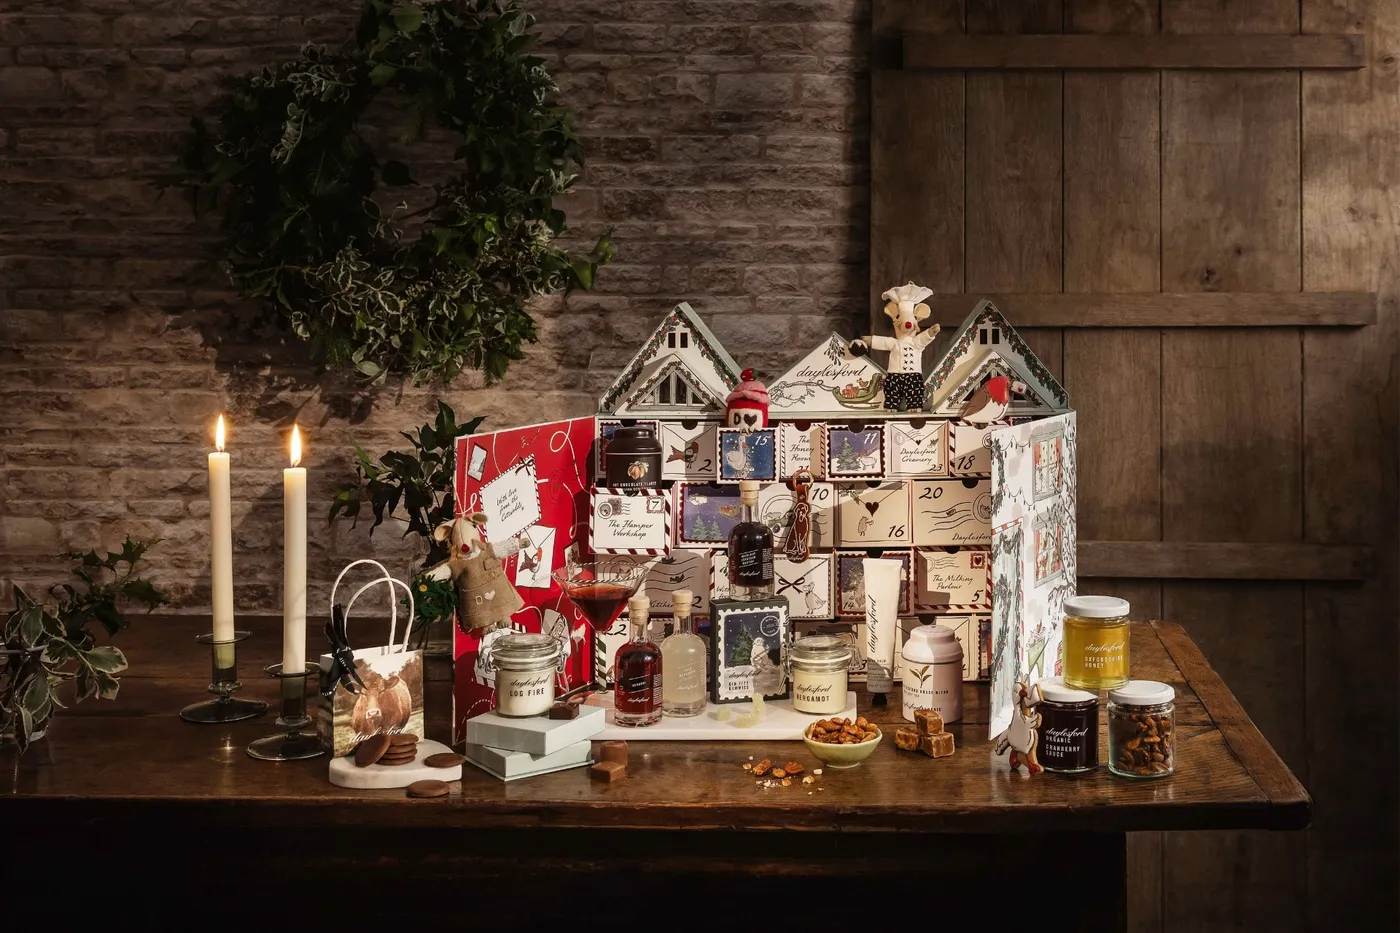
Before you commit to a food-and-drink calendar, walk through this:
- Measure the table or shelf — these house-shaped units usually run 14 to 20 inches wide.
- Check what’s behind it: brick or dark paneling means you want the calendar to be the brightest thing in frame.
- Confirm drawer depth — most mini jars need 2.5 inches of clearance.
- Set a fill budget, since good mini gins and honeys run $6 to $12 each and 24 adds up fast.
- Decide who refills it. Shared calendars die on day three without an owner.
7. Chalkboard Calendar With Silver Mailbox Doors
- Framed chalkboard, 24 x 36 inches — $45–$90
- 24 silver mailbox-style favor boxes with latches — $30–$60
- White chalk marker set — $8–$14
- Green paper banner or cardstock plus twine — $6–$12
- Two rustic wooden candle holders with cream pillars — $24–$48
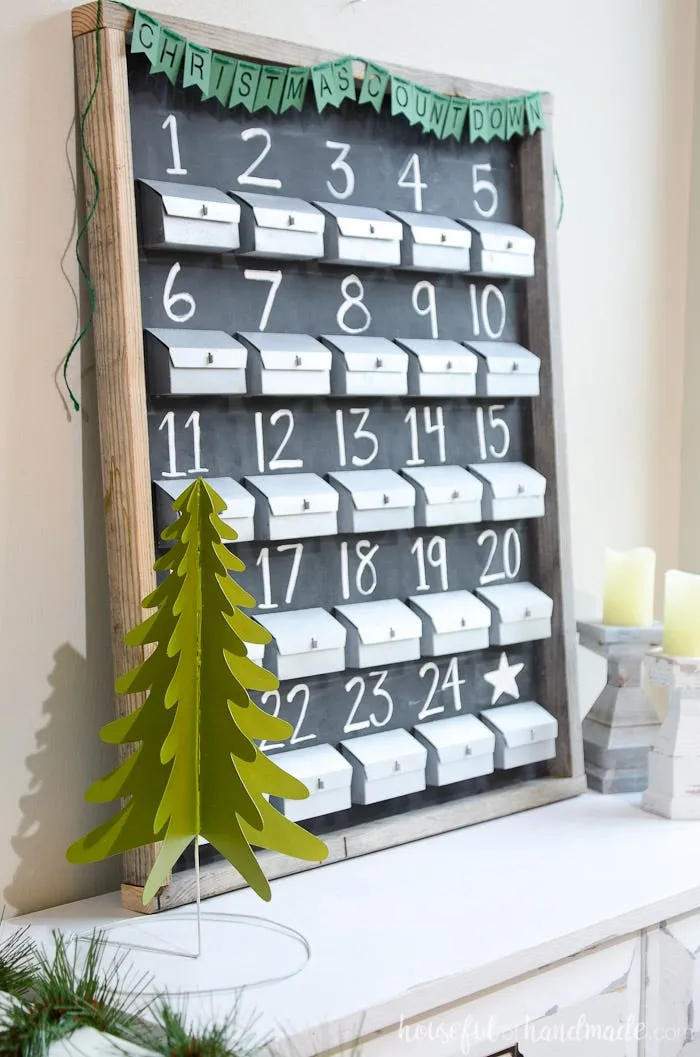
Total: roughly $115–$225. Budget alternative: a plain blackboard runs about $20 at IKEA, and unadorned silver favor boxes from a party store are around 60 cents each — that’s a $45 version of the same wall.
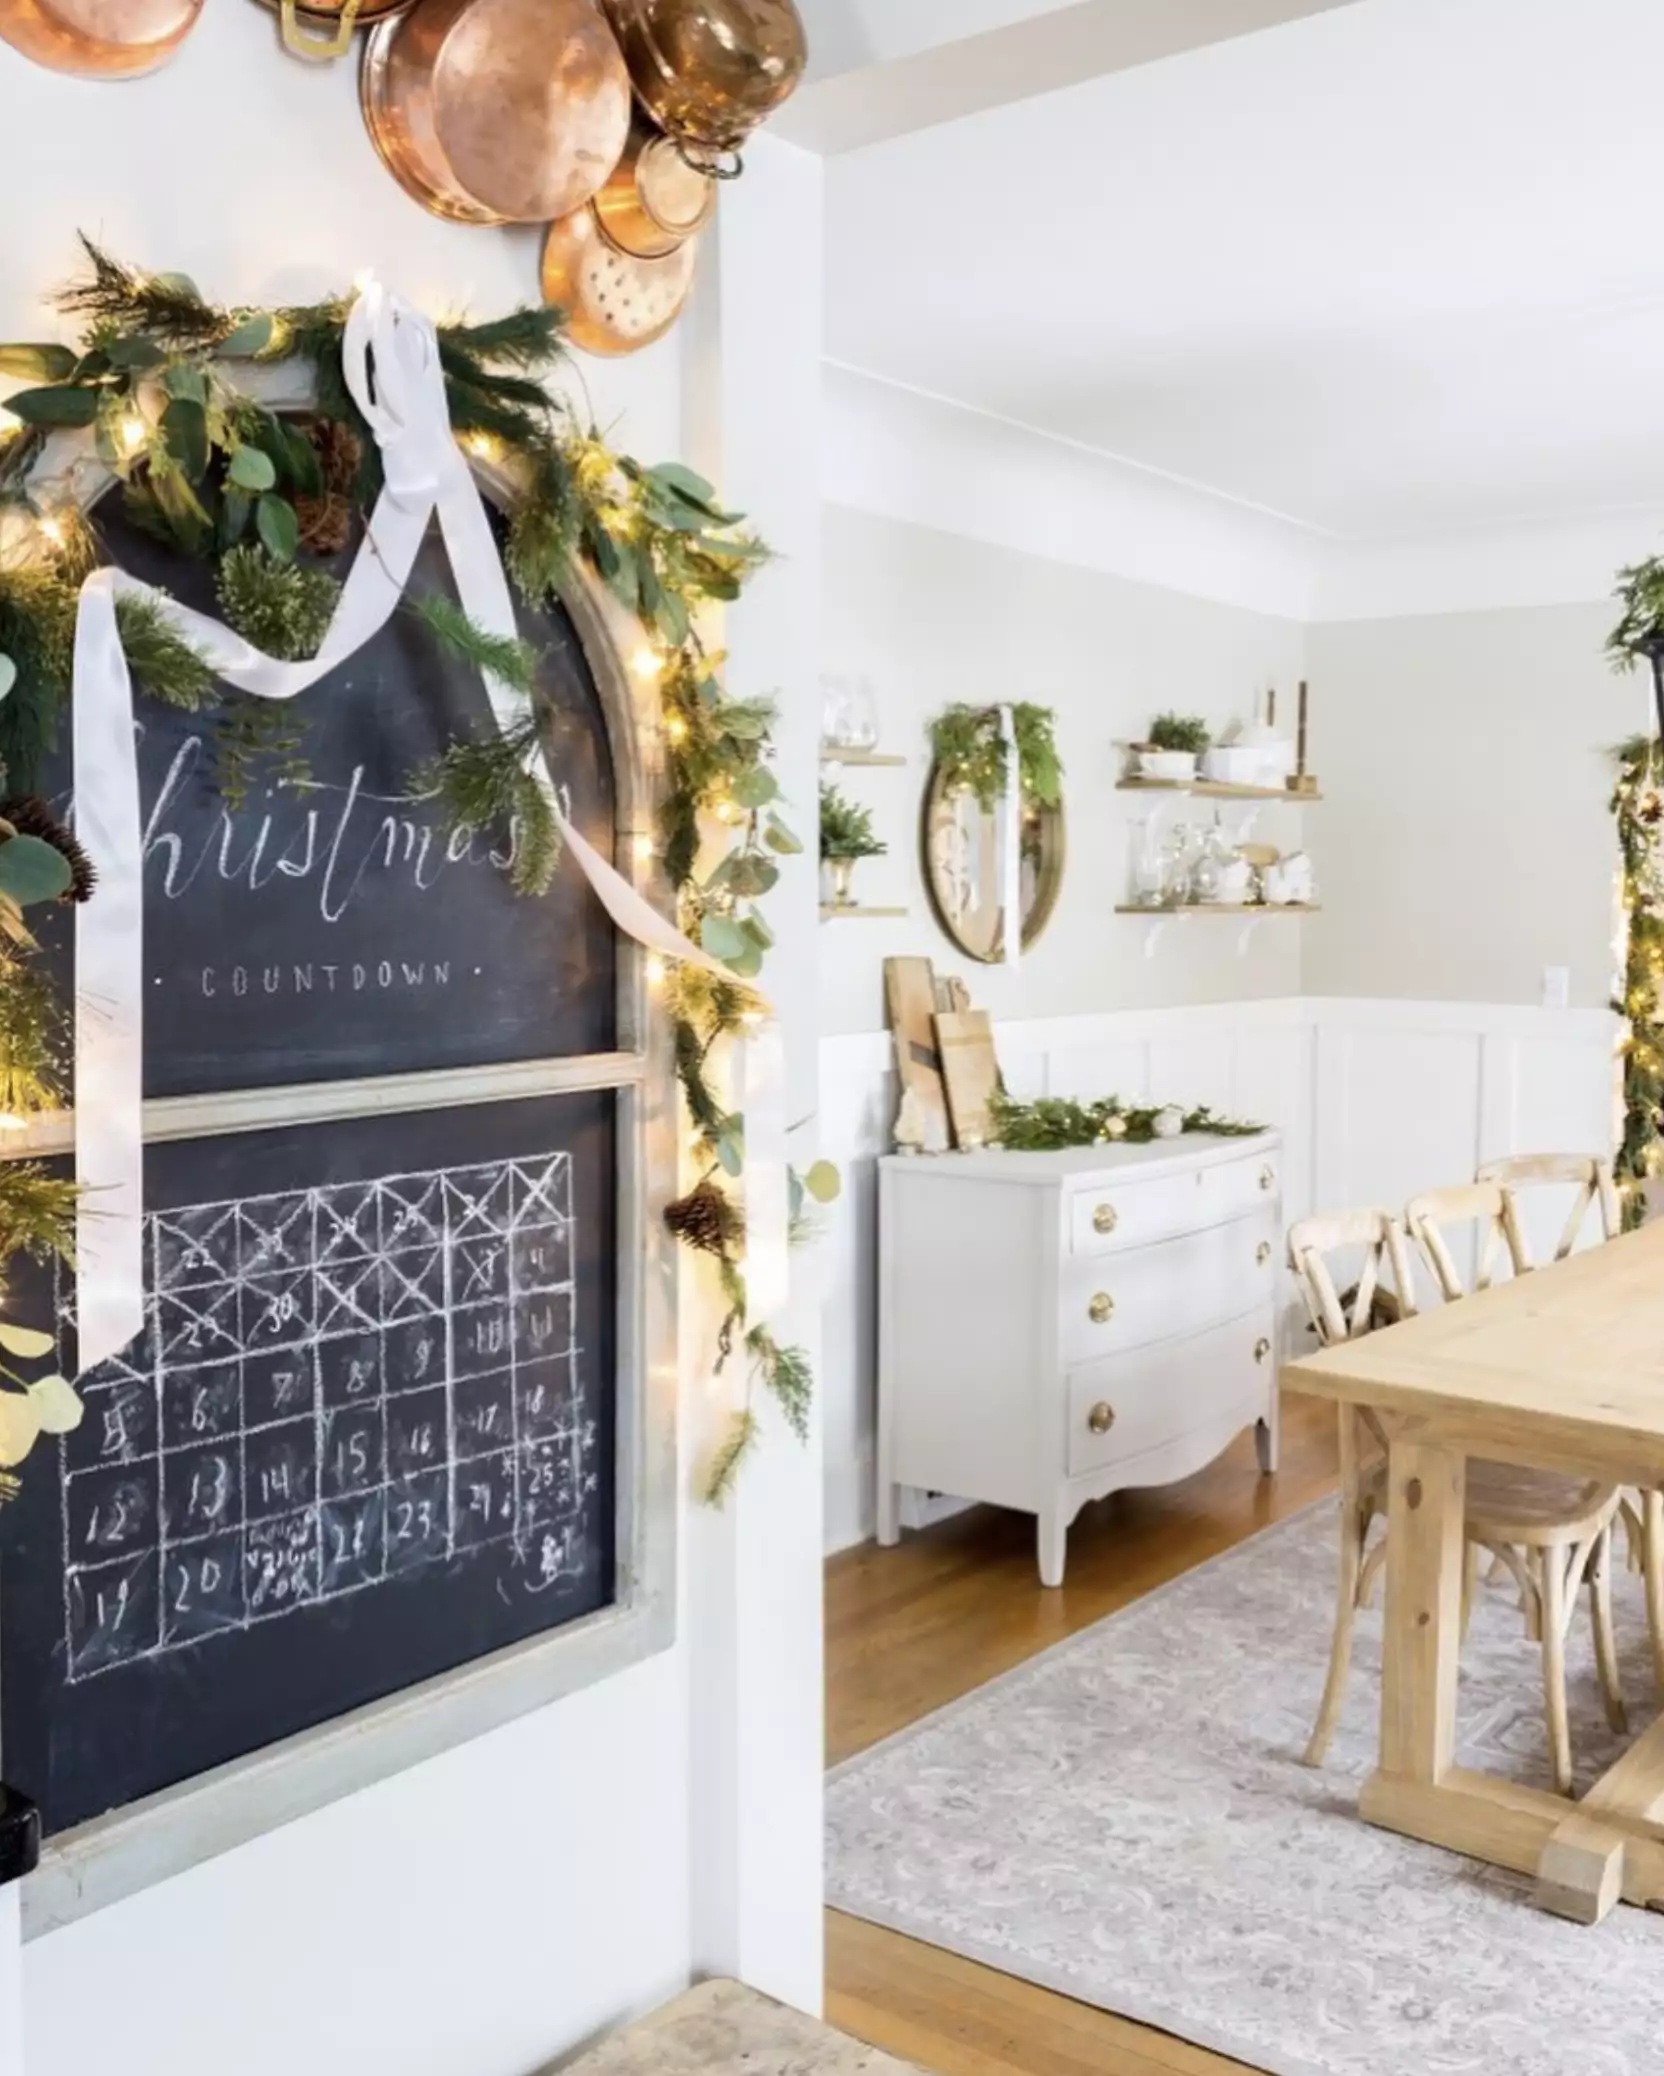
Chalk marker on a blackboard looks best when the numbers are the same size but the baseline wanders a little. A perfect grid reads as signage; slightly uneven handwriting reads as a countdown. Draw the numbers first in white pencil, go over them with the marker, then seal the board with a light coat of matte fixative so a passing sleeve doesn’t erase day 14.
8. A Painted Apothecary Shopfront With Twenty-Four White Urns
It’s the urns. Twenty-four small white vessels, each stamped with a number, lined up on painted wooden shelves like stock in an old shop. Take those away and you have a nice painted facade with nothing to hunt for — and the hunt is the entire point of an advent calendar. They also do something a drawer can’t: they’re readable from across the room, so the countdown registers as an object rather than a piece of furniture. If you build one, spend your money on the urns and not the paint job.
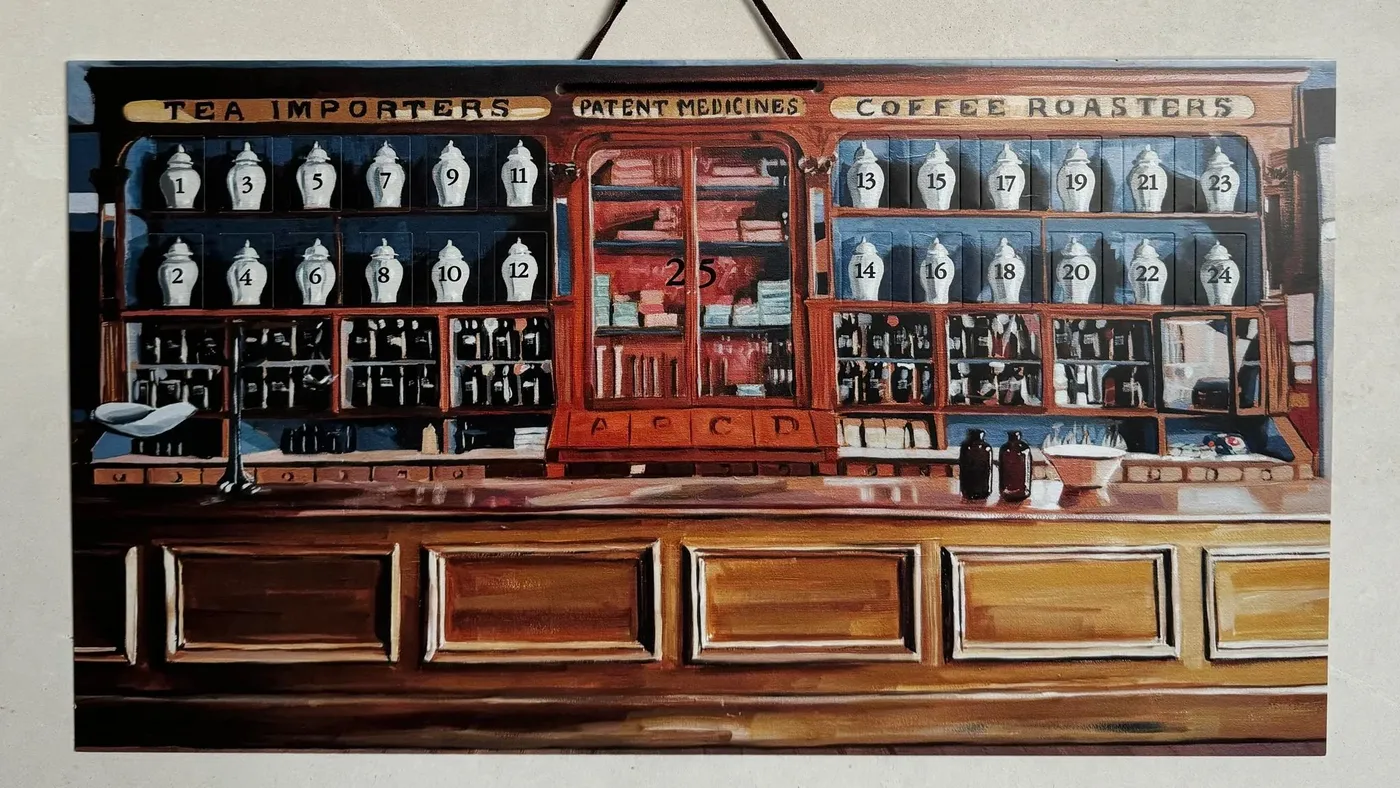
The original can run $150 and up from a decorative artist, but the concept translates. Start with a plain wooden shadow-box shelf from IKEA or Michael’s, about $15. Paint the back panel in dark walnut and add two thin strips of trim for shelving. Print the shop signs — Tea Importers, Patent Medicines, Coffee Roasters — in a vintage serif on cream cardstock. Your urns can be small white ceramic bud vases, 24 for about $12, numbered with a gold paint pen. Total: around $35 for a wall that looks like it cost four times that.
9. Light Wood House With a Village on the Roof
Lit-window house calendars are the most photographed advent design of the past two seasons and the least forgiving in a dark room. A single warm bulb behind a thin panel throws a hard rectangle of light onto the wall, and if the calendar faces a mirror or a glossy TV you’ll get doubled glare all evening. Keep it away from reflective surfaces, and if the windows look harsh, tape a strip of parchment paper behind each opening — it diffuses the light into something that reads as cozy rather than clinical.
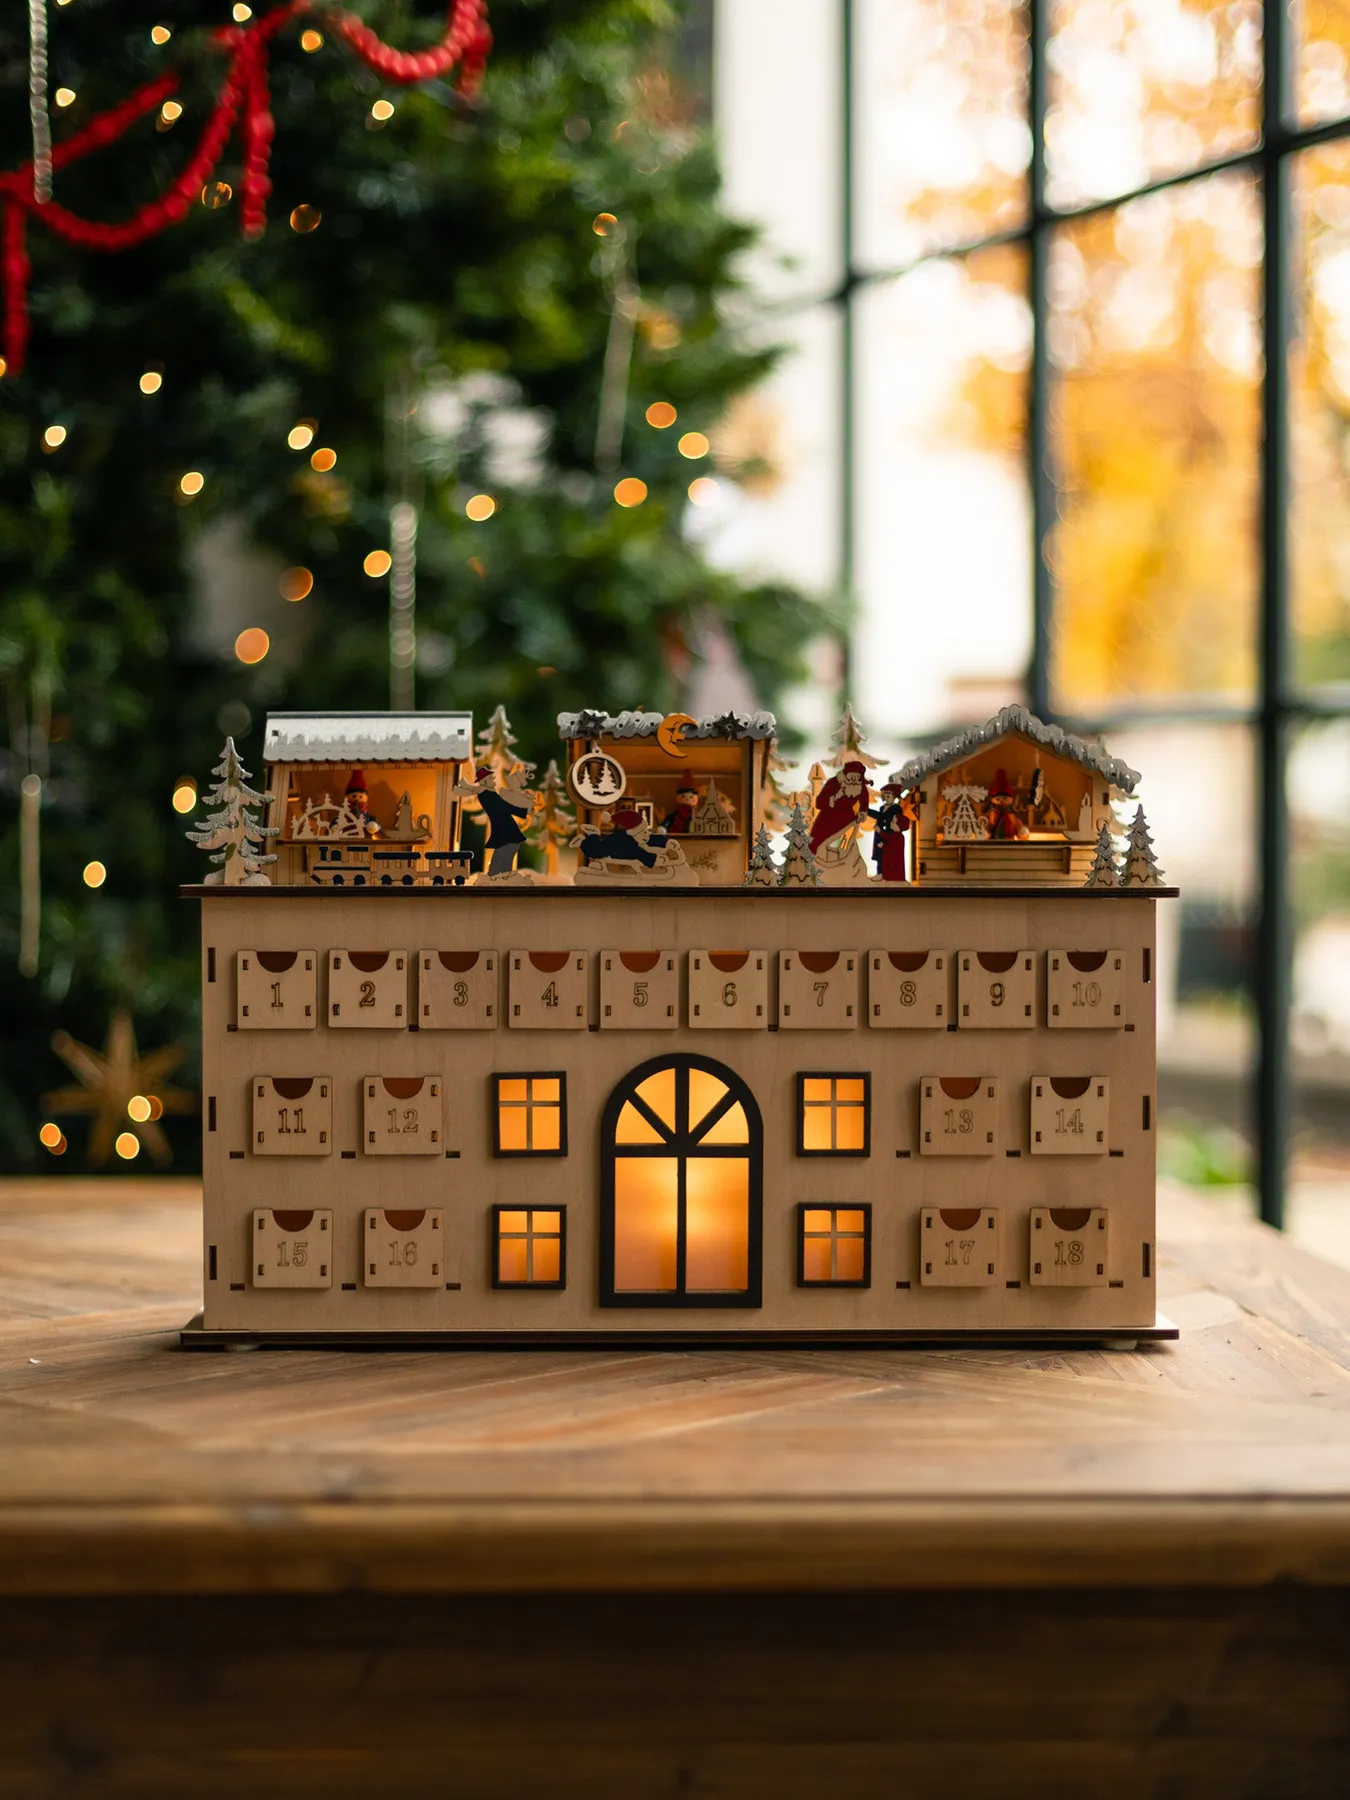
Building the rooftop village takes about 30 minutes and $18 in supplies.
- Gather 5 to 7 miniature houses or trees, mixing heights between 1 and 3 inches.
- Cut a piece of batting or faux-snow felt to the exact roof footprint.
- Hot-glue the tallest tree at the back corner first — it sets the horizon line.
- Cluster the smallest figures in front, angled slightly toward each other.
- Add one warm micro light behind the cluster, not in front, so the figures silhouette.
- Step back three feet and pull anything you can’t identify at that distance.
10. Round Red Calendars Spilling Chocolate Onto Green Satin
The formula is about 70% deep red, 20% dark green, and 10% gold — which sounds like a Christmas cliché until you see it worked in satin and glossy chocolate instead of felt and pine. Swap the green for navy and the gold for antique brass and it turns richer and more evening. Swap the red for cream and you get a calm, almost Scandinavian version. The ratio is the recipe; the colors are just seasoning.

Two things make this read as luxury rather than candy aisle. First, finish contrast: matte dark green fabric against foil and shiny chocolate gives the eye a rhythm instead of a wall of shine. Second, prop restraint — one fabric drape, one gift box, one gold chain, and then let the product talk. If you want the same rich palette in a wall-hung format, Idea #11 keeps the red and dark brown but trades satin for painted wood.
Drape the fabric with soft, uneven folds, because flat fabric looks like a tablecloth. Keep the two calendars at slightly different angles so the gold numbering catches light twice, and limit loose chocolates to five or six, placed where a shadow already falls.
11. Five Gift-Box Calendars Against a Muted Green Wall
Grouping five advent calendars on one table is its own trend right now — people are treating them like collectible objects rather than one countdown. Part of it is the collabs: a Snoopy doghouse beside a bookshelf design beside a deep red gift box reads as a curated shelf, not a random pile. It also solves a real problem, because two people sharing a house rarely agree on one calendar. The catch is discipline — five pieces only works when they share a palette, which is exactly what the light wood surface and muted green wall are providing.

Plan on a surface at least 48 inches wide and 14 inches deep for a five-piece grouping, with about 4 inches of breathing room between each. On a narrow console, cut to three pieces and stagger heights instead. Low ceilings are actually an advantage here — most of these calendars are under 16 inches tall, so a group of five stays comfortably below a 7-foot sightline and never crowds the room.
12. Numbered Apothecary Jars in a Painted General Store
Flat painted calendars are the easiest advent build to live with — no batteries, no bulbs, nothing to refill. The upkeep is mostly dust and sun. Those little numbered cubbies collect it, and a feather duster just pushes it deeper, so use a soft makeup brush once a month through the season. If the piece hangs where afternoon sun hits it, expect the dark navy and deep red to soften over two or three December runs. A coat of matte UV-resistant varnish when you finish painting buys you years.
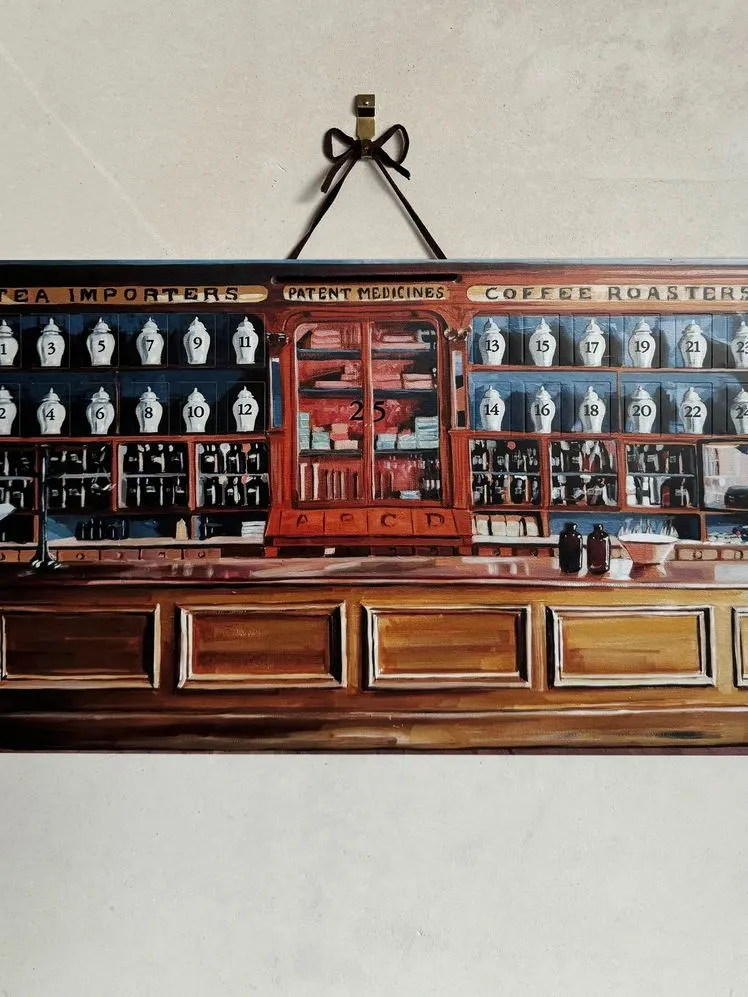
Three checks before you start painting:
- Measure your wall run — these flat shopfronts usually finish between 20 and 30 inches wide.
- Find where the light lands at 4pm; a dark painted interior needs a bright wall to read against.
- Count your cubbies — you need 24 clear, evenly spaced slots or day 19 quietly goes missing.
- Decide your hanger before you drill: a brown ribbon over a brass hook beats adhesive strips on painted plaster every single time.
13. White House Calendar With Red Velvet Bows
- White house-shaped calendar with 24 drawers — $60–$140
- Gold numbering kit or paint pen — $8–$16
- Deep red velvet ribbon, 3 yards — $12–$24
- Miniature artificial tree in a burlap pot — $18–$35
- Glossy red ornaments, set of 12 — $14–$28
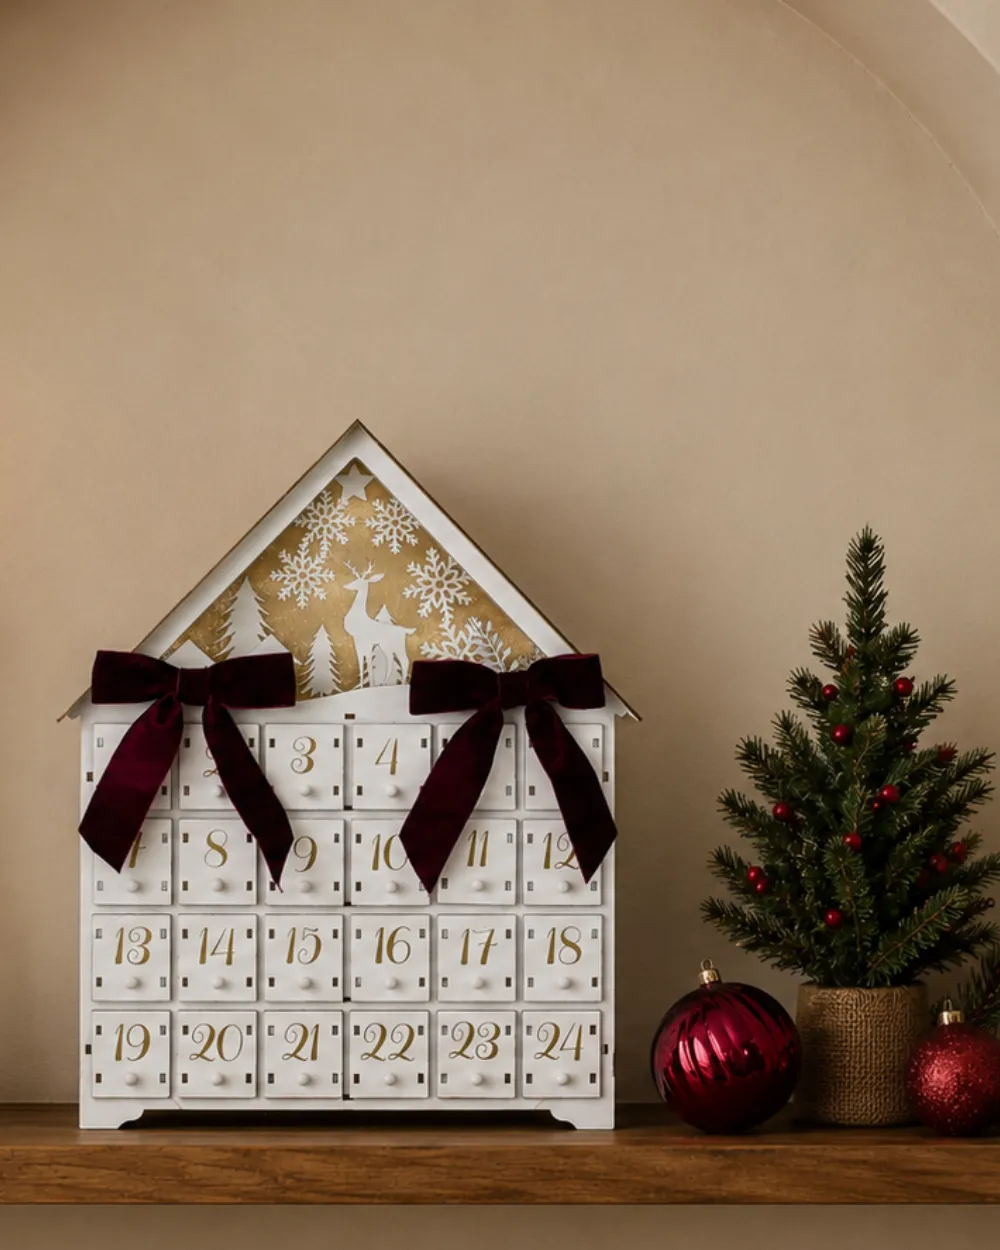
Total: about $110–$245. Budget alternative: a plain white wooden house box runs $22 at a craft store, add $6 gold number stickers, and press ordinary red satin ribbon with a warm iron to fake the velvet drape.
One placement trick does more for a white house calendar than any accessory: number the drawers by eye, not by ruler. Small drawer fronts rarely have perfect proportions, so a numeral centered mathematically on a wide drawer will look left-shifted on a narrow one. Line them up on optical center, step back six feet, and trust the squint test over the tape measure.
14. Illustrated Cottage and Grid Calendars by Candlelight
The candle is doing more than you think. Without that lit cream taper in the brass holder, these two calendars are just printed objects on a table. With it, the scene becomes a ritual — coffee, one drawer, one flame. It also solves a photographic problem, because a small flame gives the eye a single warm anchor in a frame full of flat illustration. Keep it low and off to the side, never between the two calendars, so the light rakes across the cottage illustration instead of washing it out.
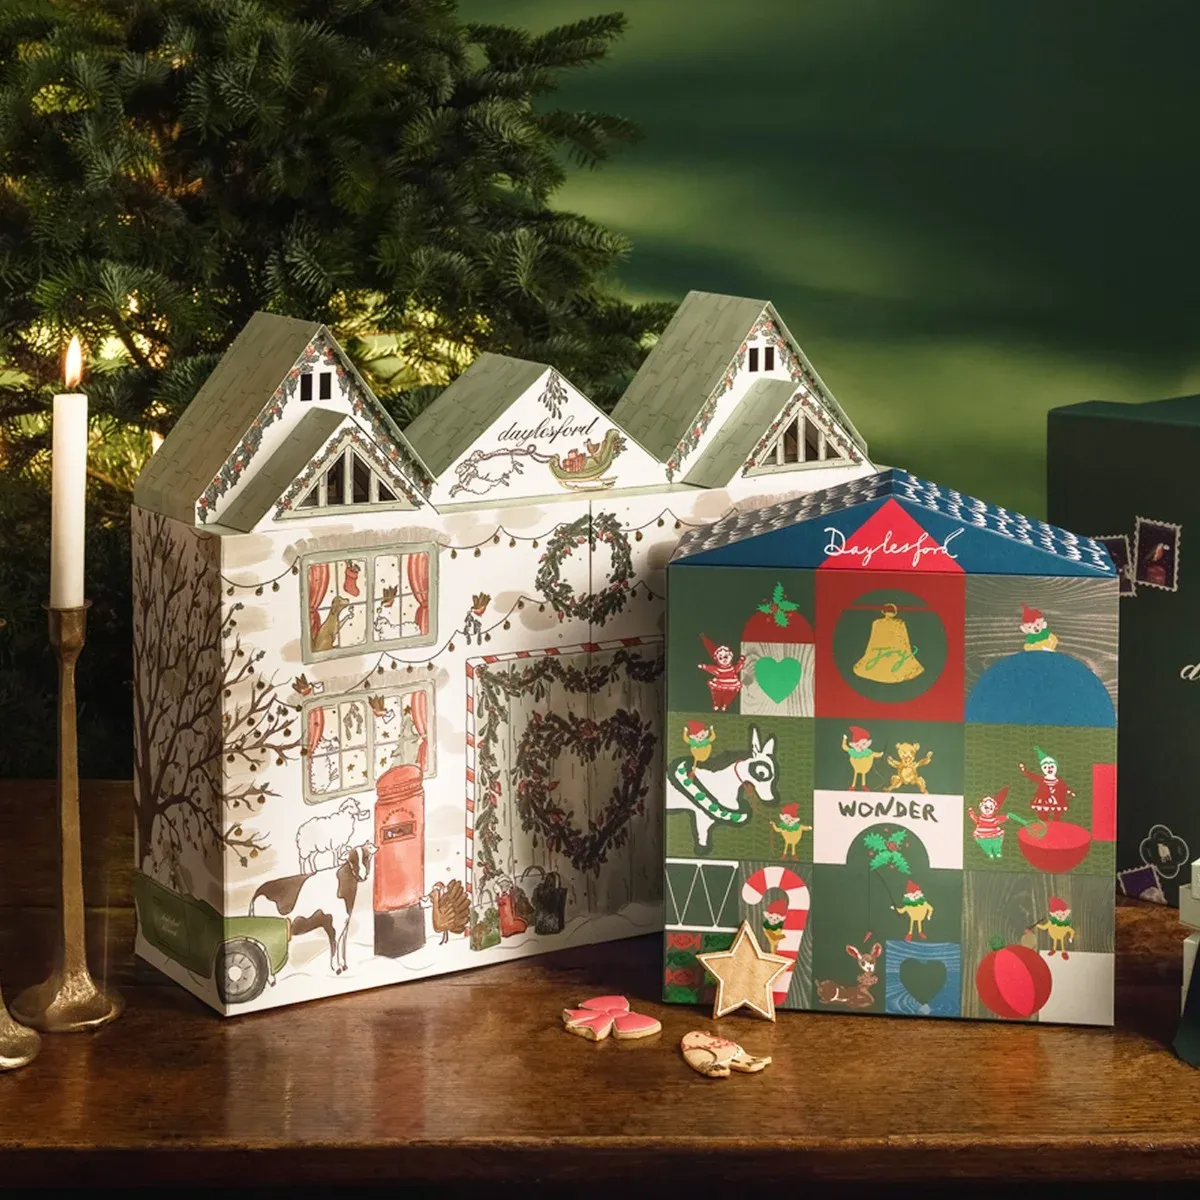
Both of these are essentially decorated boxes, which means you can build the same energy for about $30. Grab two plain white or kraft house-shaped gift boxes from a craft store, roughly $4 and $7. Cover the large one with a printed cottage image from a free vintage card download, decoupage it flat, and number the little doors with a fine paint pen. For the dark green grid version, a sheet of 24 square labels with mixed holiday motifs does the job in ten minutes. Add a $3 dollar-store taper in a thrifted brass holder and nobody will guess.
15. White Wooden House With a Gold Glitter Winter Scene
Gold glitter panels are gorgeous and slightly high maintenance. Loose glitter travels — it finds your table runner, your hands, and somehow the hallway. Seal a glitter card backing with a light mist of matte craft sealer before you install it and you’ll cut the shedding dramatically. The second thing to watch is heat: if the cut-out panel is lit from behind, keep at least an inch of air gap between the bulb and the glitter surface, or the cardstock will curl within a single season.
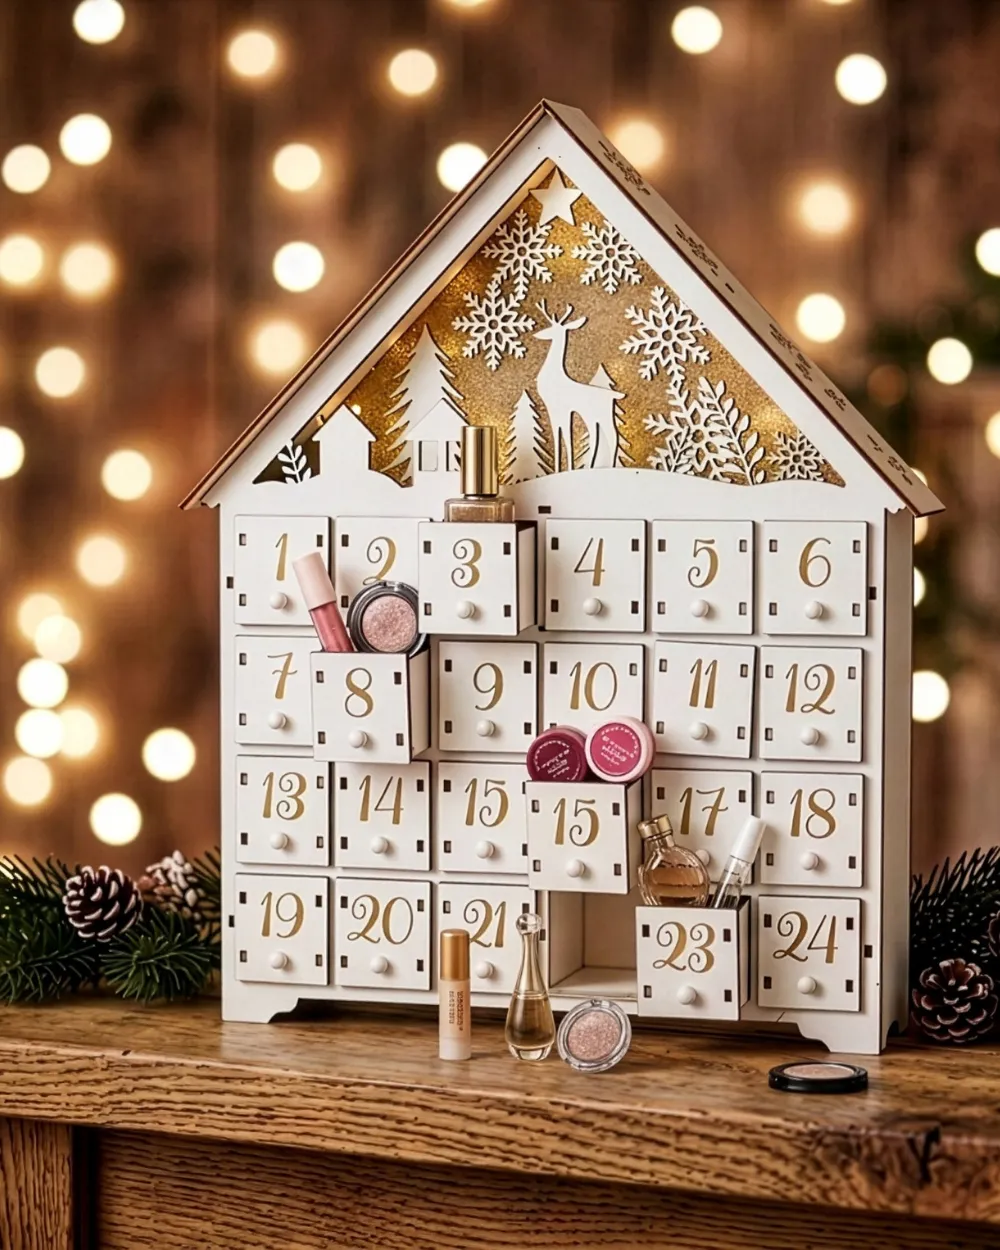
Backing a roof cut-out with glitter card takes about 25 minutes and $10.
- Trace the cut-out shape onto the glitter cardstock from the front, using a soft pencil.
- Cut a quarter inch inside your trace line so no card peeks past the wooden frame.
- Mount a battery puck light behind the card with foam tape — never glue.
- Seal the glitter side with one thin mist of matte craft sealer and dry 20 minutes.
- Reattach the roof panel and check the glow reads evenly from three feet away.
Compare with Idea #12 — same white house silhouette, entirely different mood.
16. Illuminated Village With Pine Tree Cut-Outs
Count it out: about 65% light natural wood, 20% deep forest green, and 15% warm light. The wood is the base note, the green is punctuation, and the light functions as the accent color — which is why this design never feels busy even though there’s a lot going on. Swap the green for deep charcoal and it goes modern. Swap the wood for white and the green for soft sage and it turns quiet and Scandinavian. Just don’t touch the light temperature; make it cool and the whole thing dies.
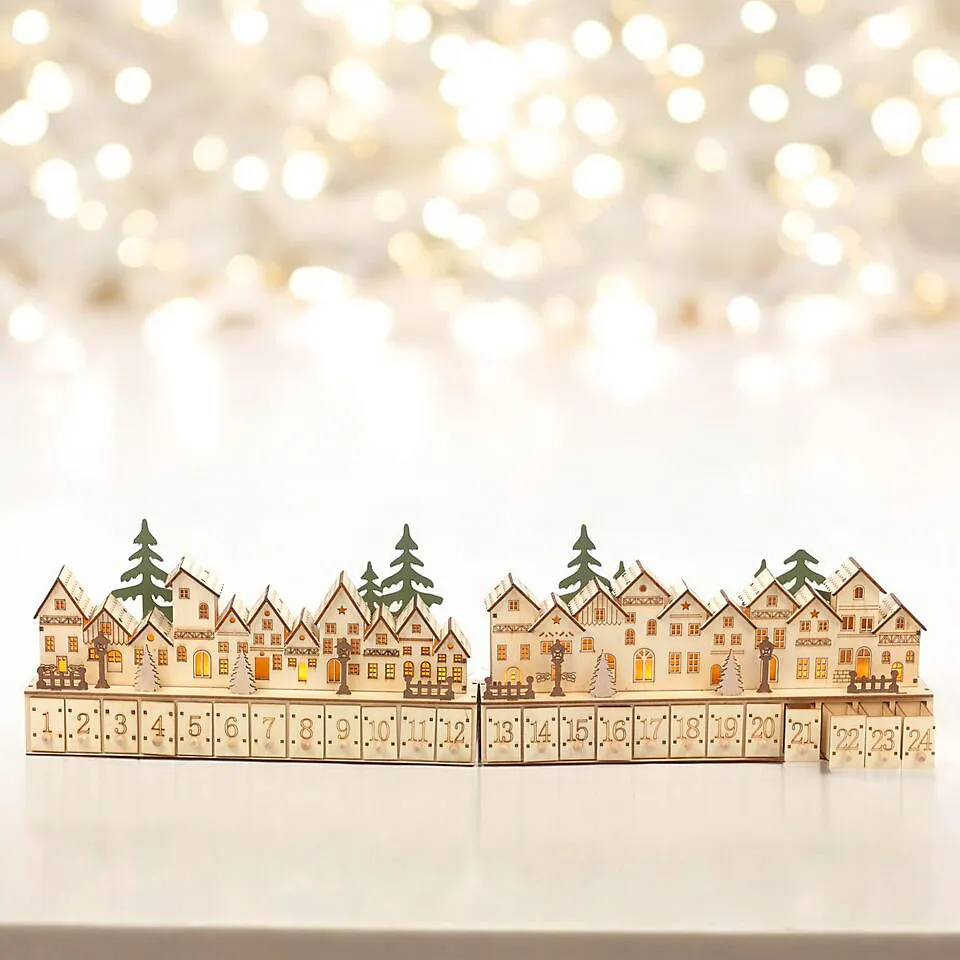
Three principles are stacked here. Silhouette — the cut-out trees and little fence create a distinct skyline, so the piece reads as a shape from across the room before it reads as a calendar. Rhythm — the row of numbered drawers underneath pins everything down and gives your eye a predictable place to rest. And negative space — the cut-outs let the wall show through, which is the difference between a decoration and a solid box.
17. Miniature House Drawers Under a Red Scalloped Roof
Miniature worlds are the sleeper trend of this holiday season. Dollhouse-scale villages, tiny storefronts, and little hand-painted figures have moved out of the toy aisle and onto the sideboard — partly because they photograph beautifully at close range, which is exactly how most of us actually experience Pinterest. The appeal for adults is a little less cute and a little more about scale: after a year of enormous decisions, controlling a world that fits in your palm is quietly satisfying.
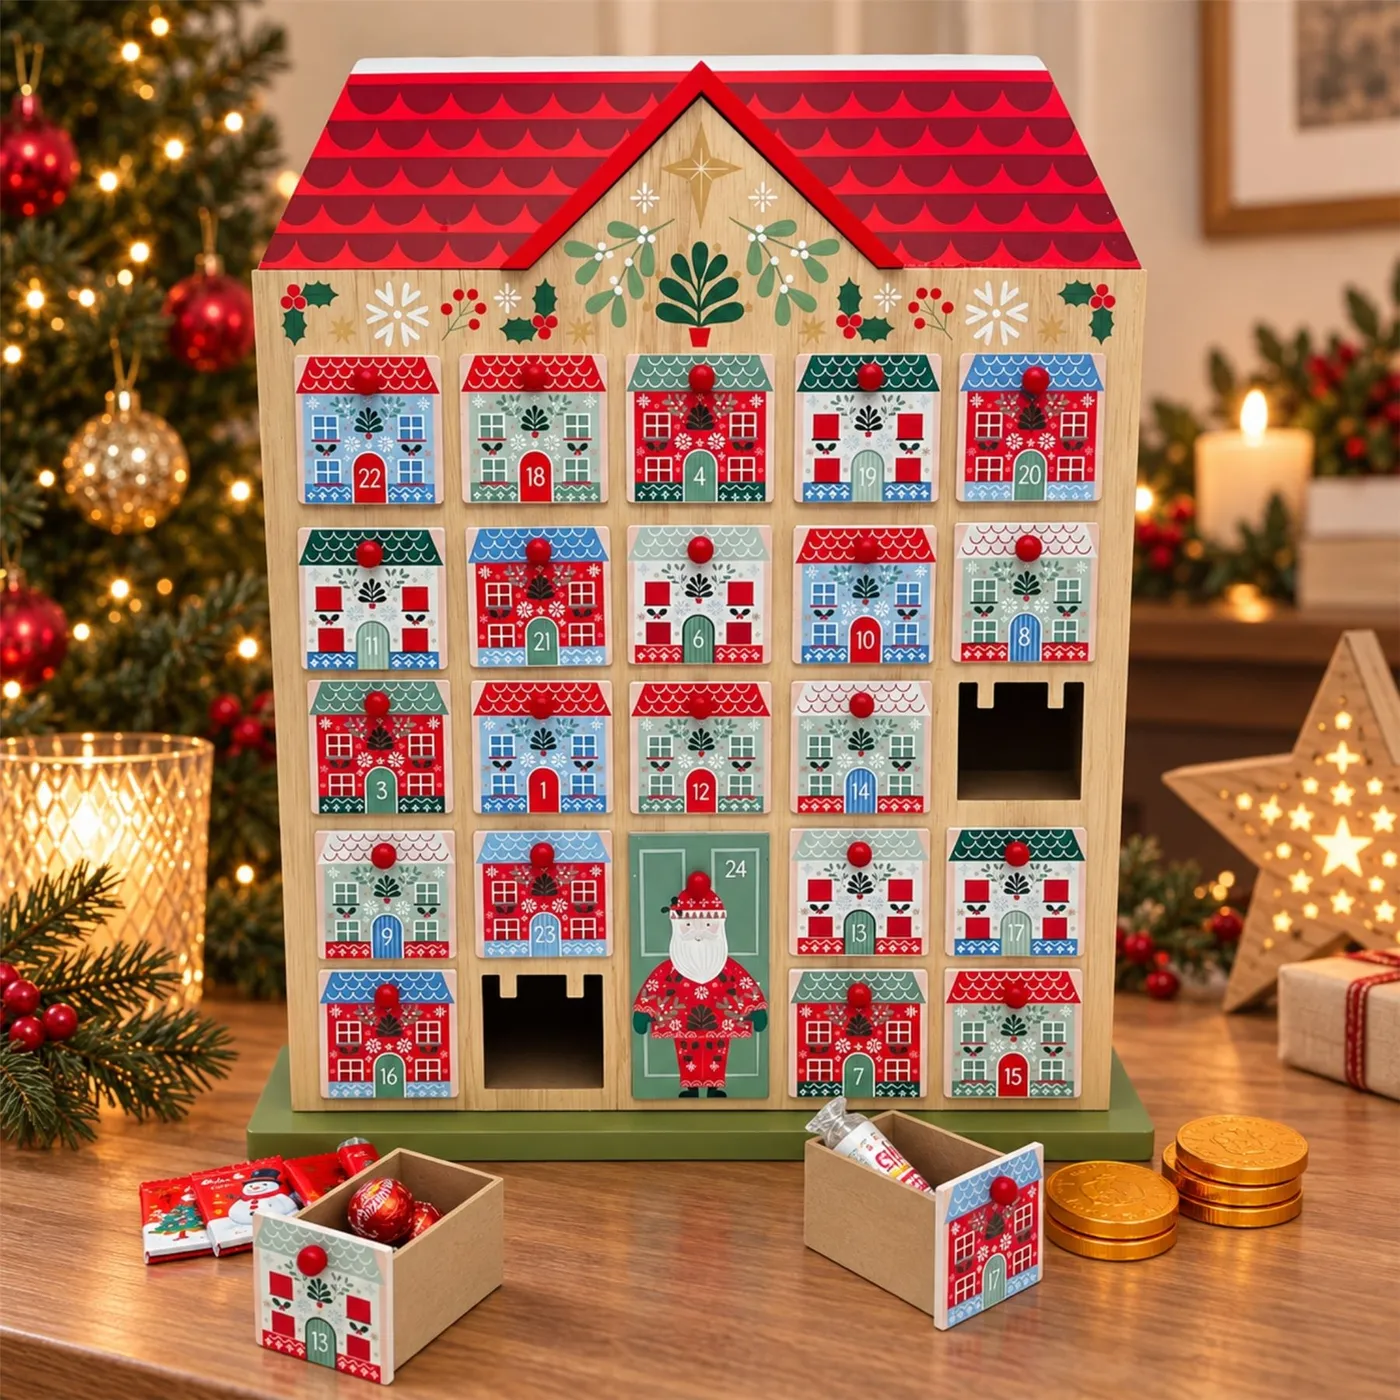
This one is small — plan on about 12 inches of width and 6 inches of depth on a tabletop or shelf. Because it’s short, it wants to sit 40 to 48 inches off the floor so you look slightly down into the drawers. Below 30 inches the little houses disappear into shadow; above a 60-inch sightline you lose the roof detail completely. That makes it great on a console or a deep window ledge and a poor fit for a tall empty wall.
- Put the glowing star lantern behind and to one side — never directly in front.
- Keep chocolate coins in a small dish rather than scattered, so they don’t compete with the numbers.
- Leave a 4-inch margin against the wall so the red scalloped roof has room to breathe.
18. Cream Fabric Pockets Between the Mantel and a Flocked Tree
Fabric calendars are the most forgiving build and the easiest to underestimate. Cotton and linen hold up beautifully — one cold hand wash in a mesh bag, laid flat to dry, and you’re done. What actually wears out is the pocket edge, because stuffing a candy cane into a shallow pocket twice a day for three weeks will stretch a seam. Reinforce each pocket corner with a small backstitch when you sew it. And don’t hang the whole thing from one loop: a loaded calendar weighs three to four pounds, and a single flimsy loop will eventually let go.
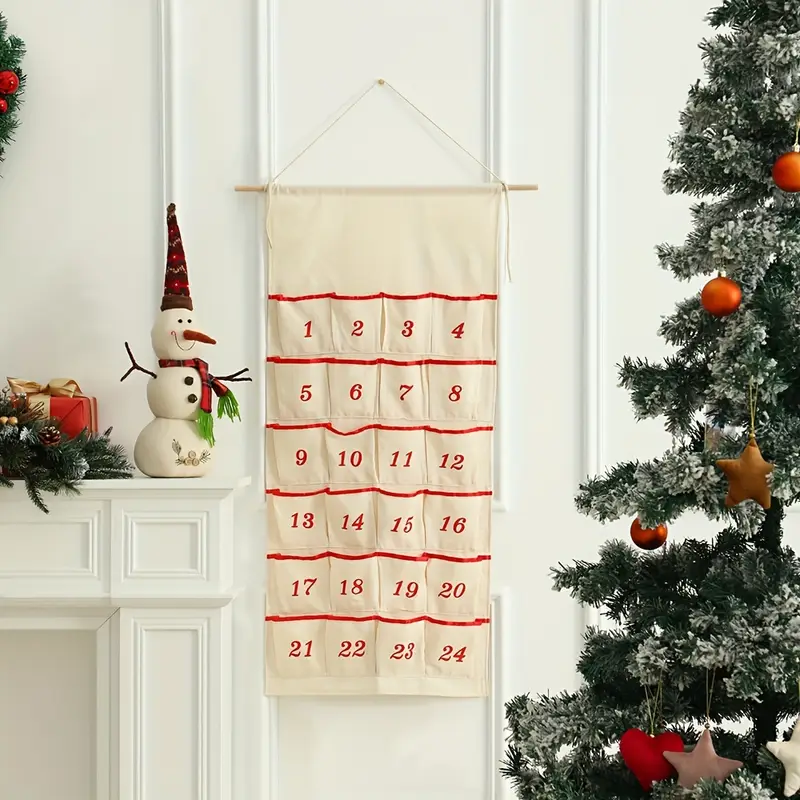
Run through this before you hang anything:
- Check the wall — painted brick and plaster both hate adhesive strips, so plan on a nail or screw.
- Measure mantel height if the calendar hangs beside one; the bottom pocket should clear the shelf line.
- Match the flocked tree to the calendar’s cream tone, or the white-on-white turns muddy.
- Confirm pocket depth — anything under 3.5 inches won’t hold a wrapped mini gift.
19. White House Calendar Glowing on a Dark Wood Coffee Table
- White house calendar with 24 numbered drawers — $55–$130
- Round dark wood coffee table, 30 to 36 inches — $120–$400
- Potted greenery plus a glass candle holder — $25–$55
- Evergreen garland for the fireplace — $20–$45
- Beige area rug, 5 x 8 — $90–$260
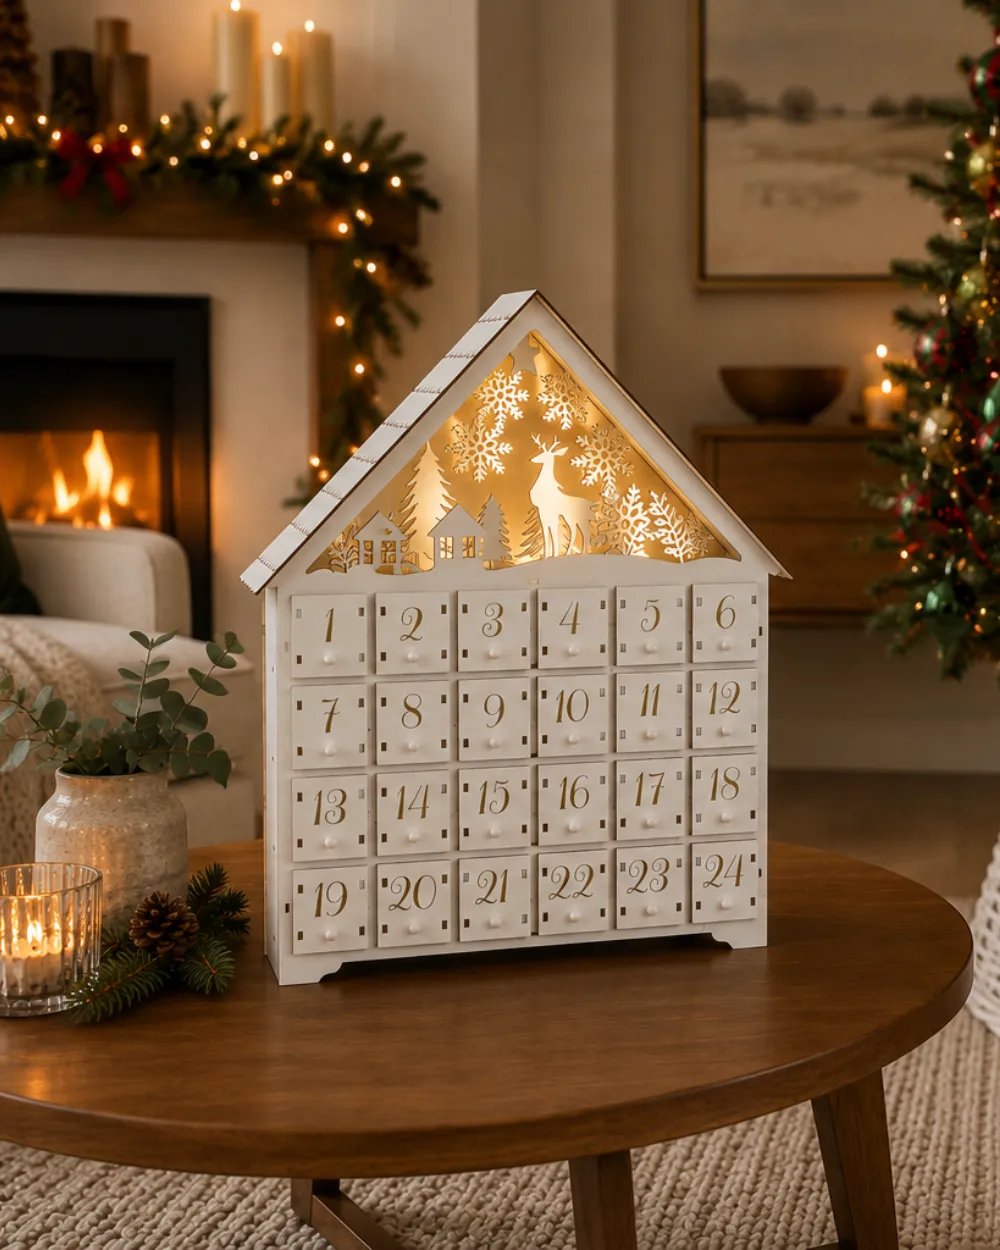
Total: roughly $310–$890, though the table, rug, and garland are the room, not the calendar. Budget alternative: keep the table you have, add a $12 thrifted tray, and set a single $8 potted fern beside the calendar — the vignette still reads.
Put this one on the coffee table, not the mantel. A mantel already has a job, and a low piece on a low surface changes how people interact with it — you have to sit down to open a drawer, which turns it into something you do together rather than something you walk past. Aim for the calendar to stand 2 to 3 inches taller than anything flanking it.
20. Paper Bags and Pine Sprigs on a Bare Branch
The branch is the whole idea. Not the bags, not the numbers, not the gold stickers — the branch. It’s the one element you cannot substitute without losing the entire feeling, because a raw, slightly irregular piece of wood makes 24 identical paper bags look gathered rather than manufactured. Any branch will do, but look for one with a natural bend and a few small side twigs. Straight shop-bought dowels give you the same structure and none of the life. Twenty minutes in a park beats a catalog order here.
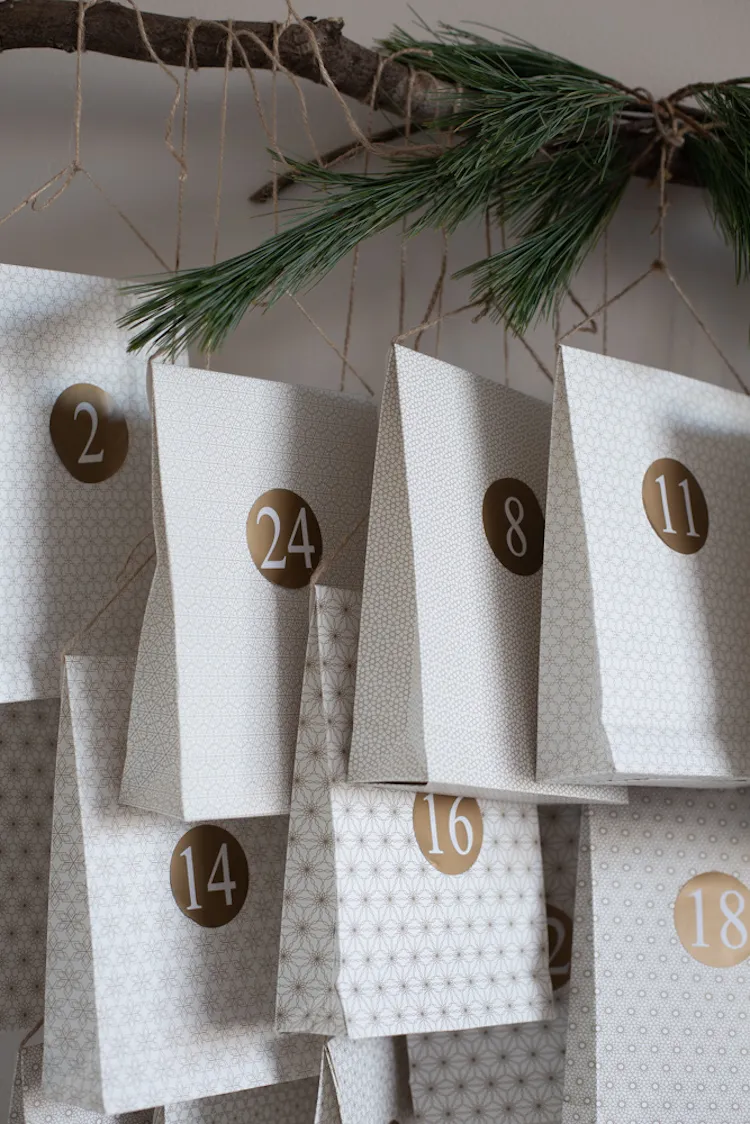
This is the cheapest idea in the entire article. A bundle of small kraft or patterned paper bags runs about $8 for 25 at a dollar store. Gold number stickers: $4. Jute twine: $3. A branch: free, and you walked past six of them this week. Fill them with anything — a tea bag, a lip balm, a scratch-off, a handwritten note. If you want the bags to survive more than one season, punch a hole and reinforce it with a $5 pack of eyelets. Total build: under $20.
21. Cream Pockets With Red Trim Between Two Flocked Trees
Two things to know before you go full white. First, flocked trees shed — not dramatically, but enough that a cream fabric calendar hung within brushing distance picks up a fine white dust by mid-December. Keep 8 to 10 inches of clearance. Second, white-on-white needs contrast to work, and the red banding on these pockets is doing the heavy lifting. Without it, the calendar disappears into the wall at exactly the moment you want it to be the star of the room.
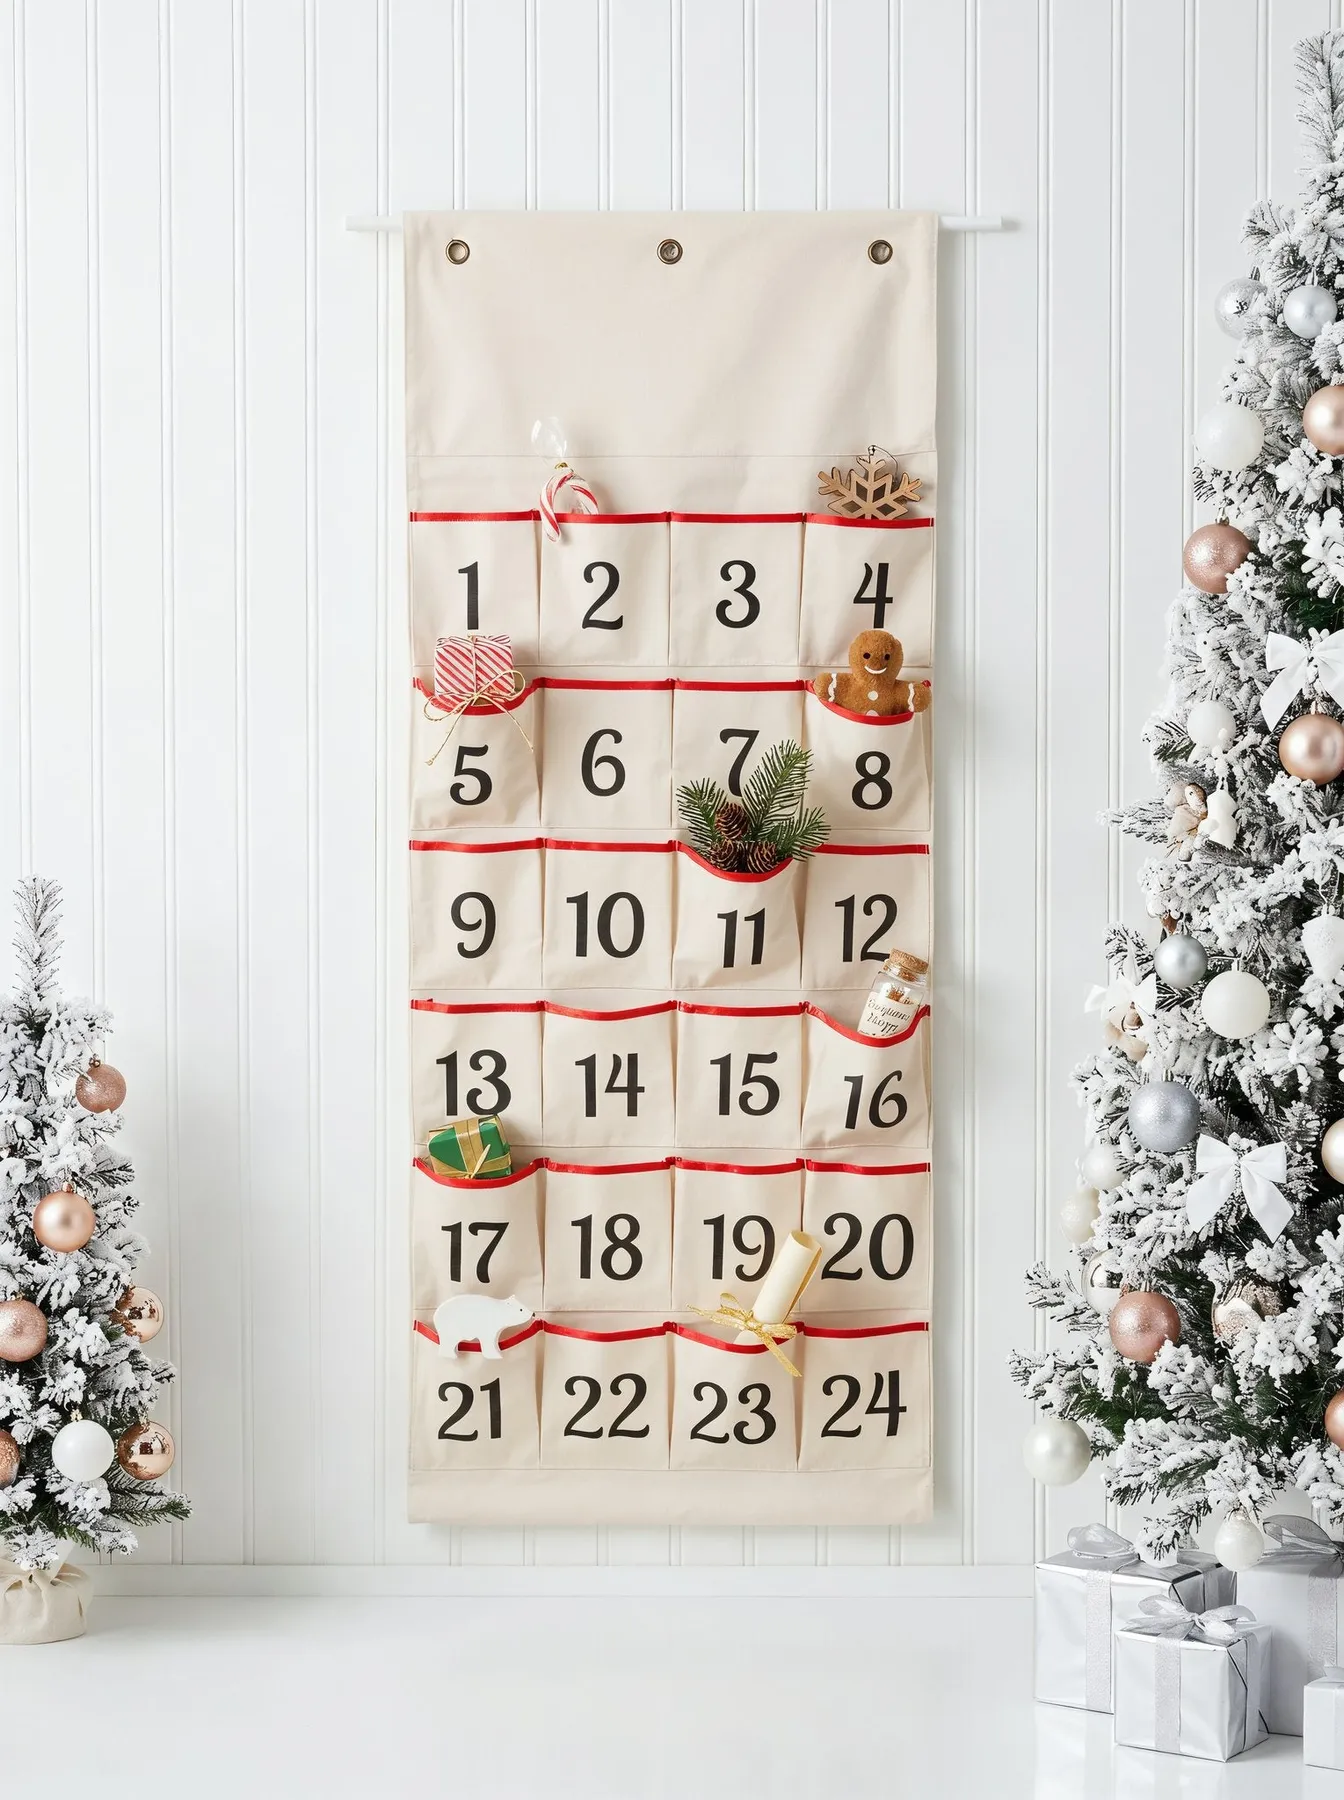
Adding red banding to plain pockets takes about an hour for 24 pockets and costs under $10.
- Cut 1.5-inch strips of red cotton across the grain so they curve slightly on their own.
- Press each strip in half lengthwise, wrong sides together, to make a firm edge.
- Pin the strip to the pocket top, raw edges together, and stitch a quarter-inch seam.
- Fold the band up, press, and topstitch an eighth of an inch from the fold to lock it flat.
- Repeat, then press all 24 pockets at once before assembling the backing panel.
22. Drawstring Fabric Bags With Felt Numbers and a Silver Bell
The ratio is roughly 55% natural brown and linen, 25% white, 15% red, and 5% silver. Notice how little red there is — that restraint is what keeps a homemade calendar looking intentional instead of crafty. Move the red to mustard and it goes warmer and more vintage. Drop the silver entirely and it turns rustic. Trade brown linen for gray flannel and you’re in winter-cabin territory. The percentages stay.
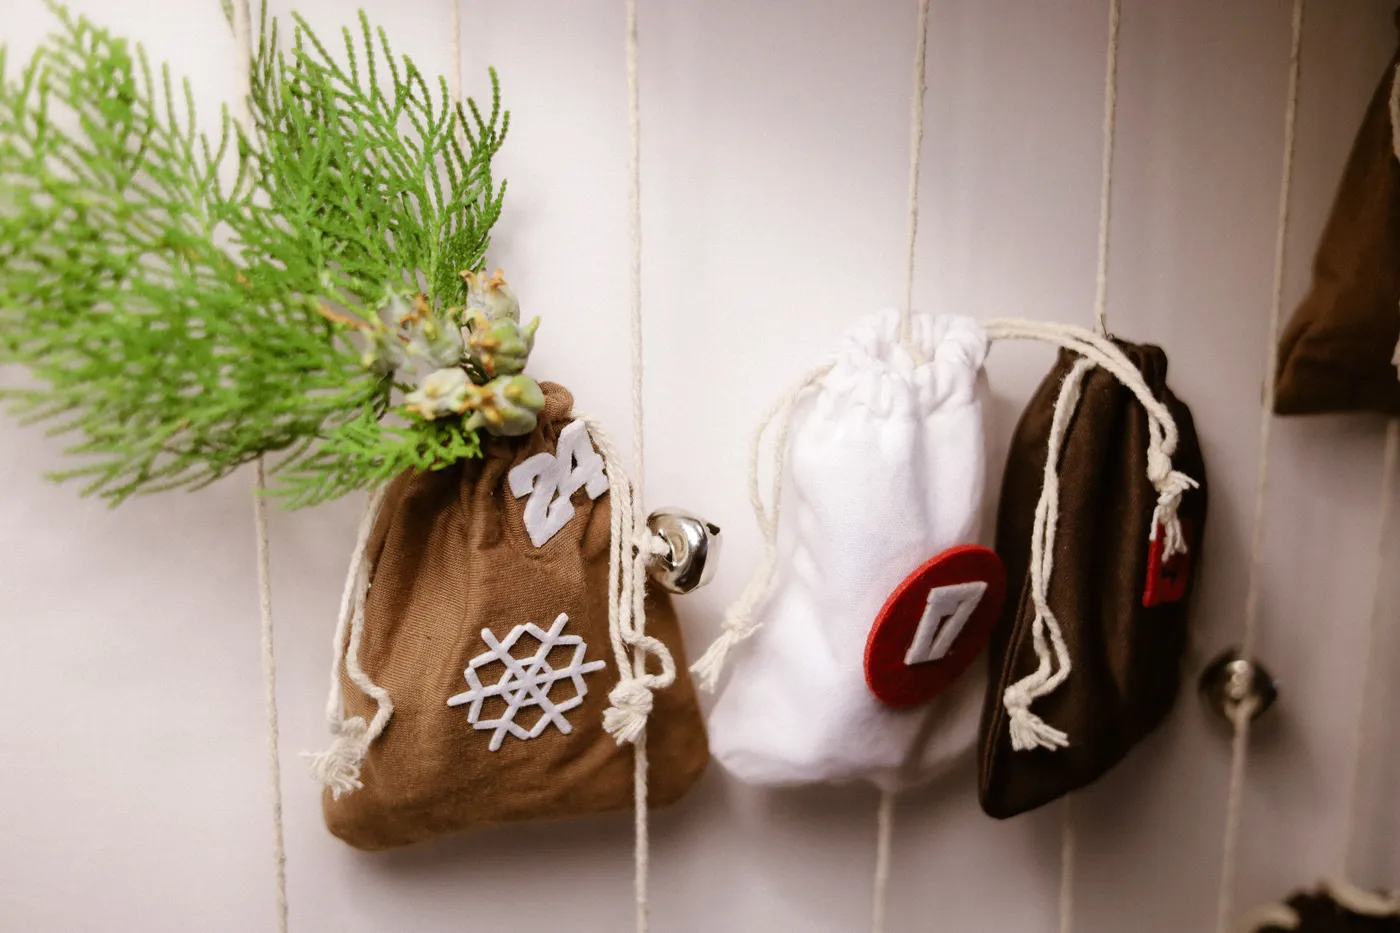
It works because everything is small. The numbers are small, the greenery sprigs are small, the bell is small — and when every element sits at the same scale, a three-bag display reads as complete rather than unfinished. The other principle is texture hierarchy: rough linen, smooth felt, soft greenery, one hard metal bell. Four textures, four materials, one palette. That’s the entire formula, and it scales to 24 bags without changing a thing.
Prefer paper to fabric? Idea #22 runs the exact same logic in kraft brown and gold.
23. Kraft Paper Bags With Evergreen Sprigs and Gilded Tags
Kraft paper and natural materials have been the dominant holiday aesthetic for three seasons running, and this is the year it consolidated. The reason is simple: it’s the style that photographs well in real homes, with real lighting, and no styling tricks. Brown paper, one sprig of evergreen, a printed tag — nothing here needs a photographer. It also has genuine staying power because it isn’t built on a color trend; it’s built on material honesty.
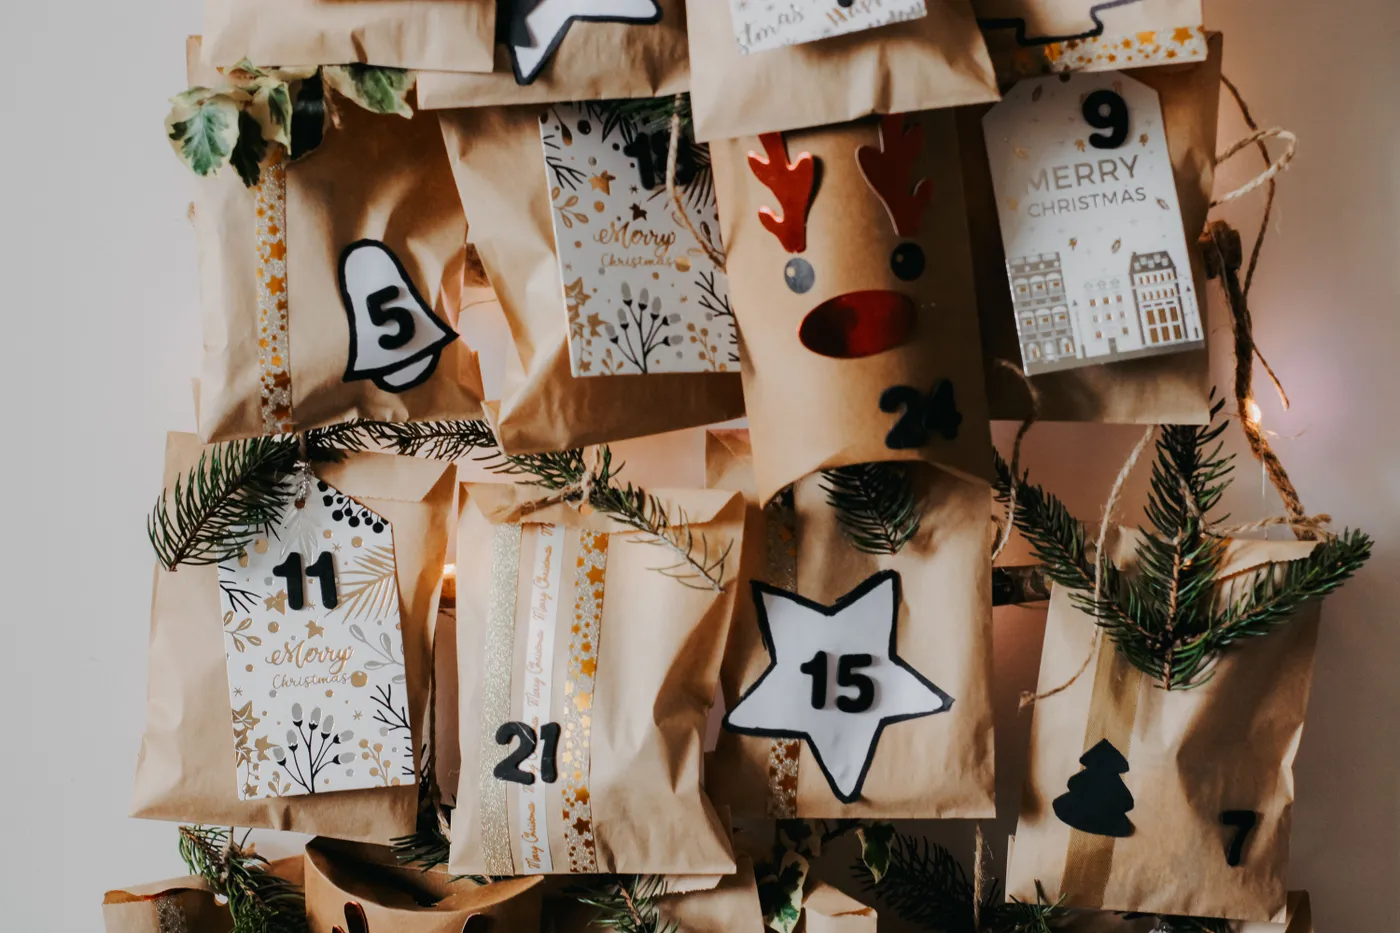
A 24-bag grid needs a wall run of about 40 inches wide and 32 inches tall, which is more than most people expect. Bags are typically 5 by 7 inches, so four across and six down is the most efficient layout. On a narrow wall, drop to three across and eight down — that’s 32 inches of width and 56 of height. Low ceilings fight this format; below 8 feet, switch to a single strung garland of bags instead of a grid.
24. A Wooden Block Calendar Topped With a Red Vintage Car
Small painted wooden calendars are deceptively fussy. Block calendars chip at the corners, especially the red ones, which show every nick, so a single coat of matte clear sealer right after you buy or paint them solves most of it. The plaid fabric underneath is the other story — it’s the piece that fades, so keep it out of direct afternoon sun if it stays out all season, and spot clean with cold water only. Warm water sets any red dye that bleeds, and then the whole vignette goes pink.
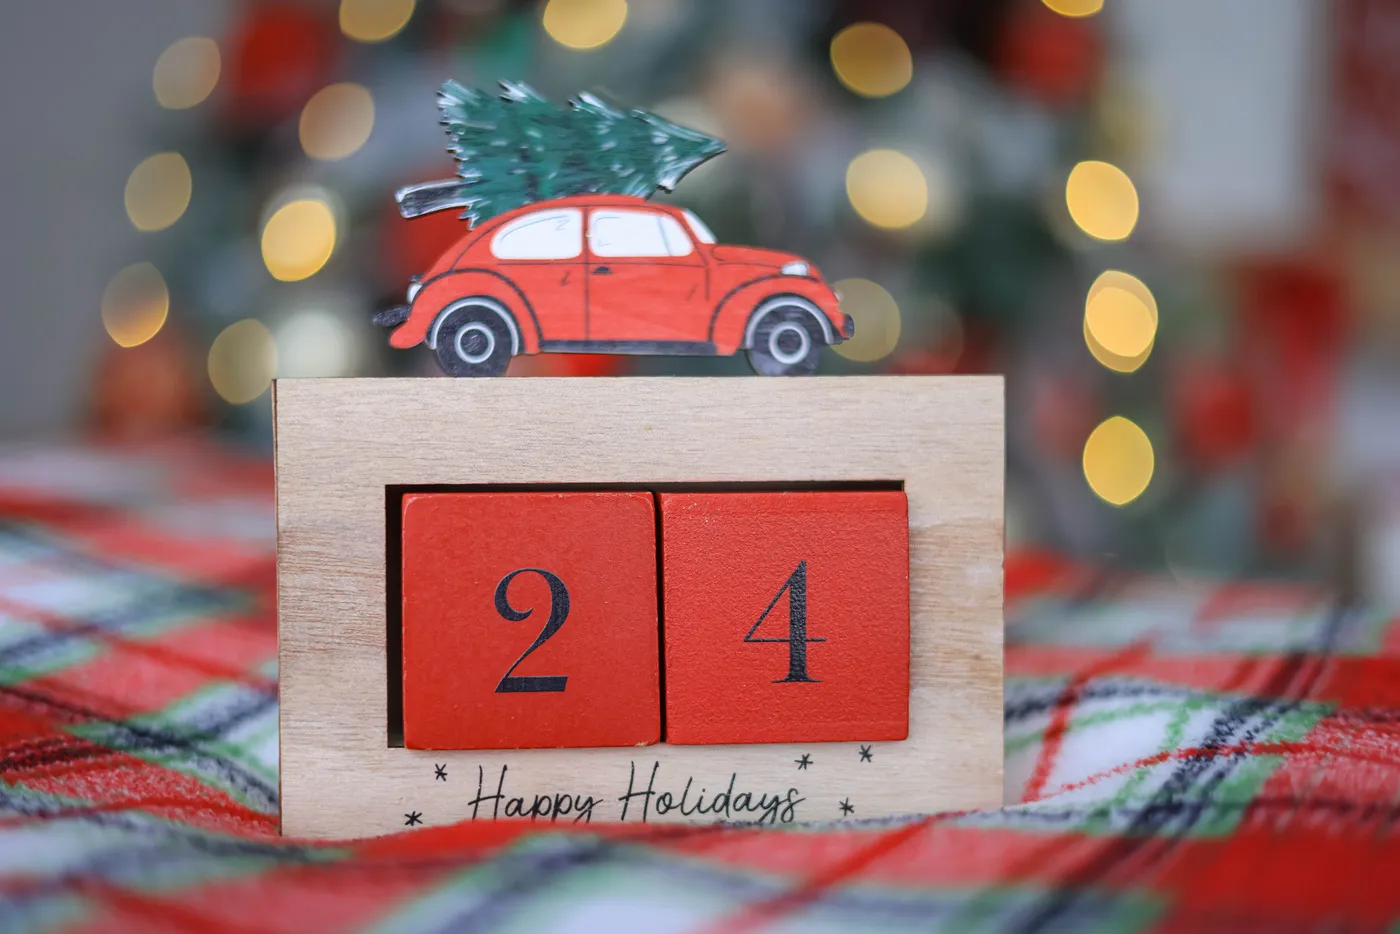
Quick checks before this goes on a shelf:
- Confirm block size — large blocks usually run 1.5 to 2 inches tall and need a truly flat surface.
- Check plaid scale against the blocks; a big plaid under small blocks looks mismatched.
- Test the car cutout’s balance — a light top piece on a narrow base tips easily.
- Keep the string lights at least 12 inches back, or they’ll blow out the number blocks entirely.
25. A Rustic Ladder Draped in Numbered Fabric Pouches
- Rustic wooden ladder, 4 to 5 feet — $30–$75
- 24 small fabric pouches — $24–$60, or sew from fat quarters at $2–$4 each
- Numbered tags or rubber stamps — $8–$18
- Small wooden clothespins, pack of 50 — $5–$10
- Mini ornaments: bells, pinecones, sprigs — $12–$25
Total: about $80–$190. Budget alternative: a thrifted ladder off Facebook Marketplace usually runs $15 to $25, and fat quarters from the clearance bin can put your pouches under a dollar each.
Lean the ladder at roughly 15 degrees — steeper and the rungs stop being usable, shallower and it looks like it’s about to slide. Then treat the rungs as shelves, not storage: vary pouch heights so the numbering doesn’t line up in strict rows. When every pouch hangs at the exact same height, the eye reads a grid; when they wander by an inch or two, it reads as collected. Clip the smallest ornaments to the rungs themselves, not the pouches.
26. Embroidered Linen Calendar With Twenty-Four Trinket Pockets
The embroidery is what separates this from a hundred printable calendars. Those stitched green trees, the warm yellow stars, the string of lights worked in thread — they give the fabric a raised texture that catches light and shadow from across the room. Remove the stitching and you have a nice linen rectangle with pockets. The embroidery is also what makes it worth keeping, and nobody frames a printable.
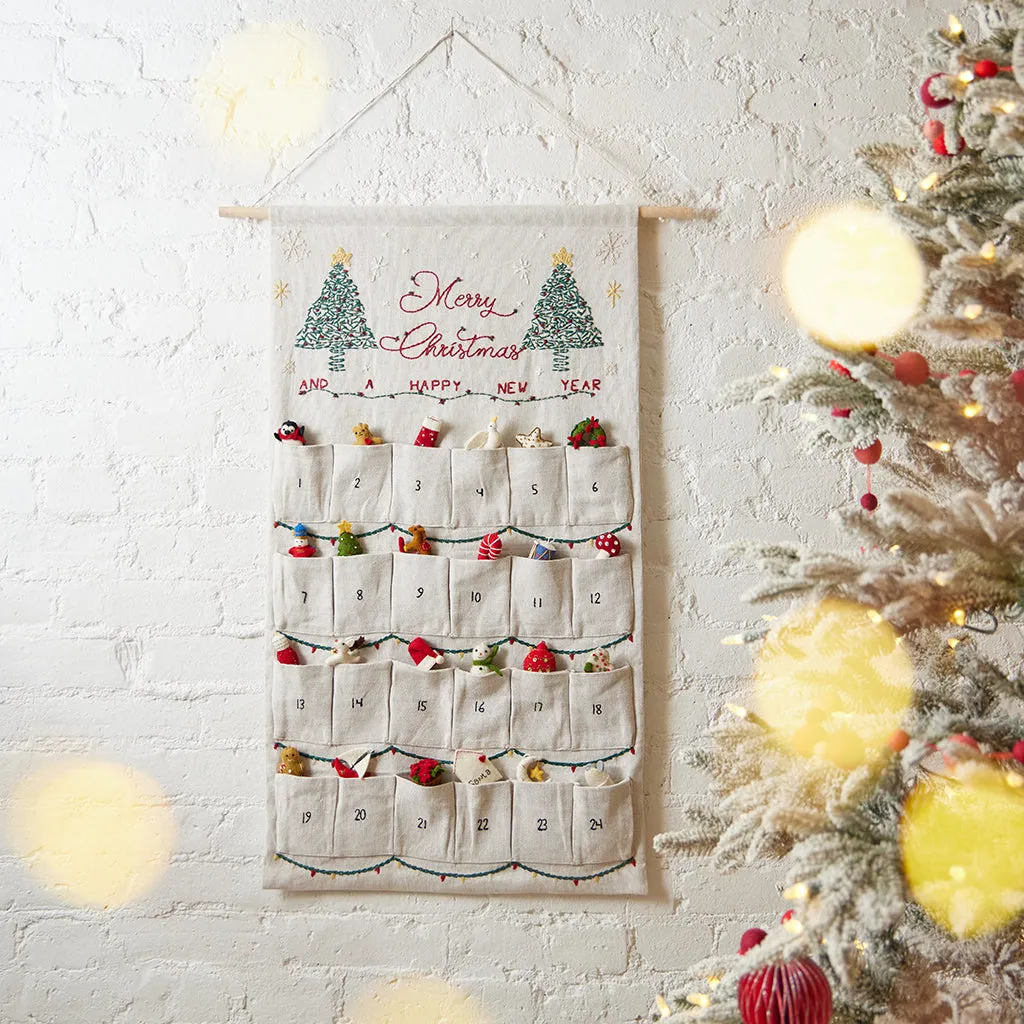
An heirloom-quality embroidered calendar can run $80 to $200. The budget route is a pattern plus patience. Download a simple tree-and-star design, print it on transfer paper, and iron it onto cream cotton for about $12. Then hand-stitch only the outlines, not the fills, which cuts the project from forty hours to eight. Number the pockets with a fabric marker and a stencil you cut yourself. If handwork isn’t your thing, a $20 printable fabric calendar from Etsy gets close on a wall, especially hung behind a garland.
27. Embroidered Trees, a Wooden Dowel, Honeycomb Garland Below
Dowel-hung fabric calendars are lovely and slightly unstable. The fabric is heavy, the dowel is thin, and by week three the center sags enough that the bottom row of pockets starts to angle. Use a dowel at least 1 inch in diameter, and don’t hang it from a single point — two hangers, 12 inches apart, keeps everything level. The garland underneath is the other quiet problem: if it’s tufted with pinecones, it will dust the bottom pockets every time someone walks past.
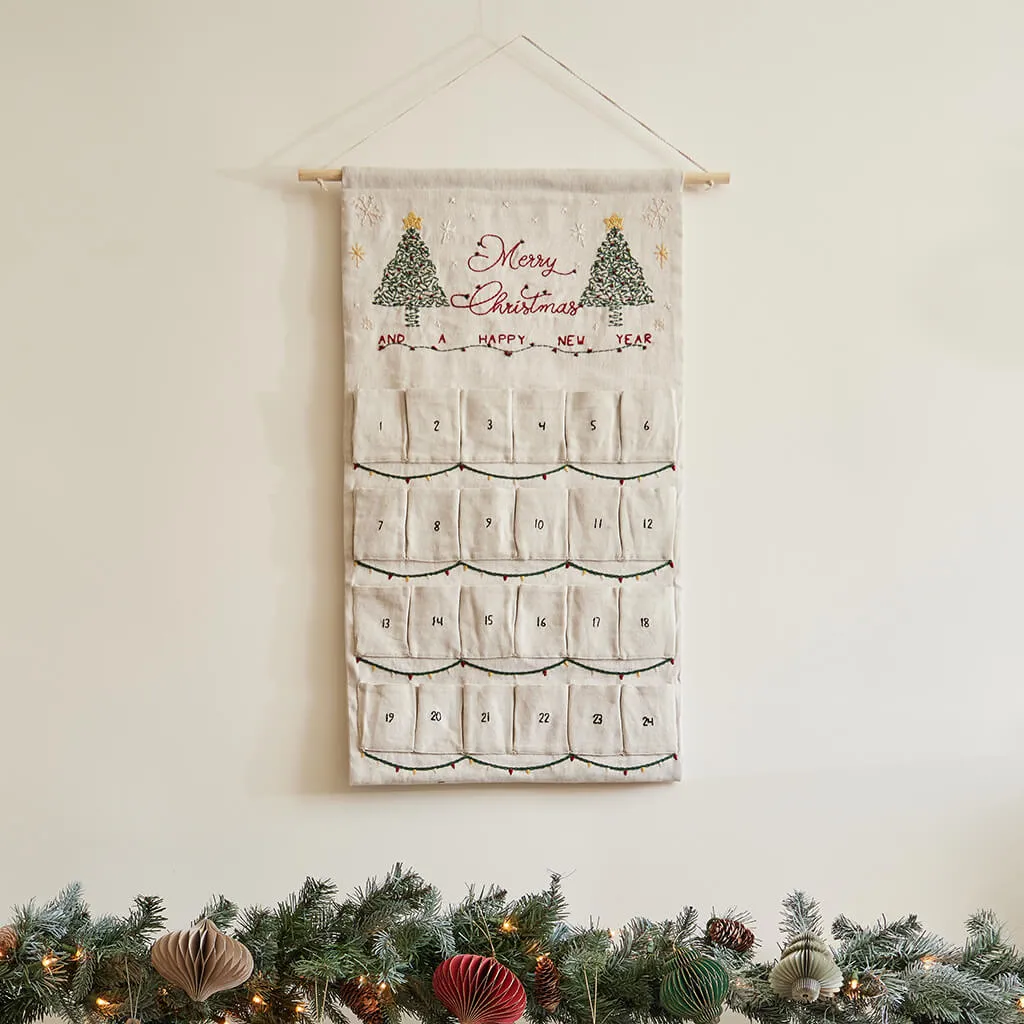
Hanging a dowel calendar on a rental wall takes 20 minutes and about $6.
- Lay the calendar flat and mark two hanging points 12 inches apart along the top edge.
- Stitch a 2-inch fabric loop at each mark, or knot jute twine tightly through the hem.
- Use two small picture hooks rated for 5 pounds each — not adhesive strips.
- Level with a phone app, hang the left hook first, then adjust the right to match.
- Step back, let the fabric settle ten minutes, then re-level once it relaxes.
For a closely related look with far fewer hardware headaches, see Idea #25.
28. White Fabric Pockets With Red Zigzag Trim
About 70% white, 20% red, and 10% natural wood — the same formula as a classic Scandinavian Christmas, just applied to a fabric calendar. The red zigzag trim does all the accent work without adding a single new material. Swap red for black and it reads modern graphic. Swap white for oatmeal and red for rust and it turns warm and vintage. Keep the wooden dowel either way.
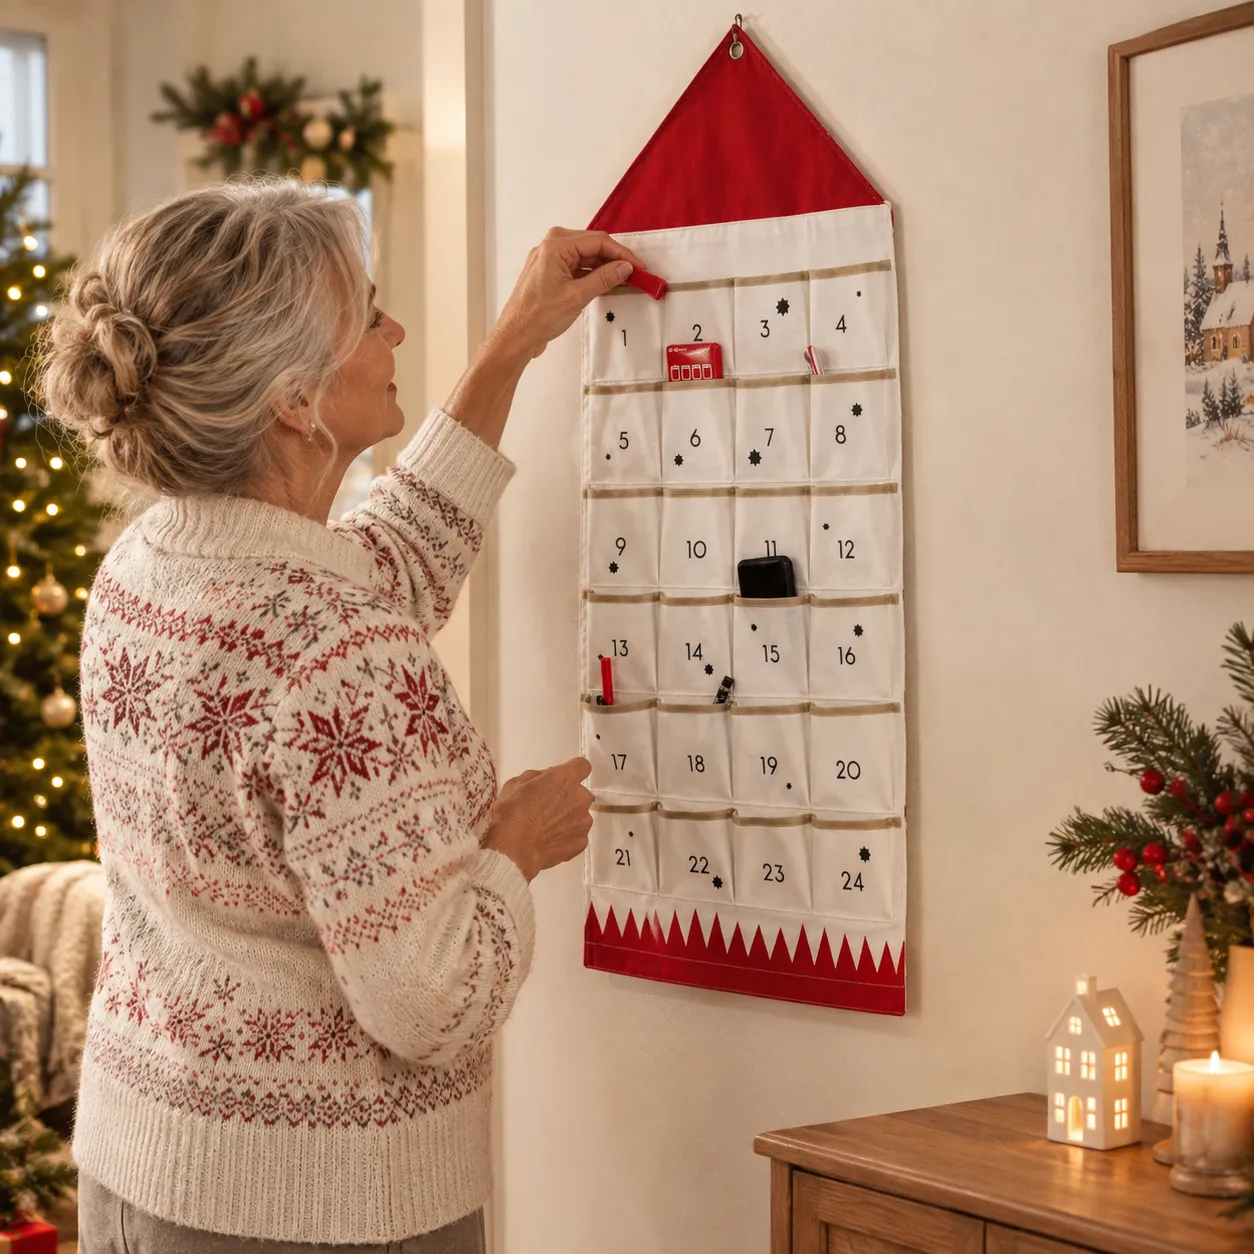
The zigzag is doing something specific. A straight horizontal band would cut the calendar into stripes; a zigzag creates movement that pulls your eye down the column of pockets, which is exactly what you want from a countdown. The red trim also frames each pocket individually, so every day reads as its own small present rather than one of twenty-four identical slots.
Cut each pocket 4.5 by 5 inches. After a quarter-inch seam allowance you finish with a 4-inch opening, which is the practical minimum for a chocolate orange, a mini candle, or a folded pair of socks. Anything smaller and you’ll be stuffing items in sideways and cursing by day 8.
- Press every pocket after sewing — wrinkles show badly on white fabric.
- Back the whole panel with fusible interfacing so pockets don’t droop when loaded.
- Use a 1-inch wooden dowel and stain it, rather than leaving it raw pine.
29. A Wooden Stable Calendar With White Nativity Silhouettes
Quiet religious decor had a real resurgence this season, and it’s less about tradition than contrast — in a market full of glitter and neon, a clean white silhouette against warm wood stands out by being calm. Designers have been calling it the quiet Christmas look, and it photographs beautifully because nothing competes for attention. It’s also one of the few advent designs that works just as well empty as it does full.
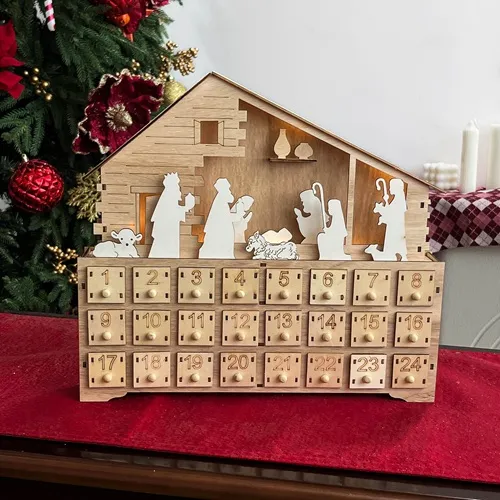
Nativity-stable calendars are deeper than they look. Plan on at least 8 inches of shelf depth for the stable structure, plus 2 more for the candles and greenery beside it. Width runs 12 to 18 inches depending on how many drawers you’re housing. Because the silhouette is white on light wood, it needs a dark surface beneath it to register — that deep red cloth is doing real work. Set it on light oak and it washes out entirely.
30. Plush Snowman With Pockets in His Belly
Plush calendars are the most forgiving in terms of durability and the least forgiving in terms of cleaning. Faux fur trim and knit scarf fibers trap dust, pet hair, and glitter faster than anything else on this list. Vacuum the whole thing on low with a brush attachment every two weeks through December — no water, no spot treatments, or the plush mats permanently. Store it flat in a breathable cotton bag, never in a vacuum-sealed bin, or the fur will hold the creases until next year.
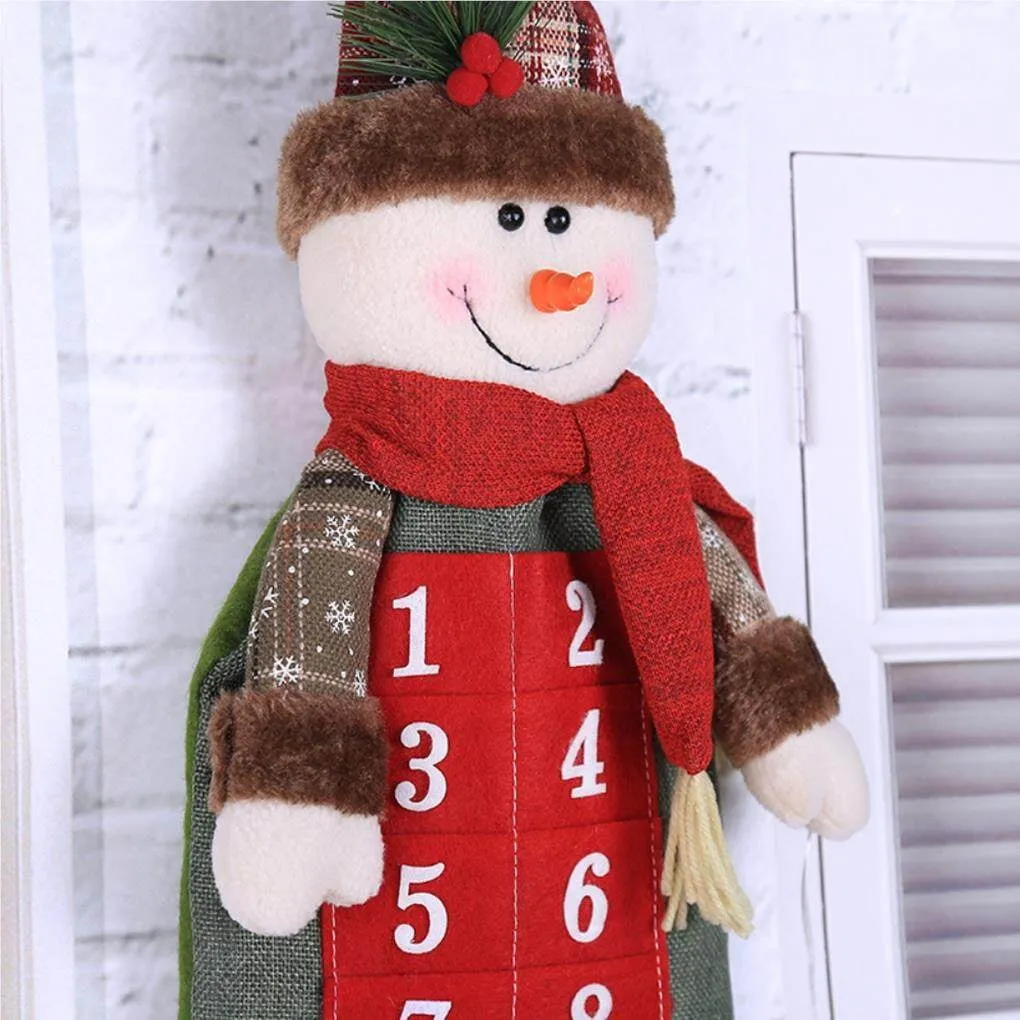
Before you commit to a plush calendar:
- Consider your household — if a pet climbs, hang it above 48 inches.
- Confirm hanger strength; a stuffed plush calendar can weigh 4 to 5 pounds.
- Pick a wall with contrast, since white plush vanishes on white walls.
- Plan the fill, because deep plush pockets are genuinely hard to reach into.
31. Lit Village Windows on a Multi-Level Wooden House
- Light wood multi-level house calendar with 24 drawers — $70–$160
- Warm-white micro LED set, USB or battery — $14–$28
- Rustic wooden table or console — $90–$300
- Miniature village extras: figures, fences, snow — $16–$40
- Warm string lights for the tree behind — $18–$34
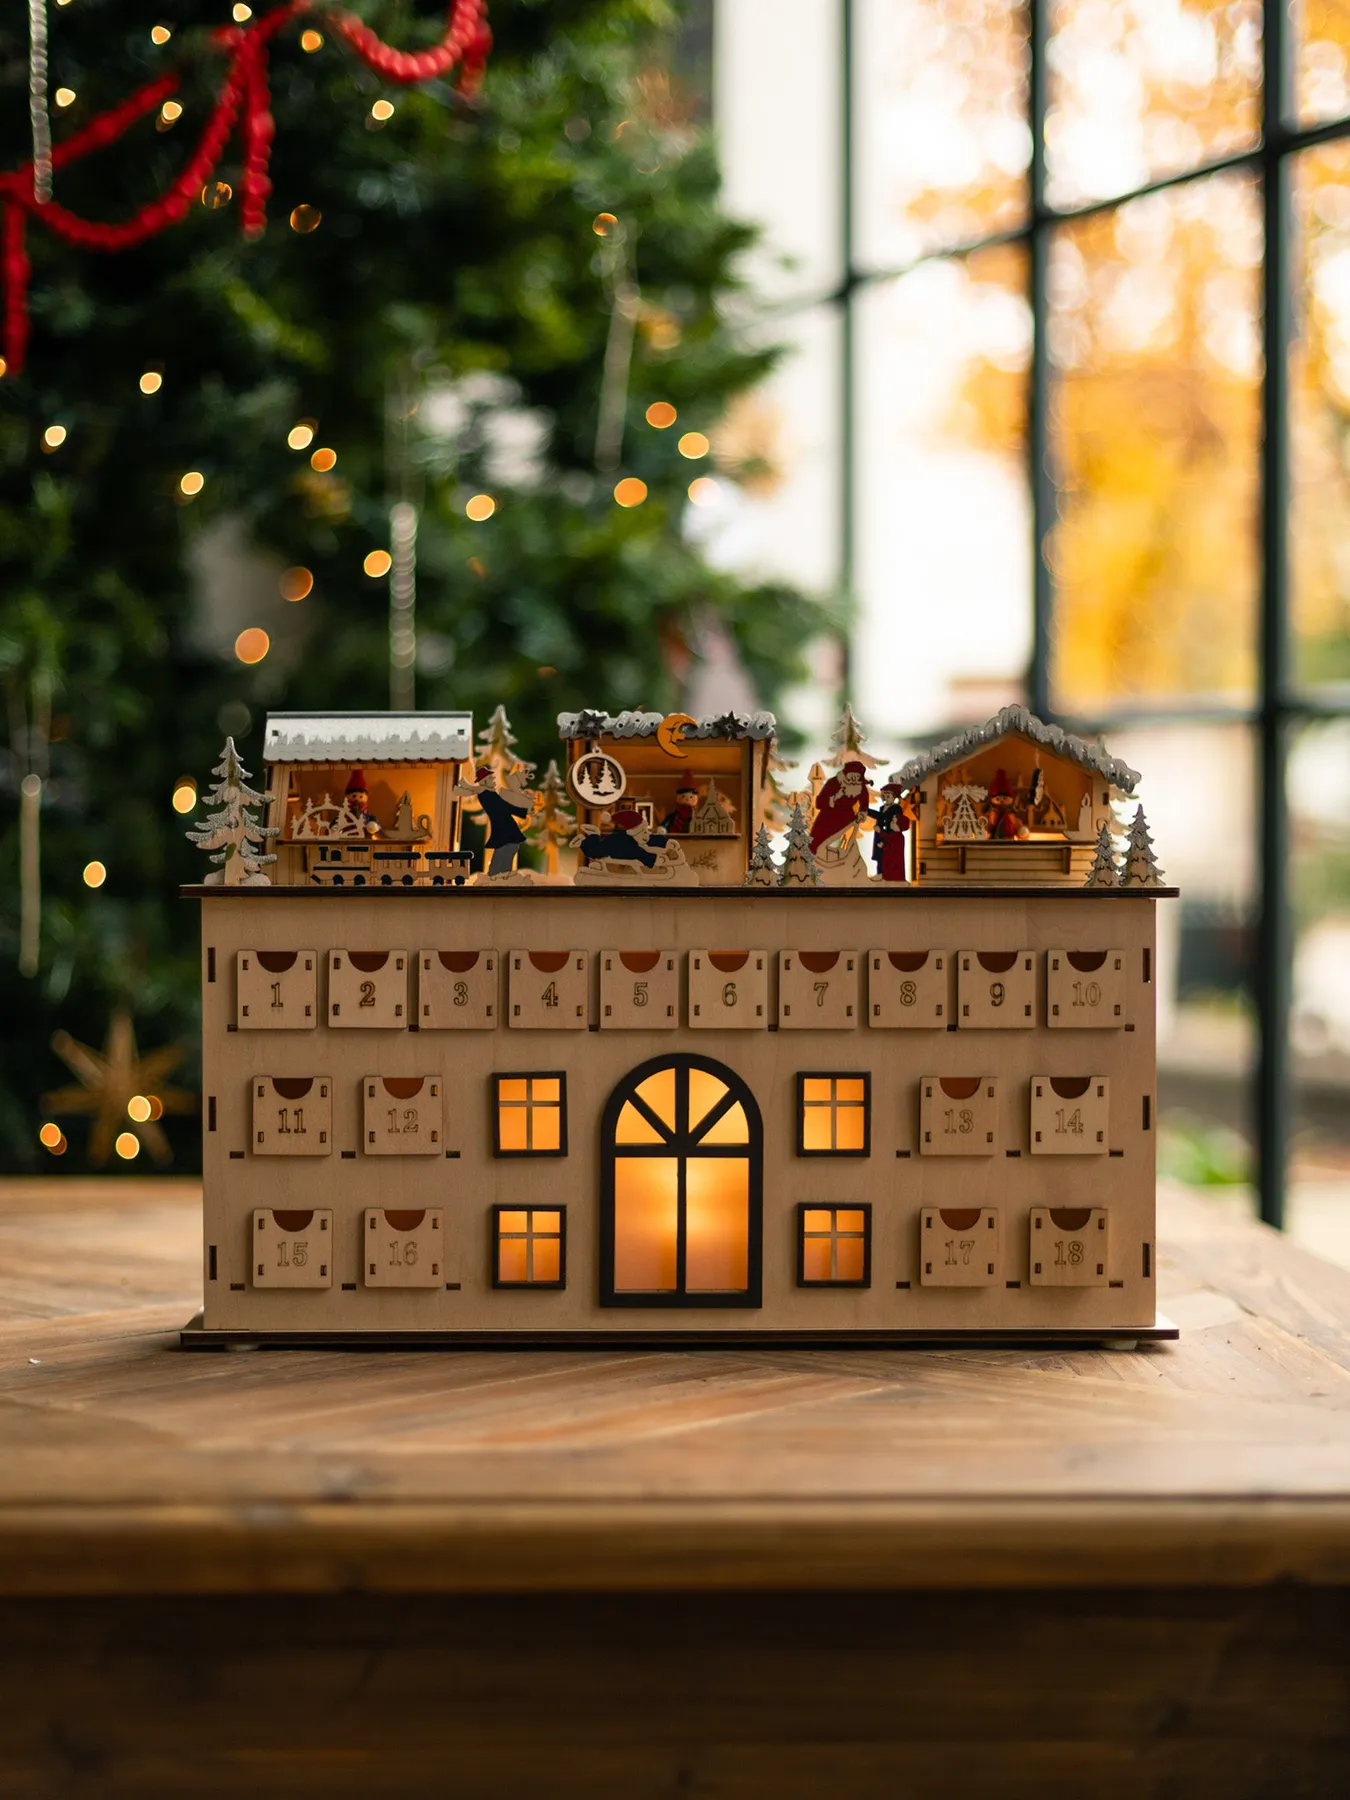
Total: about $210–$560, with the table doing most of the damage. Budget alternative: a $25 thrifted end table works fine if you wax or restain it, and dollar-store miniatures fill the top tier for under $10.
Keep the top-tier village to five pieces, tops. Multi-level calendars invite over-styling, and the more you pile up there, the less the illuminated windows below read. Place the calendar so you approach it from the front and slightly to the left, too — the drawer numbers land on the right side of most of these units, and that’s the side you want facing the room.
Compare with Idea #18 — same lit-window idea, but styled for a coffee table instead of a console.
32. Book-Shaped Gifts Wrapped in Red, Green and Gold
It’s the wrapping — specifically the fact that every gift is shaped like a book. That single decision changes everything: a box of books reads as a library, a shelf, a year of reading, and it turns a countdown into anticipation rather than a sugar delivery system. Flat rectangles also stack and line up beautifully inside a rectangular box, which is why the format looks so satisfying in a photo. Remove the book shape and you have a normal pile of presents.
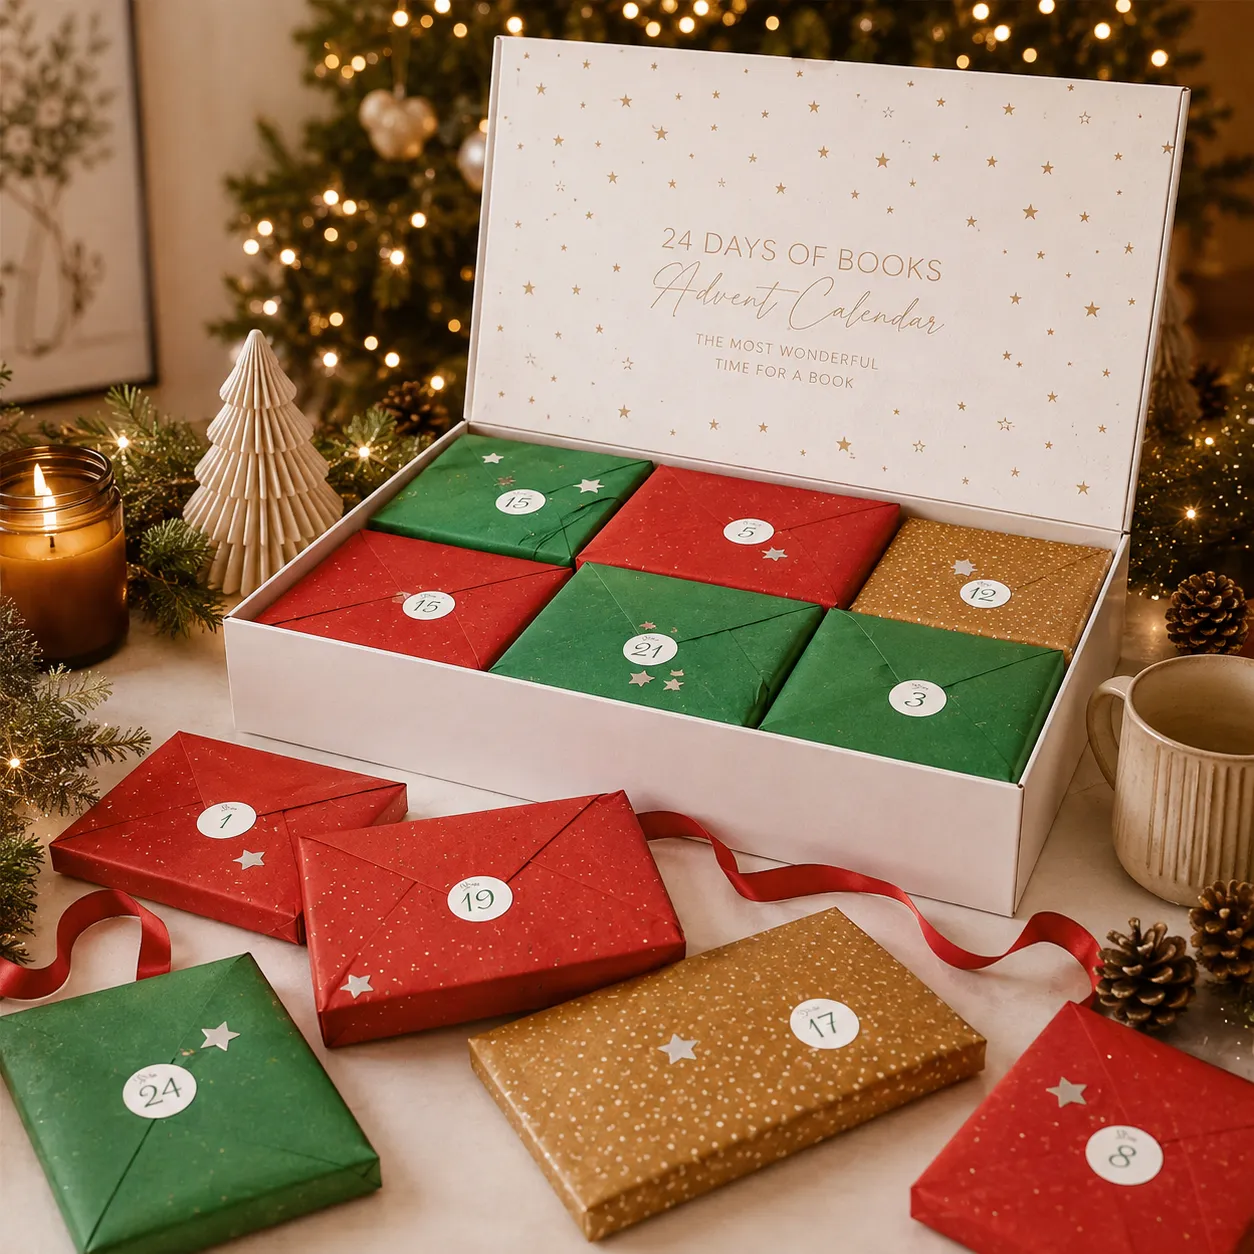
Wrapping paper and tape are the entire budget here. Dollar-store kraft paper is about $1.25 a roll, and red, green, and gold ribbon comes in at $3 from any craft aisle. Numbered star stickers: $2. If you want actual books, thrift shops sell paperbacks for $1 to $3, so a 24-book calendar lands around $50 — or fill it with book-shaped boxes holding a note, a bookmark, or a $5 gift card. The white box itself is the only real purchase, around $20.
33. Marble and Wood Cones Lined Up on a White Shelf
Cone calendars look effortless and are quietly annoying. They’re top-heavy, so a light bump sends the whole row down like dominoes, and small number stickers on a curved surface peel within a season. Weight the base of each cone with a few coins or a bit of polymer clay before you decorate, and seal the number stickers with a thin layer of matte medium. Also check the shelf itself: a 1-inch-thick floating shelf will visibly sag under twelve cones over the course of a month.

Making faux marble cones takes about 40 minutes for twelve and costs around $15.
- Buy plain papier-mâché or foam cones in mixed heights, 4 to 8 inches.
- Base-coat each in matte white and let them dry fully, about 30 minutes.
- Sponge on light grey paint in irregular, thinned patches — never in lines.
- Drag a dry brush lightly across the surface to blur the edge of each patch.
- Apply a small round number sticker off-center, then seal with matte medium.
- Mix in two or three plain wood-tone cones so the row doesn’t read as a matched set.
Twenty-Four Tiny Moments, One Wall That Earns Them
Pick the version that fits the wall you actually have — a bare branch, a leaning ladder, a thrifted cabinet, or a plain wooden box that just needed better shelfmates. Refill it, restyle it, and it will keep working for you long after December 26, which is more than the cardboard box ever did.
📌 Pin your favorite one now, so it’s waiting for you in November when everyone else is panic-buying chocolate.