You know the feeling: you’ve pinned forty Grinch trees and none of them look like they’d survive contact with your actual living room. Same here. So we went looking for the ones that would.
After filtering through hundreds of options across Etsy, Target, Walmart, and HomeGoods, we narrowed it down to 30 ideas that actually deliver — from a $4 pack of mini Santa hats to a $1,200 full Whoville entryway. Some links below are affiliate links, which means we may earn a small commission at no cost to you.
Inside you’ll find flocked trees, pastel Whoville corners, a pancake-house village, and the exact ribbon math behind them, with budget and luxury versions compared side by side.
2026 is the year character decor went full editorial — Whoville searches keep climbing on Pinterest, and this time the palette is as likely to be pastel pink as it is lime green.
And stay until the end — we break down the most common mistakes that can ruin these looks. 📌 Save this to Pinterest for later — you’ll want to revisit these ideas.
1. A Flocked Tree Loaded With Striped Ribbon and Plush Grinch Characters
Flocked trees eat ornaments — the white coating makes every bauble read smaller. On a 7.5-foot flocked tree, plan for 90 to 110 ornaments plus 12 to 15 picks, and build in three passes: picks first so they sit deep in the branches, ribbon second in loose 8-inch loops woven between tips, ornaments last and only on the outer third. Anything pressed against the trunk disappears into the flocking and you’ve wasted half your budget.
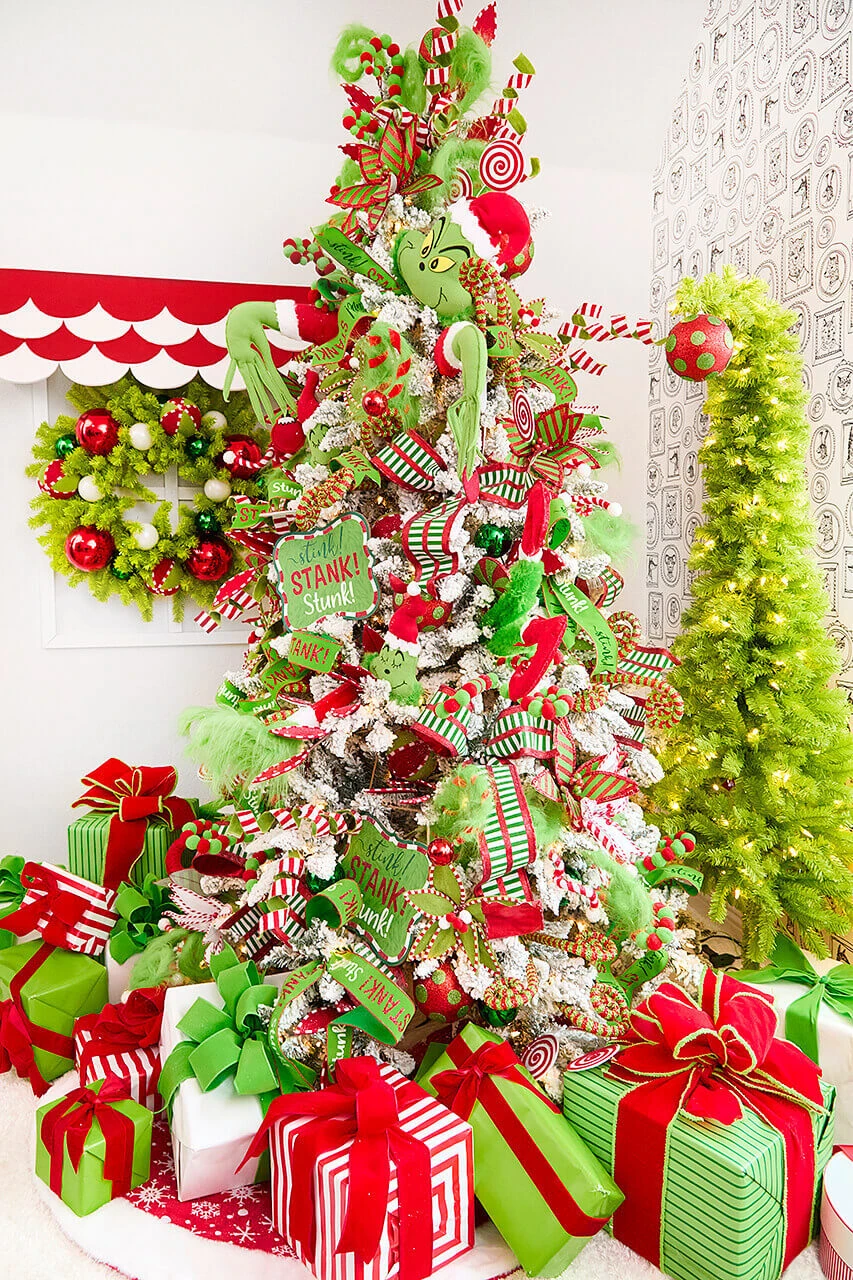
The reason this tree reads as designed rather than just decorated comes down to contrast and repetition. Snow-white flocking against bright lime green is the highest-contrast pairing in holiday decorating, and the striped ribbon repeating at three or four depths keeps your eye moving instead of stalling on one ornament. The oversized bows stacked under the tree echo the ribbon above — same motif, different scale.
2. A Slim Hallway Tree With Grinch Arms Reaching Out of the Branches
Plenty of Grinch trees have a character topper. What makes this one stop you is the pair of green arms threaded through the middle branches, gloves splayed, like the tree is being burgled from the inside. Take the arms away and you have a nice slim tree in a hallway. Leave them in and the tree has a plot. If you buy one accessory this year, make it the limbs.
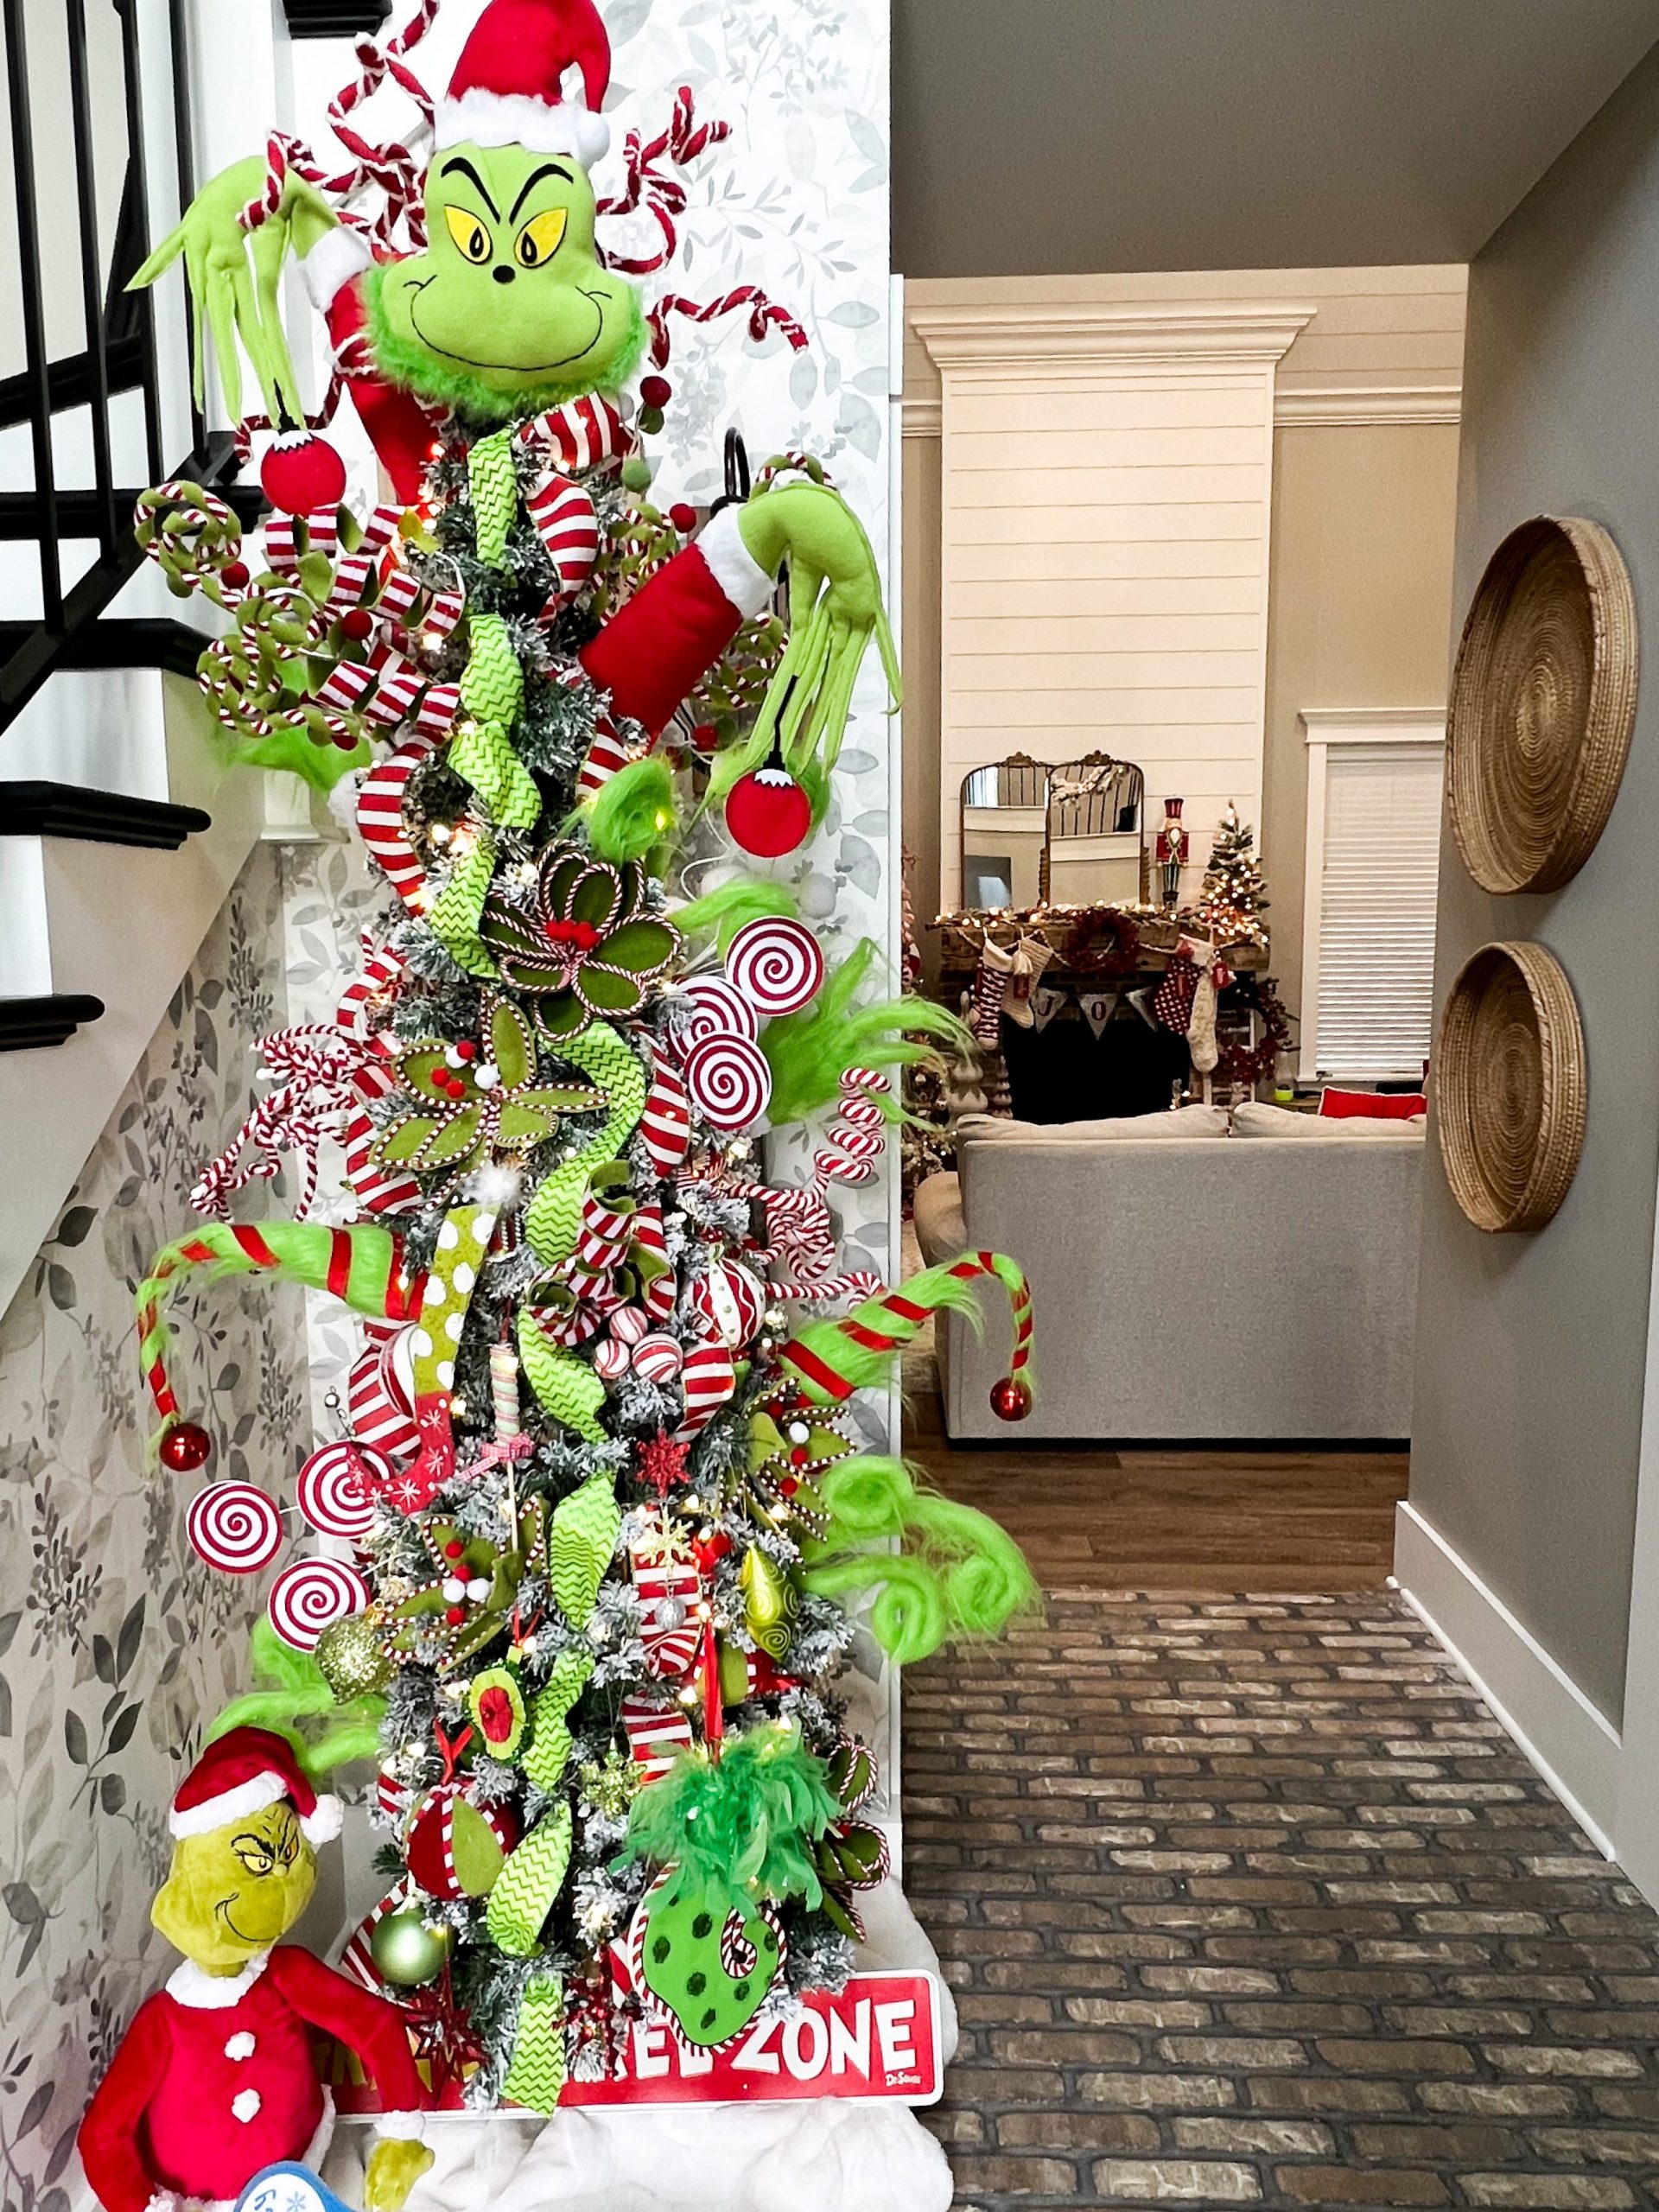
This is a narrow-tree solution, and narrow is the entire point — a 24- to 30-inch-wide slim tree is what fits a hallway 36 to 42 inches across. You need 8 to 10 inches of walking clearance on at least one side, so measure your narrowest point, not the widest. Tall foyers can go to 9 or 10 feet; standard 8-foot halls top out around 7.5. Compare with Idea #20 if you’ve got room for a full-width flocked tree instead.
3. Fuzzy Green Pom-Poms Wearing Tiny Santa Hats
This look is almost embarrassingly cheap to fake. Two-inch lime green pom-poms run about $6 for a 30-pack at any craft store, miniature red-and-white Santa hats come in 12-packs for $5, and a bag of gold baubles from Dollar Tree is $1.25. Glue a hat onto each pom with a dot of hot glue and you’ve got a designer-looking ornament for under 40 cents. Total for 40 ornaments: about $25.

Cluster the fuzzy ornaments in odd-numbered groups of three and keep them on the outer third of the branches — pom-poms pushed toward the trunk just look like moss. Balance that matte texture with something reflective every 8 to 10 inches: gold baubles, glass, a few metallic picks. Roughly one shiny ornament for every three fuzzy ones keeps the tree from reading as a craft project.
4. A Flocked Tree With Lime Mesh Ribbon and Grinch Figures in Santa Suits
The formula here is roughly 60 percent flocked white, 25 percent lime green, 10 percent crimson, and 5 percent natural wood from the floor and the sign stake. That ratio is why it doesn’t tip into chaos — the white does the heavy lifting and the lime stays an accent, not a base. Swap crimson for cherry red and you lose nothing. Swap the white flocking for a dark green tree and the whole thing goes muddy, so keep that one constant.
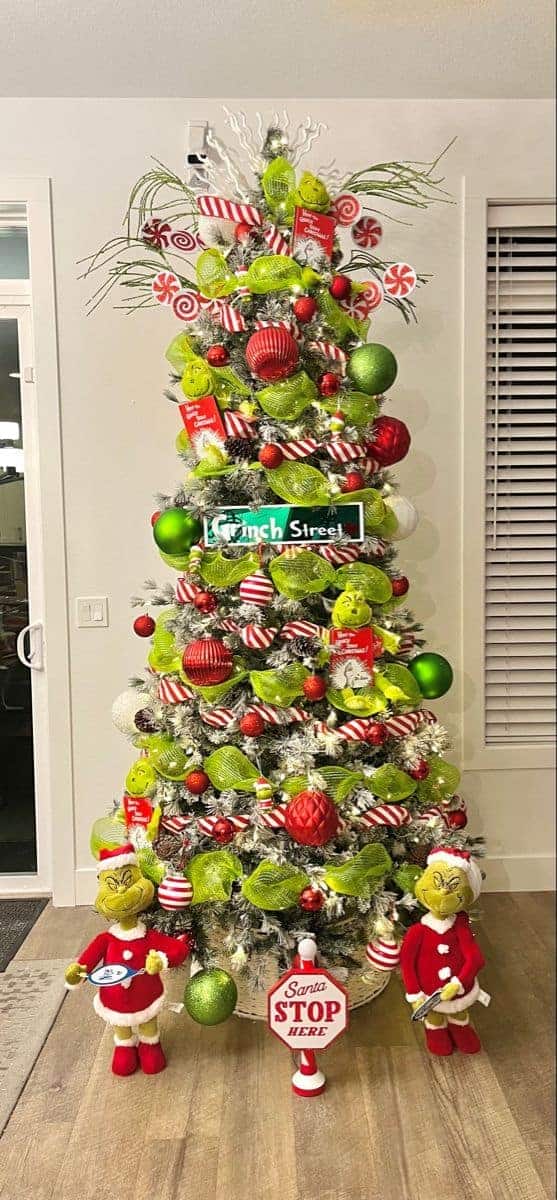
Two honest warnings. Mesh ribbon is unforgiving — it snags on every branch tip, holds a crease forever, and looks cheap if you pull it tight instead of leaving it billowy. And flocking sheds. Expect a fine white dust under the tree all season, plus a vacuum filter you’ll want to clean in January. If you have a flocked tree and a long-haired pet, budget for a lint roller subscription.
5. A Dining Table Set for Whoville, Down to the Boxwood Chair Wreaths
Build the centerpiece in this order and it takes about 45 minutes:
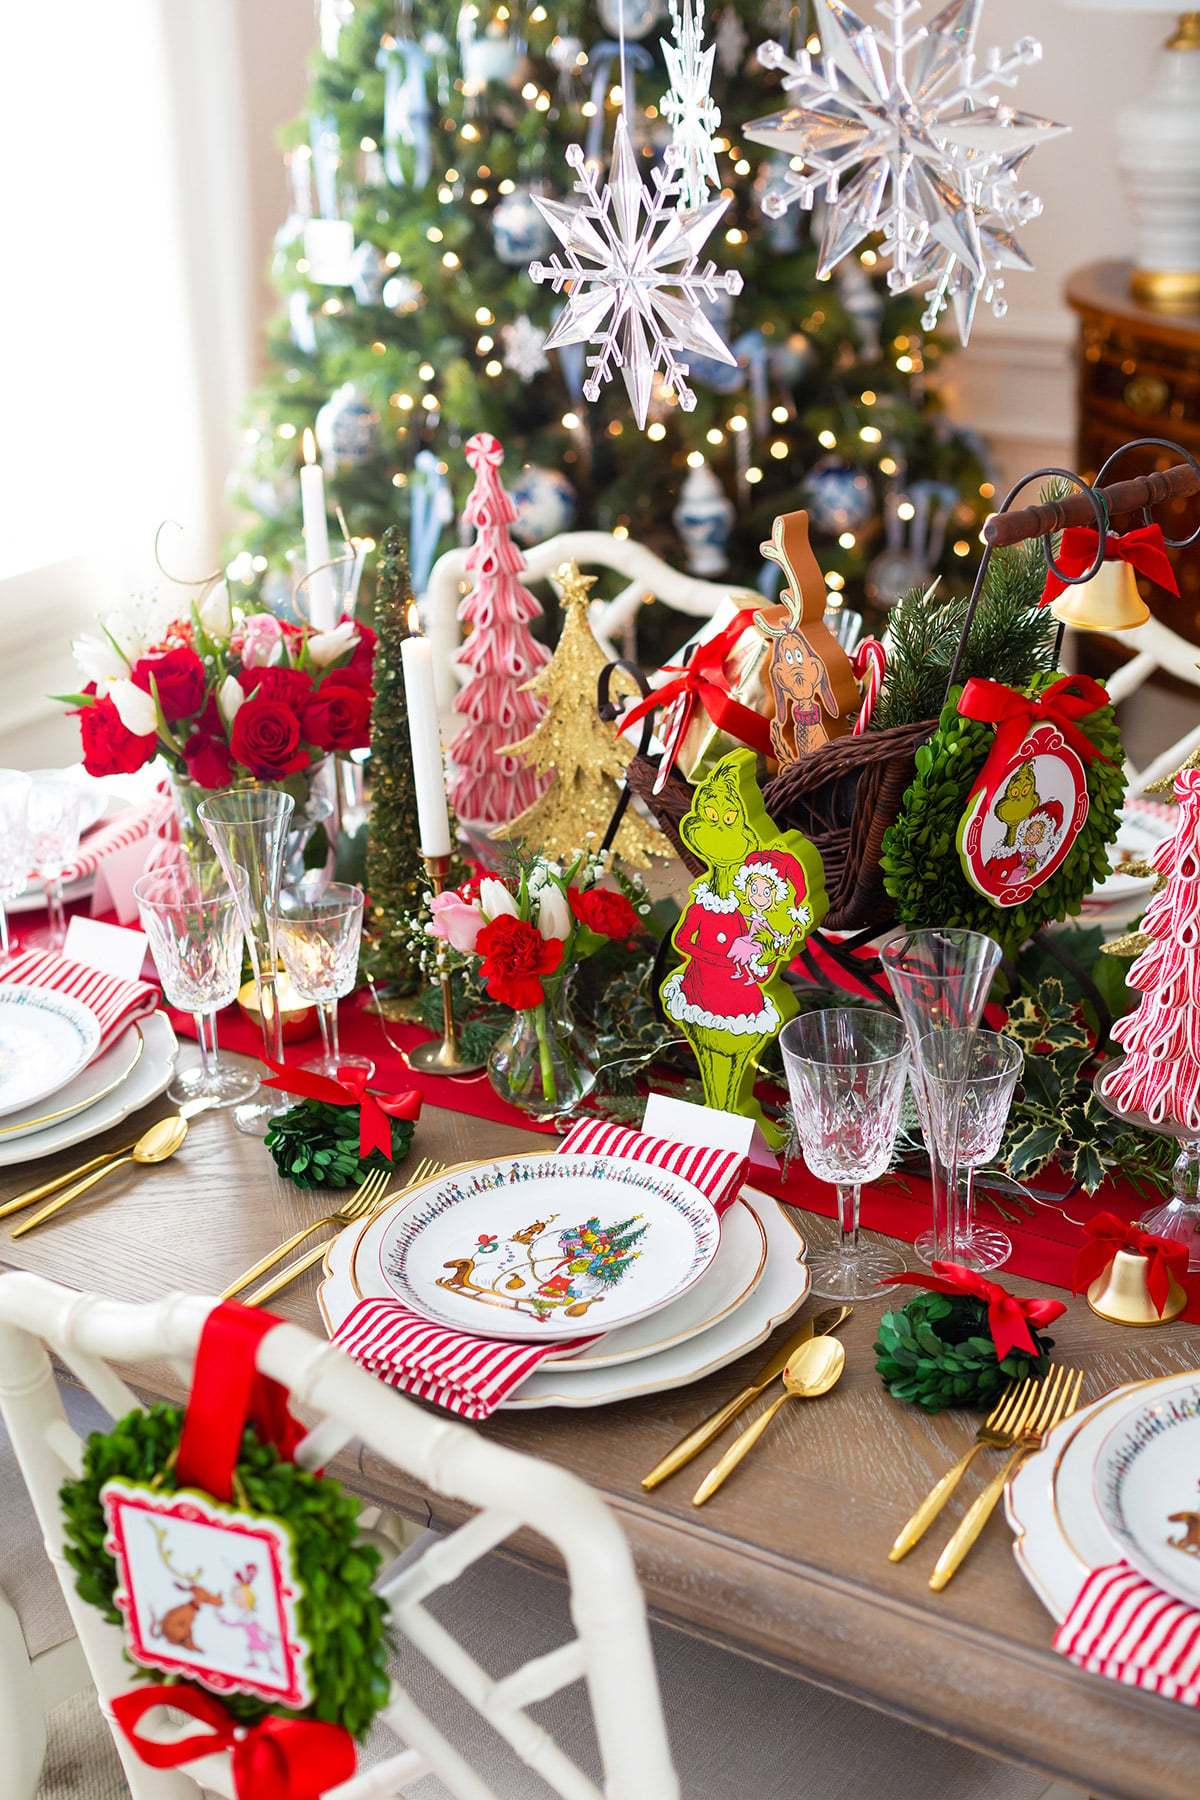
- Lay a red runner down the center, letting it hang 6 to 8 inches off each end.
- Set two or three tabletop trees at uneven heights — 18, 24, and 30 inches works.
- Tuck character cutouts between the trees, angled, never facing straight forward.
- Add cut greenery and peppermint picks at the base to hide the stands.
- Hang mini boxwood wreaths on the chair backs, all at the same height.
Materials run $60 to $90 if you already own the plates and flatware.
Tablescapes have quietly become the biggest holiday category on Pinterest, and 2026 is the year people stopped treating the dining table as an afterthought. The shift: character decor used to live on the tree and nowhere else. Now it’s layered into place settings, napkins, and chair backs, which is why this look photographs so well — every seat is its own tiny scene without a single item costing more than $20.
6. A Green Mesh Wreath With a Drooping Santa Hat on a Red Door
- Mesh character wreath: $45–$120
- Two pre-lit evergreen garlands: $40–$90 each
- Black metal lantern with pillar candle: $25–$60
- Wrapped gift stack (boxes, paper, bows): $20–$50
- Coir doormat: $18–$35
- Candle, LED or real: $8–$20
Total: $200–$465
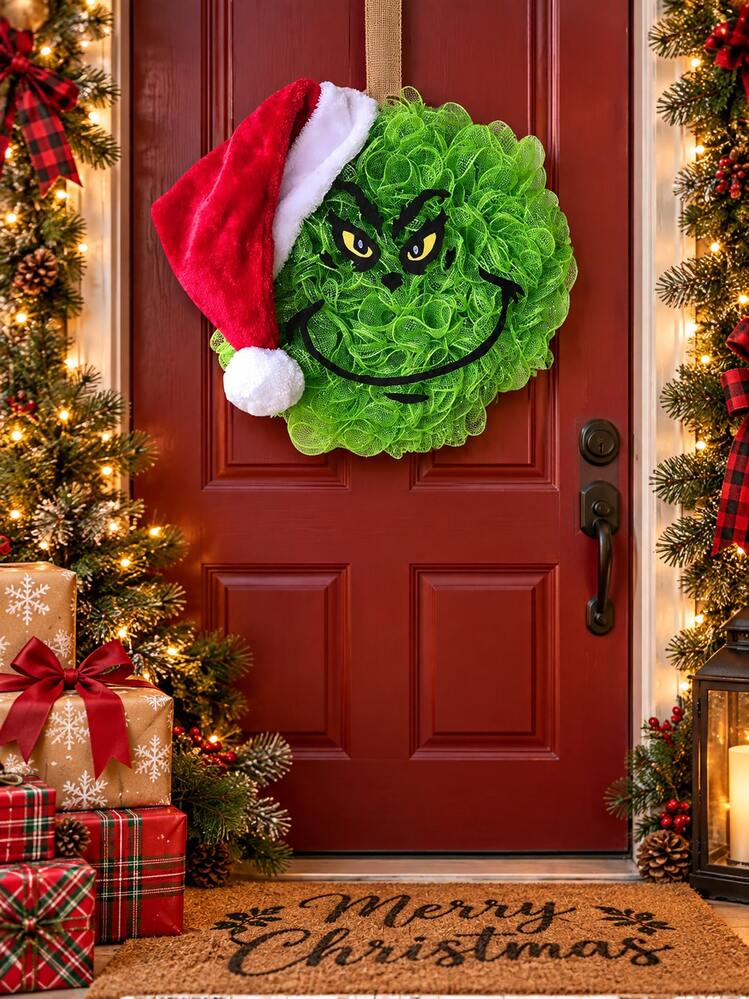
Budget alternative: skip the pre-lit garlands for unlit ones ($12–$18 each) and add a $9 strand of warm fairy lights, buy the mesh wreath form for $8 and build it yourself, and wrap empty boxes you already own. Same doorway, roughly $85–$140.
Wreath height matters more than wreath style. Hang it so the center sits 60 to 66 inches off the ground — roughly eye level — which drops that drooping hat to about chest height where people actually notice it. Garlands flanking the door should start at the same height on both sides, and if the door has recessed panels, center the wreath on a panel, not on the door.
7. A Pastel Pink Entryway With Whoville Cutouts and a Curved Flocked Tree
Three things are doing the work here. First, color temperature: the pink base lowers the volume on the red and green so a very loud theme reads soft instead of shouty. Second, asymmetry — the staircase garland is heaviest at the newel post and thins as it climbs, which is the rule of thirds applied vertically. Third, storytelling: the Grinch, Max, and Cindy Lou sit at three different heights, so your eye travels instead of landing once. Pastel doesn’t make a theme quieter — it makes it look intentional.
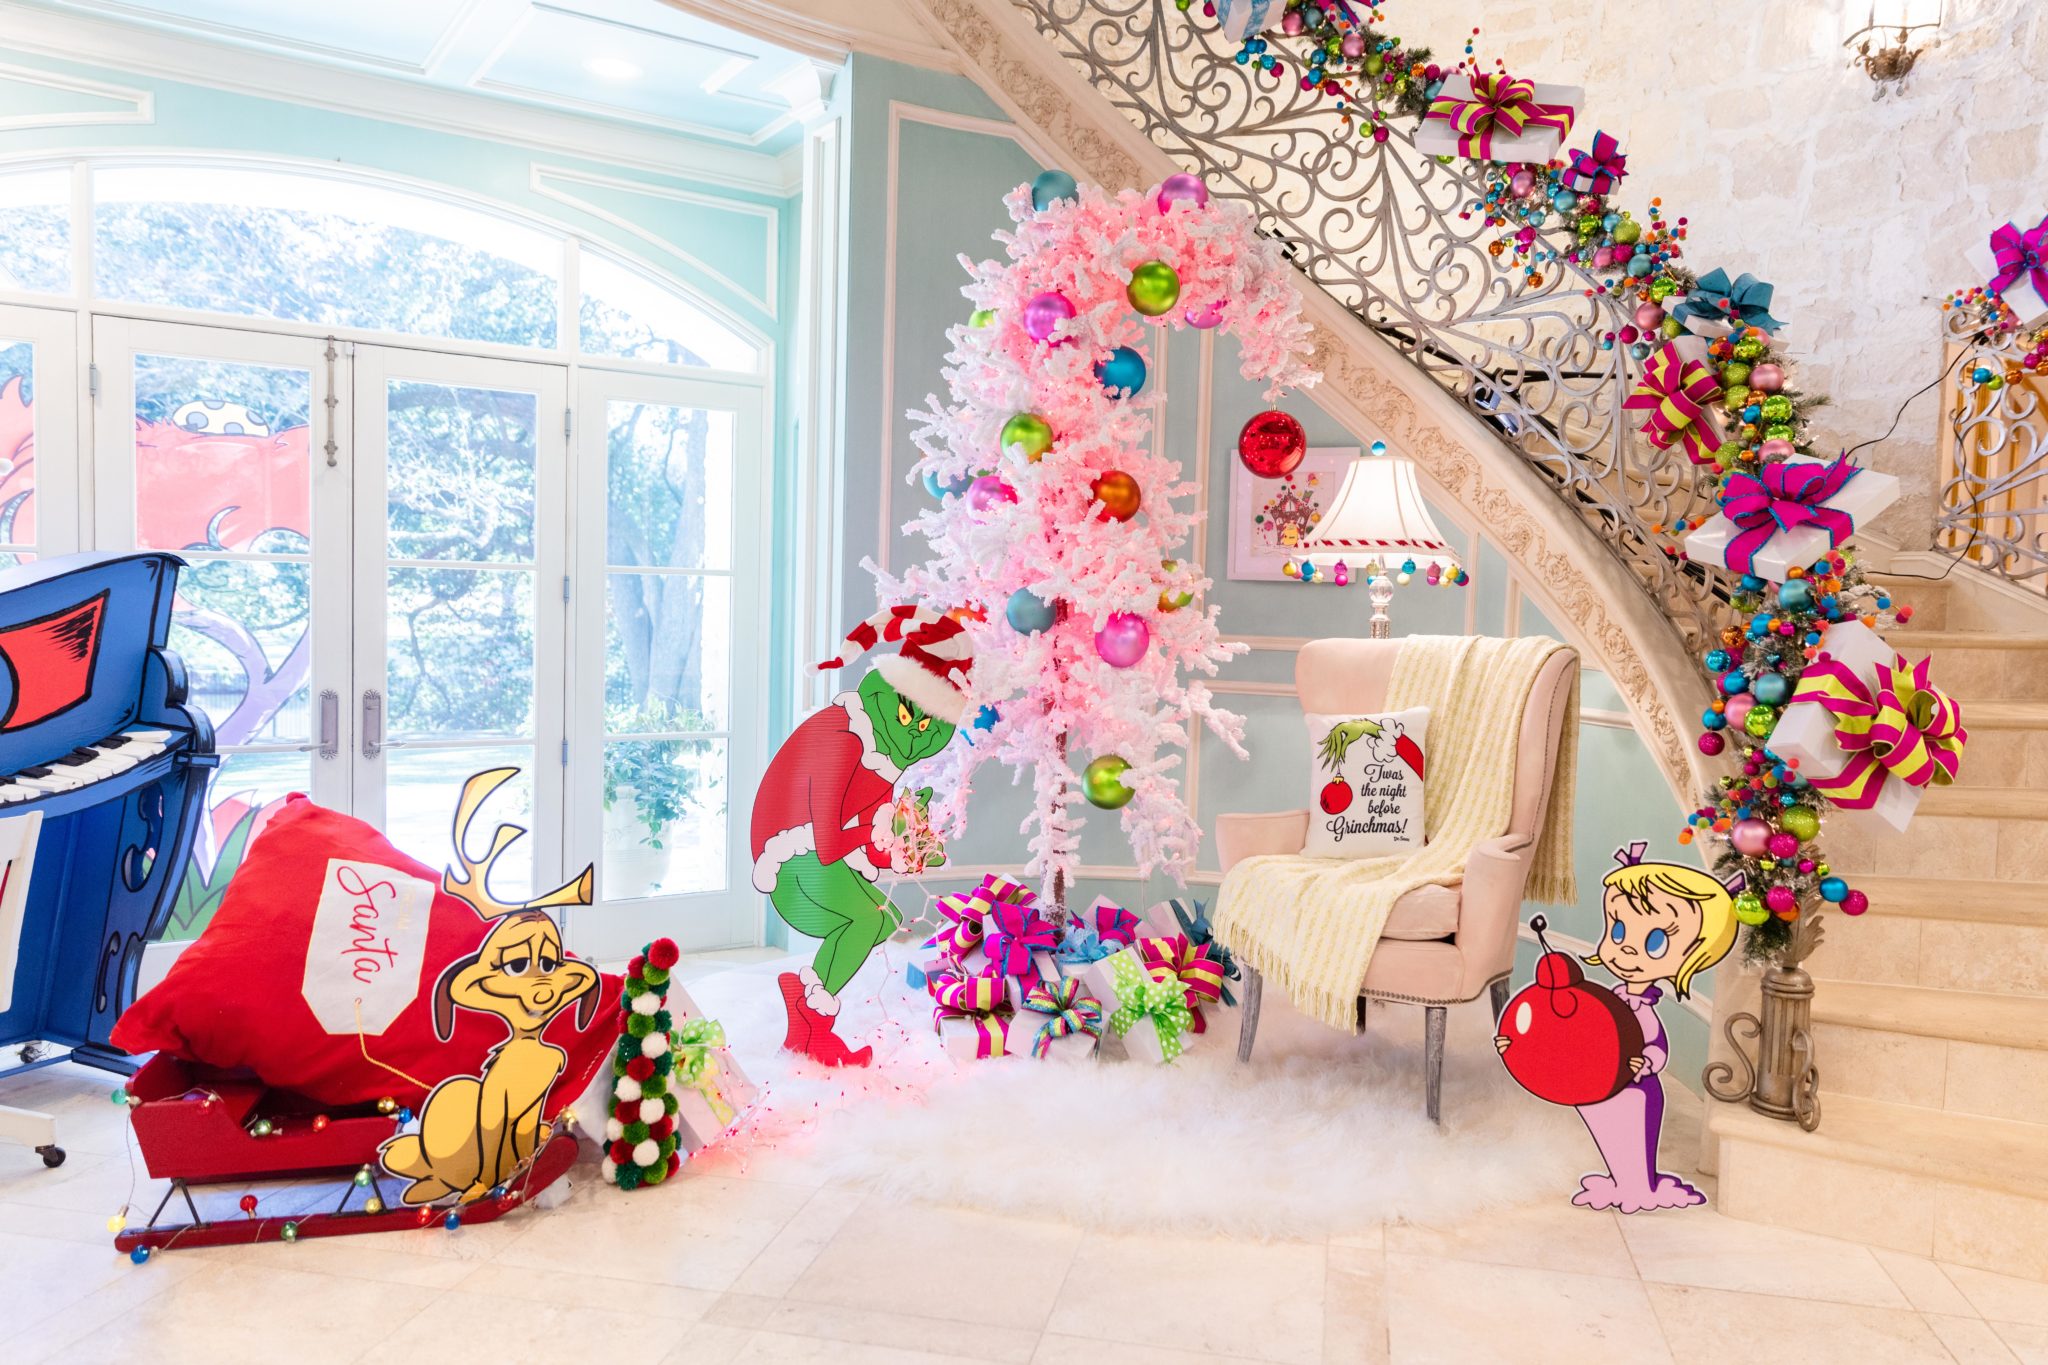
- Measure your railing run — garland plus gift boxes needs about 1.5x the rail length in materials.
- Check ceiling height: a curved 7.5-foot tree plus a topper wants 9 feet minimum.
- Confirm a grounded outlet sits within 6 feet of both the tree and the railing.
- Decide where the cutouts will live before you buy — they need floor space, not wall space.
- Set a cutout budget ceiling; character standees are the fastest way past $300.
8. Grinch Faces Tucked Into Evergreen Garland Against Wood Paneling
Call it 55 percent evergreen, 25 percent red velvet, 15 percent character green, and 5 percent candlelight white and gold. The wood paneling behind it counts as your neutral, which is why this palette can carry more saturation than usual. Want it softer? Drop the bows to a dusty rose and the character faces to sage — the formula holds, the mood changes. Just keep the candlelight constant; it’s what stops the whole thing from looking flat.

Real pillar candles are the maintenance tax here. They drip onto garland, scorch needles, and need replacing every few evenings. LED pillars with a moving flame cost $8 to $15 each and you’ll never think about them again. Fresh evergreen drops needles for three weeks and needs a water source; faux garland just wants a dusting with a hair dryer on cool every few days. Either way, plan on 15 minutes of fluffing each time you redecorate the mantel.
9. A White Tree With Grinch Feet Poking Out From Under the Skirt
It’s the feet. Two fuzzy green Grinch feet sticking out from beneath a plush red skirt turn a tree into a character mid-prank, and everything else — the white branches, the Santa-hat topper, the red and green baubles — is supporting cast. Remove the feet and you still have a pretty tree. Keep them and you have the photo everyone stops scrolling for. It’s a $20 accessory doing the work of a $200 one.
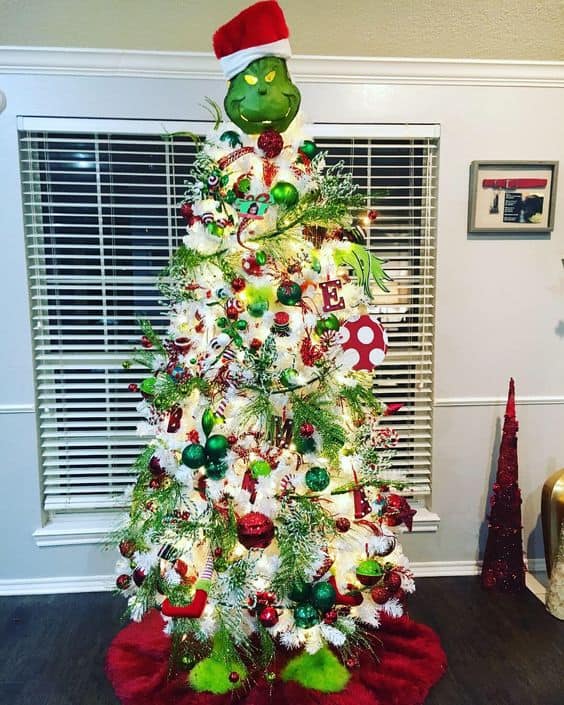
White trees reflect light, so they read about a third brighter than a green tree of the same size, which means they need more room to breathe. This look works best in rooms 10 by 12 feet or larger, and always against a colored or paneled wall. Put a white flocked tree in front of a white wall in a small room and it dissolves. Compare with Idea #20, which uses the same white base but goes dense and full instead of sparse.
10. Grinch and Santa, Flanked by Poinsettias and Hairpin-Leg Benches
Real poinsettias are the trap. They’re toxic to cats and dogs, they drop leaves the moment they catch a draft, and they need six hours of indirect light to stay red past New Year’s. Faux poinsettias have gotten genuinely good — $12 to $25 a pot and they’ll survive a cold hallway. Also worth knowing: faux fur tree skirts mat within a season unless you hang them instead of folding, and dark floors show every stray strand.
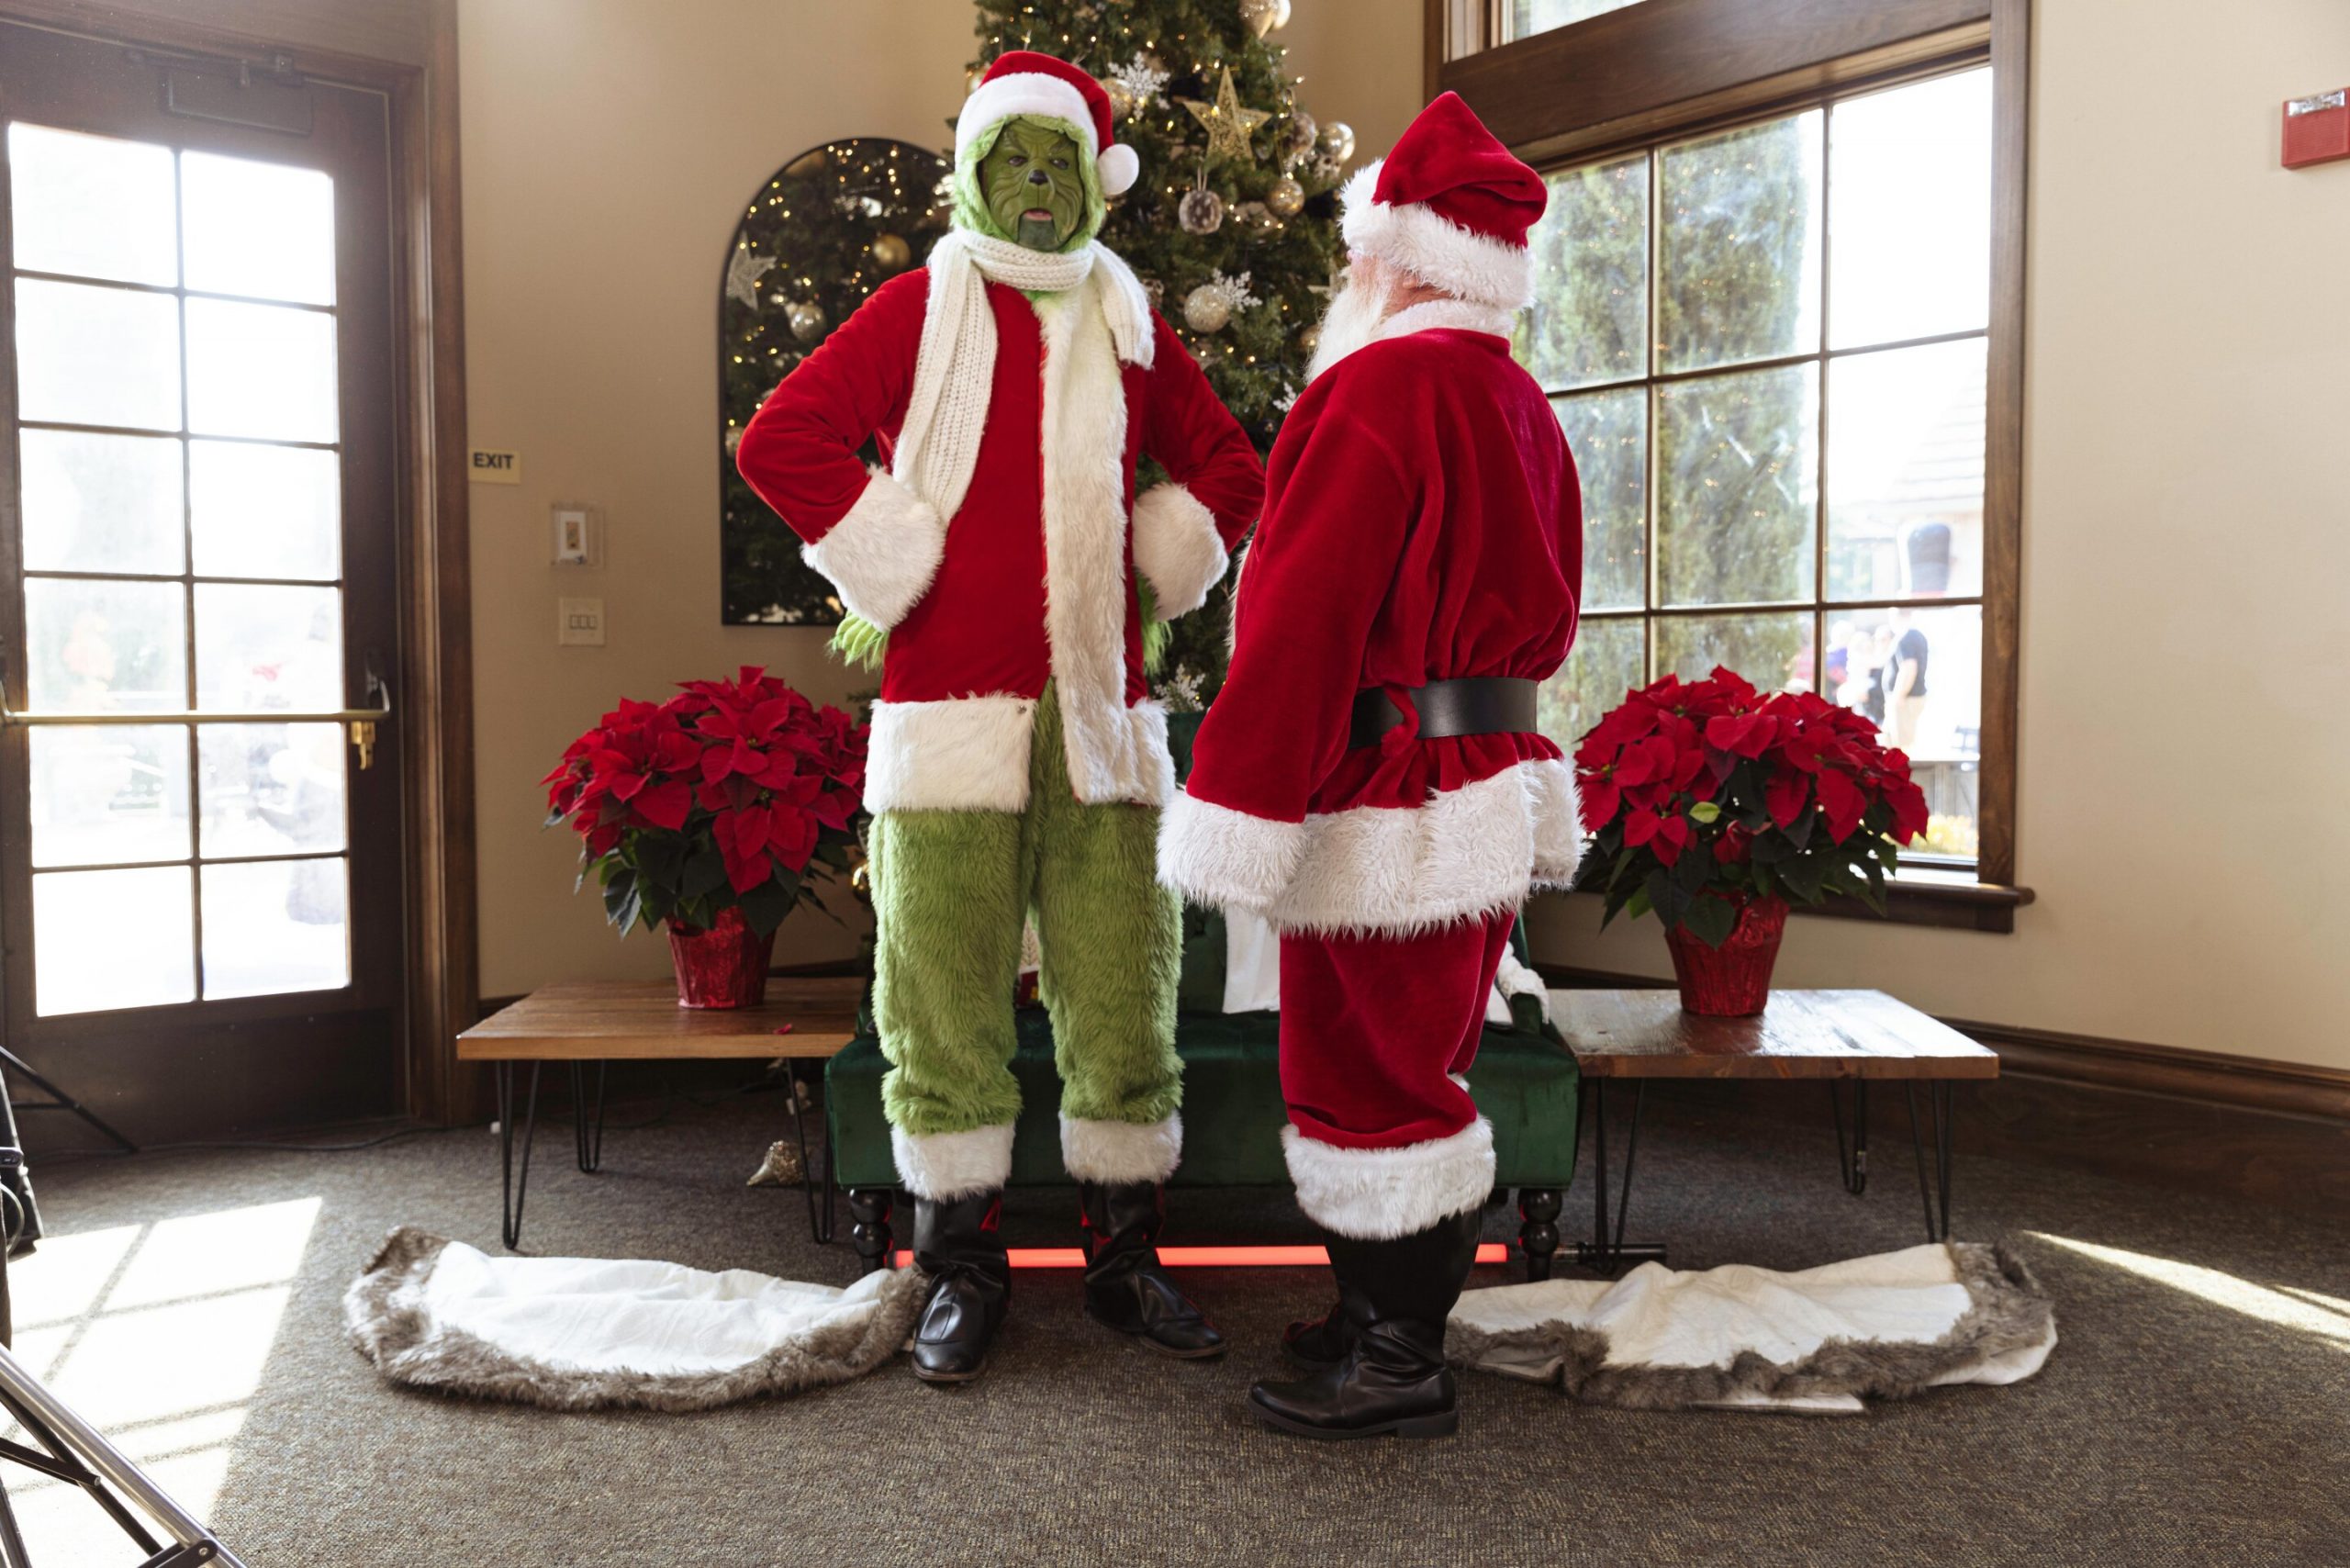
The bench is the easy save. A hairpin-leg wood bench runs $120 to $300 retail, but you can make one from a $40 IKEA or Target tabletop and $25 in screw-in hairpin legs from Amazon — 20 minutes with a drill. Faux fur skirt: a $15 throw blanket tucked and pinned around the base beats most $60 skirts. Potted poinsettias: $6 each at Walmart in early December versus $20 at a florist.
11. A Lime Green Tree With a Bent Whoville Top and Turquoise Ornaments
If you’re bending a tree top to get that Whoville curl, do it before you decorate and never force a wire spine — you’ll snap the center pole. Work with a tree that has flexible branch tips: pull the top 12 to 18 inches over gradually, then hold the curve with two zip ties wrapped in green floral tape and buried in the branches. For a faux curl, mount a curved topper on a weighted base instead. Whole job: 15 minutes.
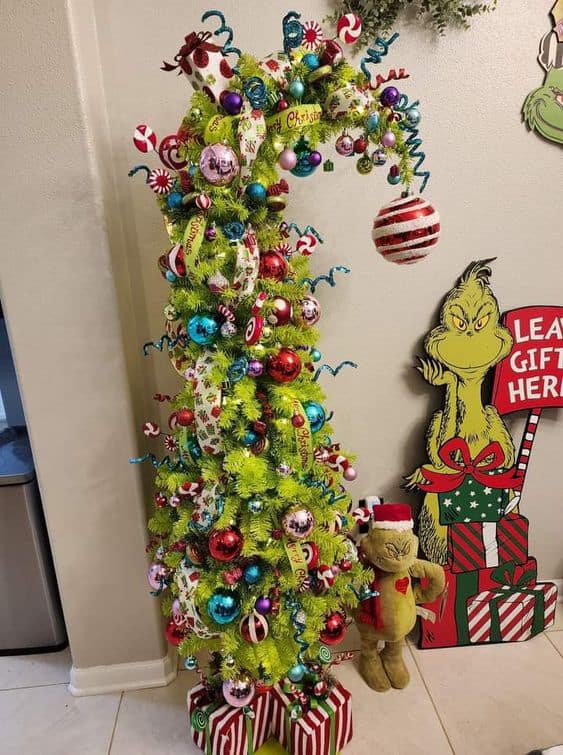
Two principles carry this. First, silhouette — a bent top breaks the triangle every tree has had since 1950, which is why your eye catches it from across the room. Second, the turquoise. Red and green are a closed loop; nothing surprises you. Dropping in 15 percent turquoise gives the palette a third note that makes the lime look chosen rather than default. The same trick works with cobalt or plum.
12. Grinch Arms and Red-Booted Legs Threaded Through the Branches
Attaching plush limbs takes about 20 minutes and $25 to $40 in materials:
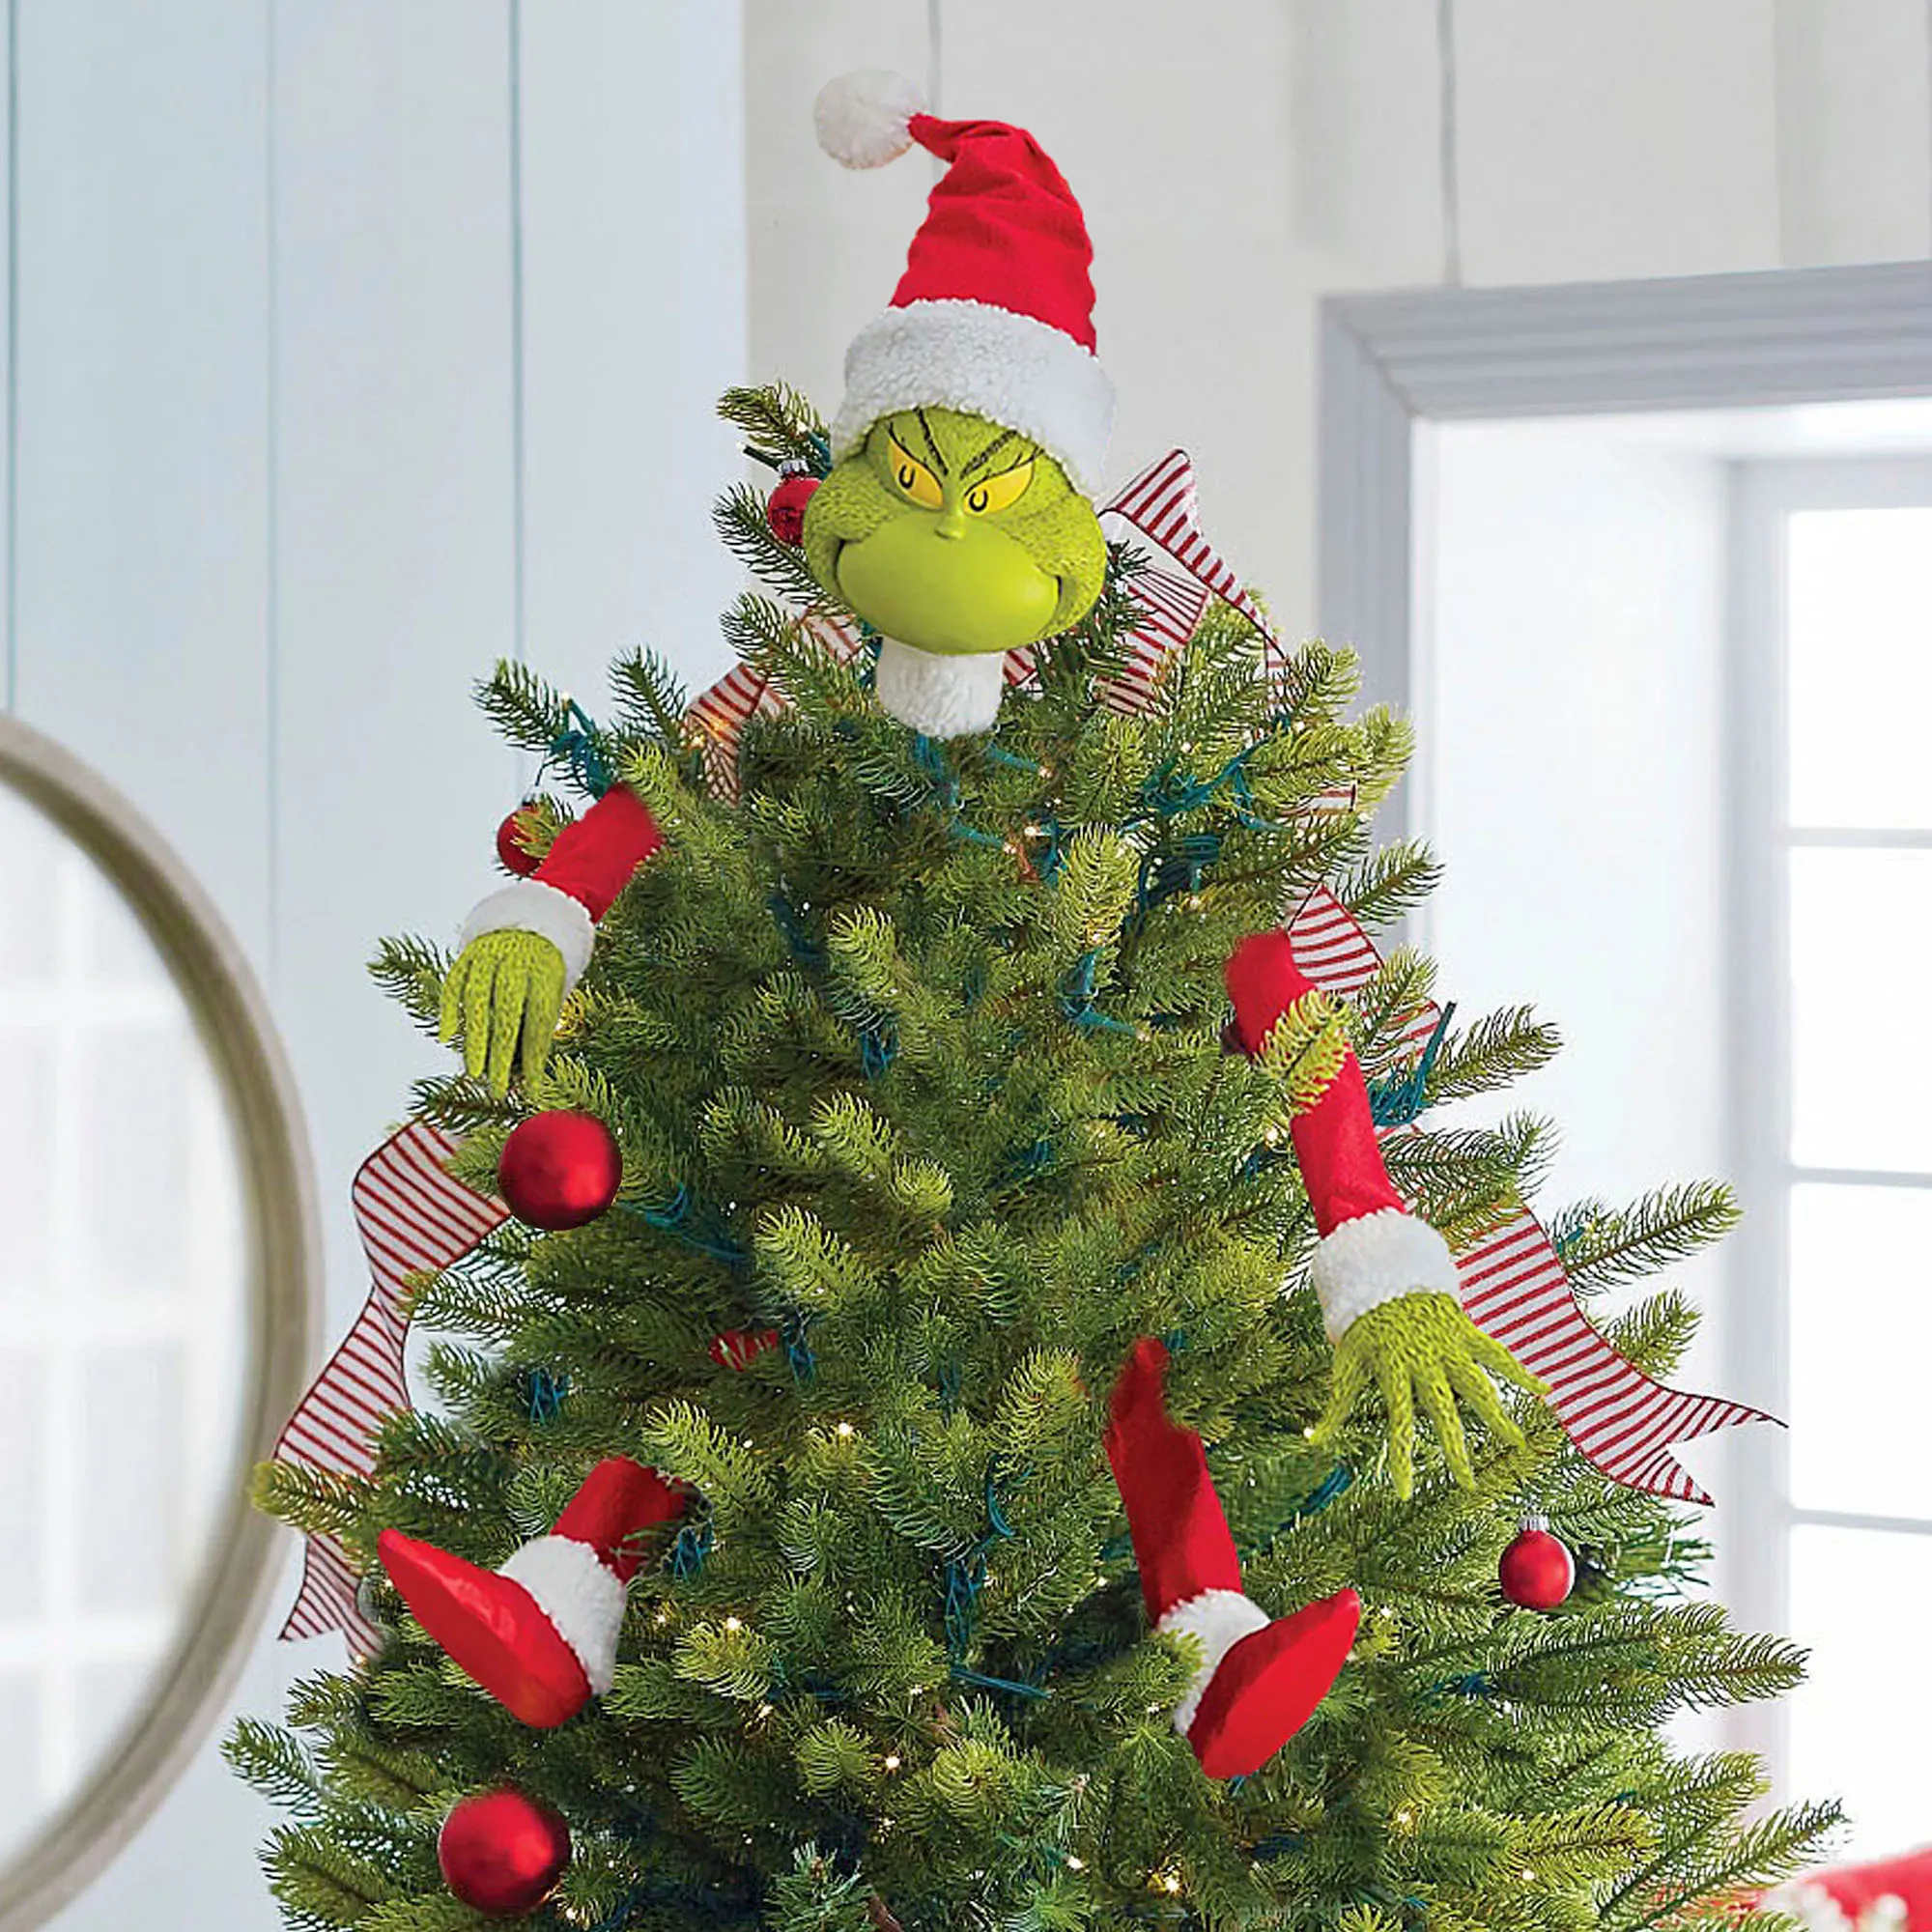
- Pick anchor points first — one arm per side, mid-tree, roughly 40 and 60 percent up.
- Thread a 12-inch zip tie through the plush cuff and around a sturdy branch stub.
- Angle the hands outward and slightly down, like they’re grabbing, not waving.
- For the legs, use an upper branch and let the boots hang free below the limb line.
- Step back six feet and adjust — if you can see a zip tie, tuck a sprig over it.
Same technique as the arms in Idea #2, just positioned lower on the tree.
Notice where the legs are: threaded through the middle of the tree, not poking out at the base. That’s the joke, and it’s easy to get wrong. Boots coming out of the bottom read as a tree standing on feet; boots coming out of the middle read as a Grinch who has climbed inside. One placement decision, two completely different reactions. If you fix one thing this year, fix that.
13. A Tufted Red Velvet Chair Framed by a Tree With a Giant Yellow Star
Character decor has been migrating off the tree and into the furniture for two seasons now, and 2026 is the year it went velvet. Vintage tufted seating — nailhead trim, deep crimson, slightly worn — became the most-saved backdrop for holiday photos because it makes even a costume look styled. The staying power is real: a good velvet armchair works in January, which is more than you can say for most of what’s in this article.

The ratio is about 50 percent crimson velvet, 30 percent green, 15 percent white, and 5 percent that enormous yellow star. The star matters out of proportion to its size — it’s the only warm yellow in the frame, so it pulls every green in the room toward Whoville instead of Christmas tree farm. Swap the star for silver and the whole shot cools off. Keep it yellow and you’ve committed to the bit.
14. A Faux Brick Fireplace With a Grinch Cutout and Three Red Stockings
- Faux brick panels: $25–$60 each, or $60–$120 for a stencil kit
- Grinch cutout with wreath: $40–$120
- Three red stockings: $12–$25 each
- Glowing faux campfire insert: $60–$150
- Green pine garland with lights: $30–$70
Total: $230–$610
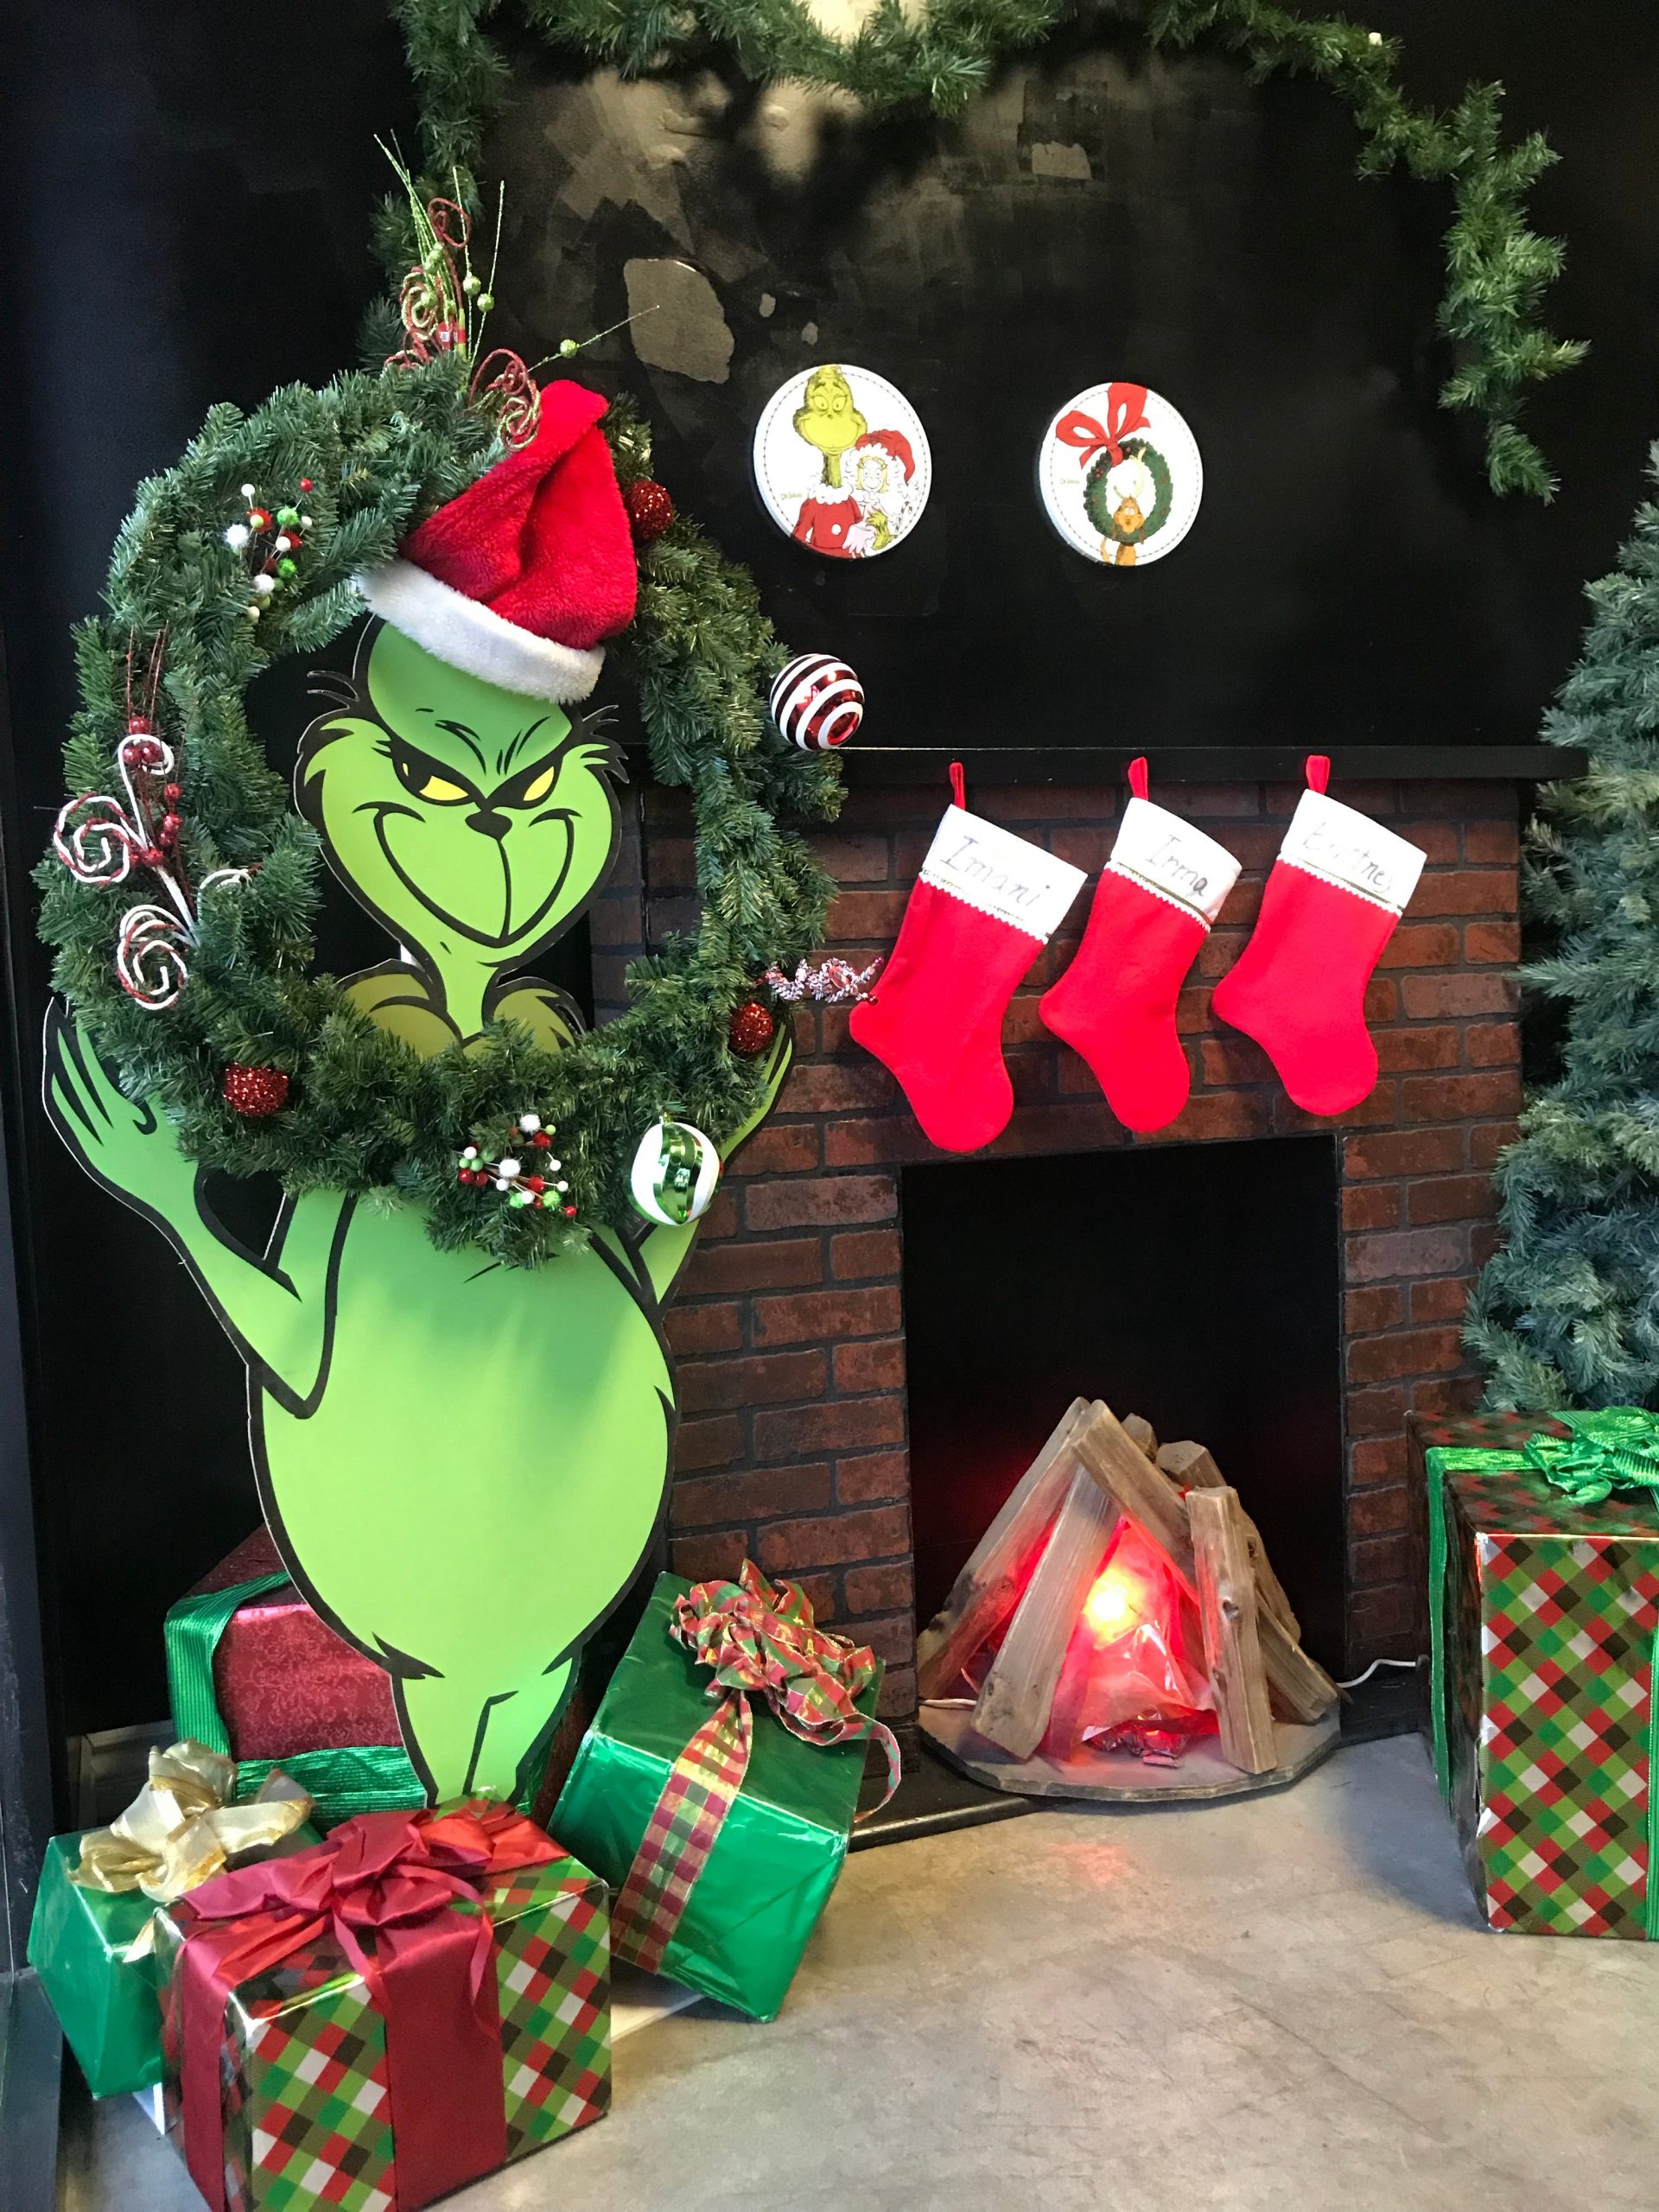
Budget alternative: stencil your existing wall instead of buying panels ($60 in materials, one weekend), print a character cutout at a local shop on foam board for $15 to $25, and skip the faux campfire in favor of a $20 LED flicker bulb set tucked behind logs you already own. Roughly $130–$200.
Don’t hang three stockings at the same height. Stagger them — highest on the center hook, about 3 inches lower on each side — and drop a small wreath or a sprig of greenery between two of them to break the row. Also lean the character cutout against the wall instead of hanging it; the slight tilt makes it read as a figure standing in the room rather than a poster on the wall.
15. Twin Beds Dressed in Character-Print Quilts With Red Piping
This look needs a kids’ room of at least 10 by 10 feet. Twin beds side by side want 36 inches between frames and 30 inches of walking room on the outer sides, so the practical minimum width is closer to 13 feet if you’re placing them along one wall. Ceiling height is less fussy — 8 feet is plenty. A miniature tabletop tree goes on the nightstand between them; anything taller than 24 inches starts blocking the window. For small-space character ideas, see Idea #16.
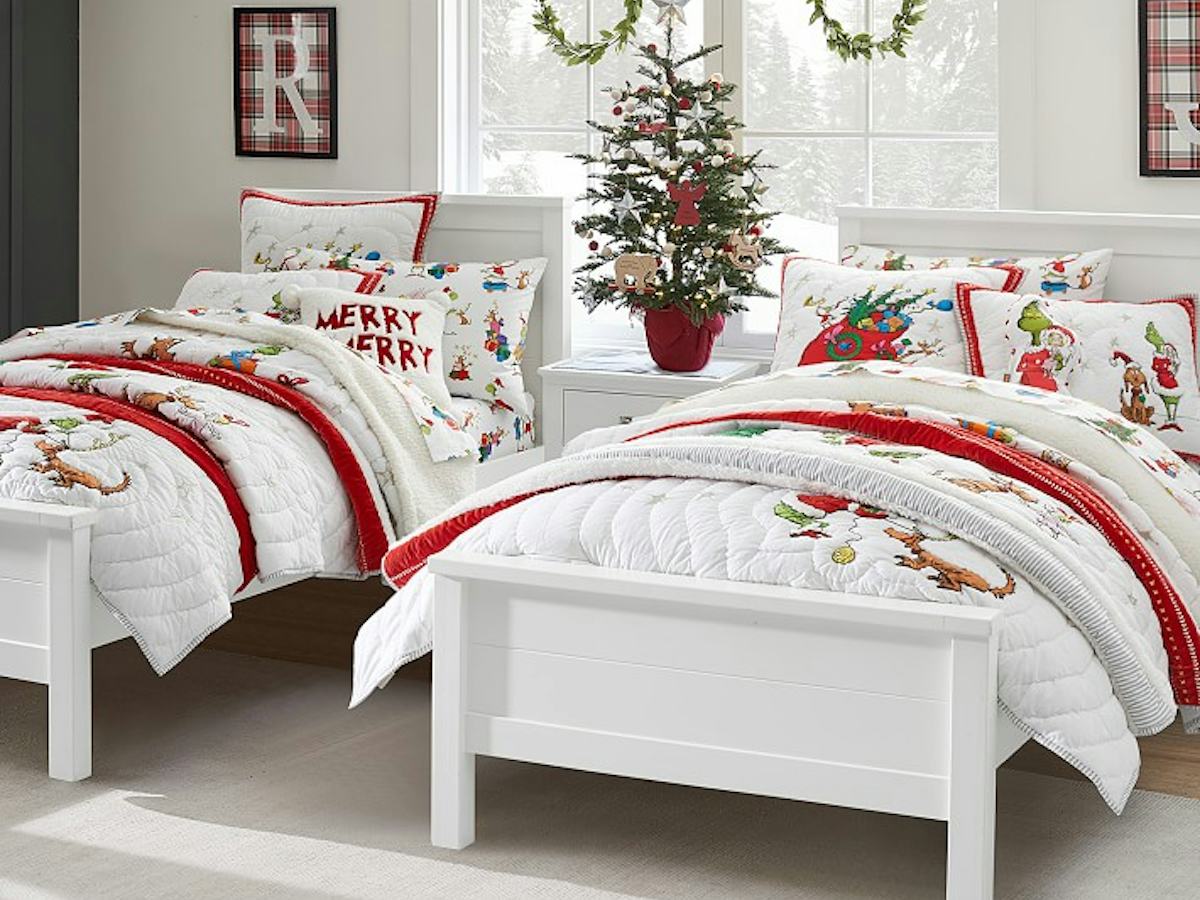
White bedding plus children is a math problem. Printed quilts hide crumbs better than solids but show stains around the piping and shams, and character-print sets fade if you wash them hot. Wash cold, line dry, and keep a spare set. Also: red piping is a heat magnet for iron marks, so skip the touch-up ironing and let a few wrinkles be part of the charm.
16. A Pink Armchair Corner With Neon Bows and a Frosted Pink Tree
- Confirm the pink reads warm, not nursery — test swatches beside your floor in daylight.
- Measure the corner: a frosted pink tree plus an armchair needs about 6 by 5 feet.
- Check where your overhead light lands; cool-white bulbs will grey the pink out instantly.
- Pick one accent — neon bows and lavender pillows compete, so choose.
- Budget for the faux fur rug first, since it’s the piece guests actually touch.
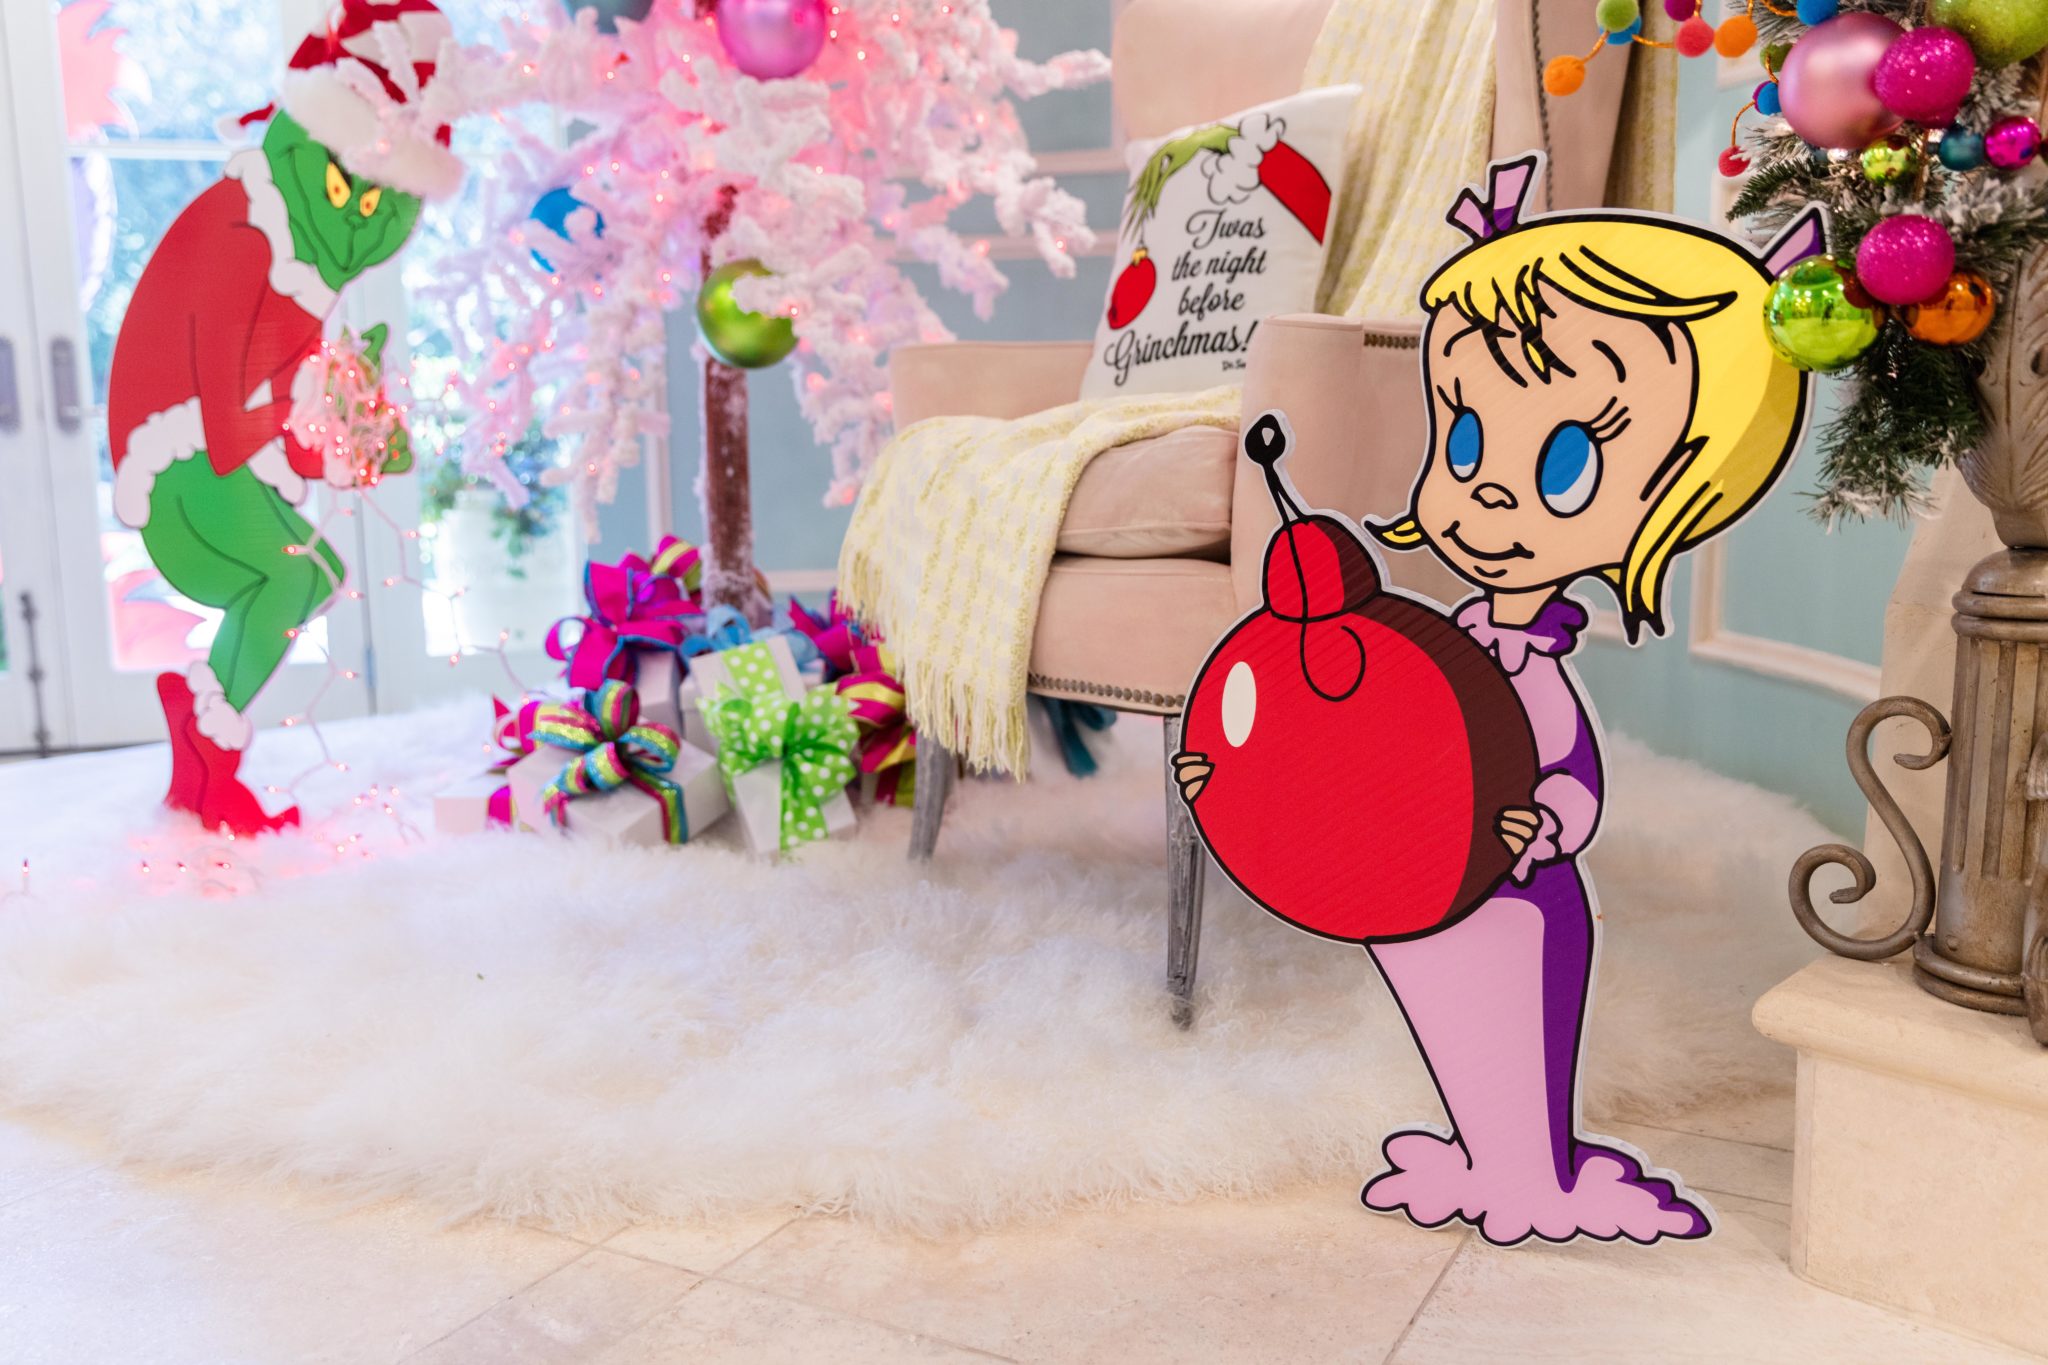
A frosted pink tree is $40 to $90 at Walmart or Target in early November and double that by mid-December, so buy early. Neon ribbon is $4 a roll at any craft store; wrap empty boxes you already own. The faux fur rug is where people overspend — a $30 throw-size faux fur works fine for a corner vignette, and the pink armchair is the one piece worth buying used. Facebook Marketplace is full of dusty rose armchairs in January.
17. Grinch Piñatas Sharing a Corner With Gilded Armchairs
The whole idea is collision — a paper-mâché party piñata standing beside a white-and-gold carved armchair and a black tufted chair with gold trim. Formal furniture and a candy-filled character shouldn’t work together, and that’s exactly why it does. The balloon cluster up in the corner softens everything: peach and burgundy echo the red and green without repeating them, and gray keeps the whole thing from sliding into a birthday party.
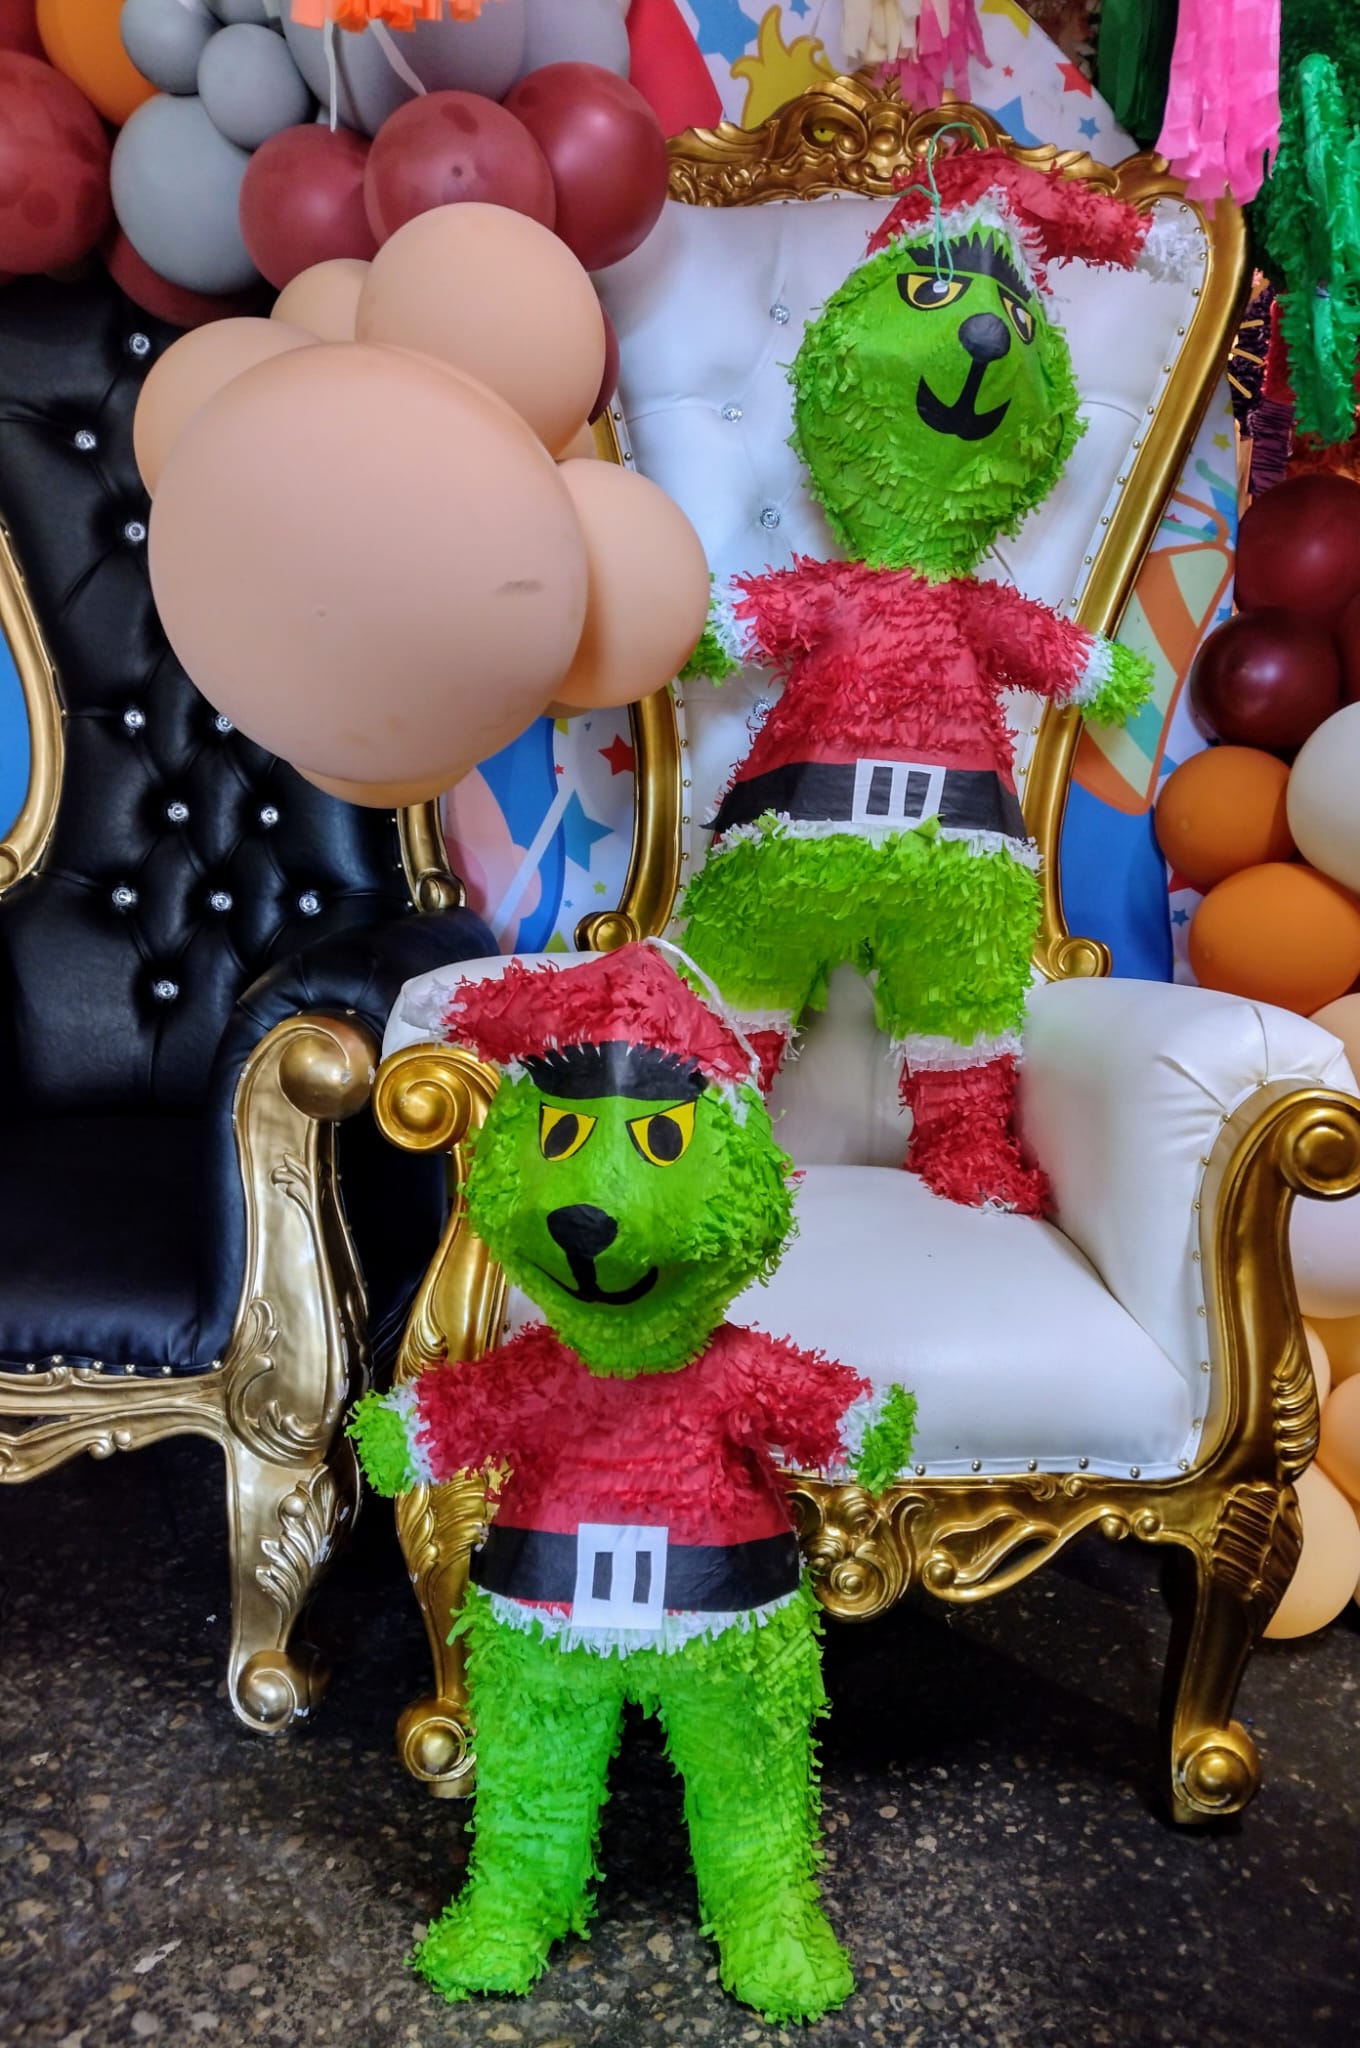
The gold trim on both chairs. Without it, the piñatas read as leftover party supplies in a nice room. With it, the metallic thread runs through the entire vignette and the piñatas become part of the decor story. If you’re doing this at home, pull every brass, gold, or bronze object you own into that corner — trays, frames, candleholders — before you buy a single new thing.
18. A Lime Green Tree Hung With Grinch Dr and Nice Directional Signs
Roughly 60 percent lime green, 20 percent white, 15 percent red, and 5 percent gold. The white is doing more than you’d think — it’s the pause between two loud colors, and pulling all the white into one zone (the upper third) makes the tree look styled rather than sprinkled. Want a deeper version? Drop lime to 40 percent and bring in a dark forest green. The signs stay either way; they’re the personality, not the palette.
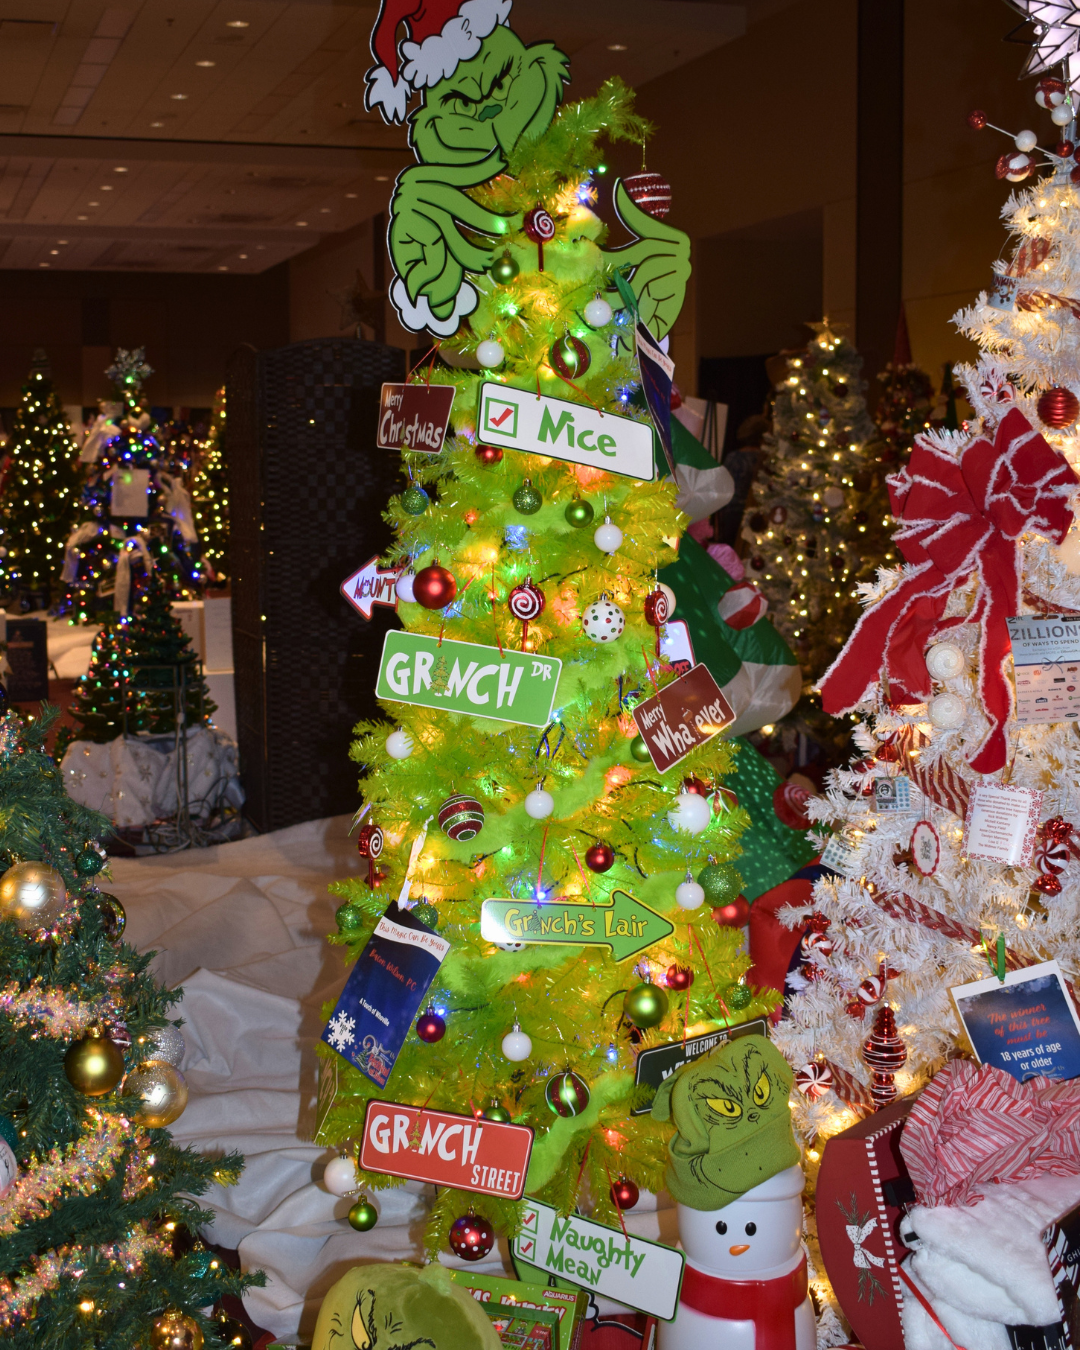
Signage is where Grinch trees go wrong. Cap it at three to five signs, hang them on fishing line so they float, and place them at different depths — one deep near the trunk, one mid-branch, one almost touching the front. Keep the lettering between 55 and 70 inches off the floor so it’s readable while standing. More than five signs and it stops looking like a tree and starts looking like a gift shop.
19. Hand-Painted Whoville Cutouts and a Candy-Cane Welcome Post
Painted plywood outdoors is a two-year commitment, not a one-season one. Seal every face and edge with three coats of exterior spar urethane or the paint will chalk and peel by February. Re-seal annually, store the pieces flat and indoors (never leaning in a garage where they’ll warp), and expect the ground stakes to rust regardless. The string lights on the tree trunk will outlast the cutouts by years — buy commercial-grade, not the $9 box.
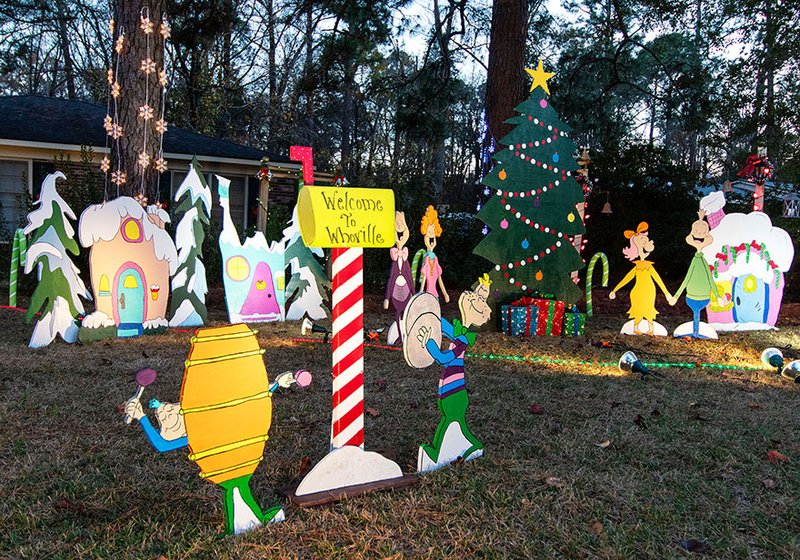
Making the cutouts takes a weekend and about $60 to $120:
- Draw your shapes on paper first, then trace onto half-inch exterior plywood.
- Cut with a jigsaw — go slow on the curves, and sand every edge.
- Prime both sides, then paint flat colors; add outlines last with a fine brush.
- Seal with three coats of spar urethane, letting each one dry fully.
- Attach L-brackets to the backs and stake into the ground, or weight the bases with sandbags.
20. A Heavily Flocked Tree With Candy-Striped Spheres and Green Hand Cutouts
- Heavily flocked 7.5-foot tree: $150–$600
- Ornament set, 80–120 mixed sizes: $80–$250
- Candy-striped picks and peppermint accents: $30–$70
- Wide ribbon in two widths: $15–$30
- Warm white string lights: $20–$50
Total: $295–$1,000
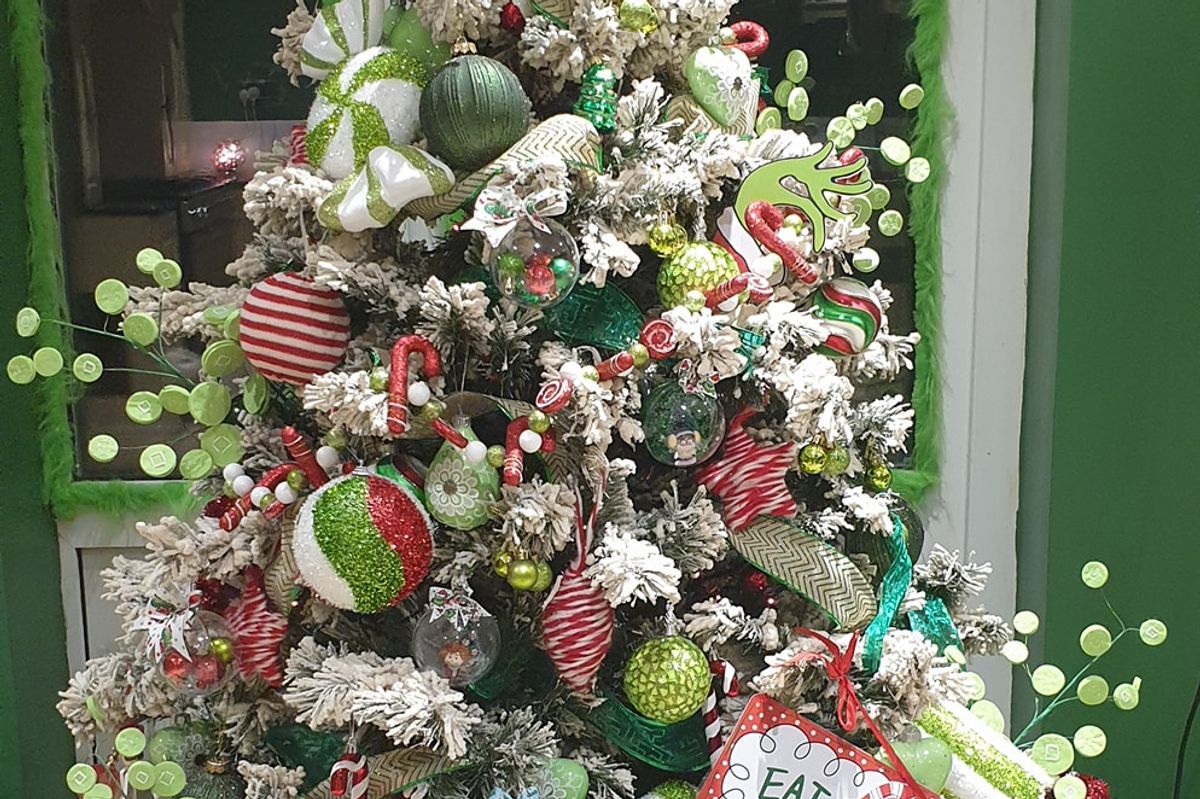
Budget alternative: buy a lightly flocked tree and add a $15 can of flocking spray, then build the ornament mix from two Dollar Tree sets plus one splurge set of striped spheres ($25). Hand-shaped cutouts can be printed on cardstock and laminated for $6. Same density, roughly $140–$220.
A heavily flocked 7.5-foot tree needs a 5-by-5-foot footprint once the branches are pulled down, plus 6 to 8 inches of clearance behind it. That means a room no smaller than 10 by 12 feet, or a corner where the tree is the only large object. Ceilings: 9 feet gives you room for a topper; at 8 feet you’ll be bending branches. Work with less space and the slim tree in Idea #2 is your answer.
21. A Rustic Trolley Built From Wood, Covered in Grinch Cutouts and String Lights
Two things to know before you build a trolley in your den. First, string lights: the multicolor strands in this scene are the loudest decor decision in the whole article, and they will make every other light in the room look dim and sad. Second, indoor-rated versus outdoor-rated matters — outdoor strands run hotter and shouldn’t be coiled around wood beams for six weeks. Use LED, plug into a timer, and check the cord temperature once after the first full day.
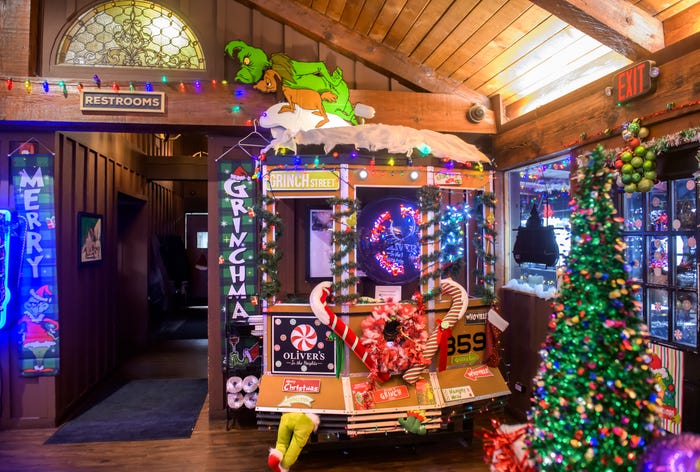
The trolley is a weekend build, not a purchase. A faux structure made from pallet wood, a few 2x4s, and PVC pipe for the wheel hoops runs $80 to $150 in materials versus $600-plus for a pre-made display. The cutout figures can be printed at a copy shop on foam board for $15 to $25 each. Add a $25 thrifted pre-lit tree and you’re at a fraction of the cost — see Idea #19 if you’d rather take the whole thing outside.
22. An Ice-Sculpted Grinch Valley With Carved Green Trees and Blue Peaks
Immersive holiday installations have moved from theme parks into hotel lobbies, and carved ice is the 2026 version of the walk-through light show. The appeal is the same thing driving holiday decor generally: people want to stand inside a scene, not just look at one. If you’re recreating the mood at home, the takeaway isn’t ice — it’s the blue. Cool blue surroundings have become the most-copied backdrop for saturated red and green.

It’s all color temperature. Deep blue ice makes the carved red suit and green trees look almost fluorescent, because cool surroundings push warm colors forward. Cold backdrops make warm colors louder than any amount of extra saturation will. You can steal the trick without a freezer: put your Grinch display against a dark blue wall, navy drapery, or even a navy tablecloth, and the same reds and greens read twice as bright.
23. A Tabletop Whoville Village on a Blanket of Artificial Snow
A convincing snow blanket takes about 30 minutes and $25 to $40:
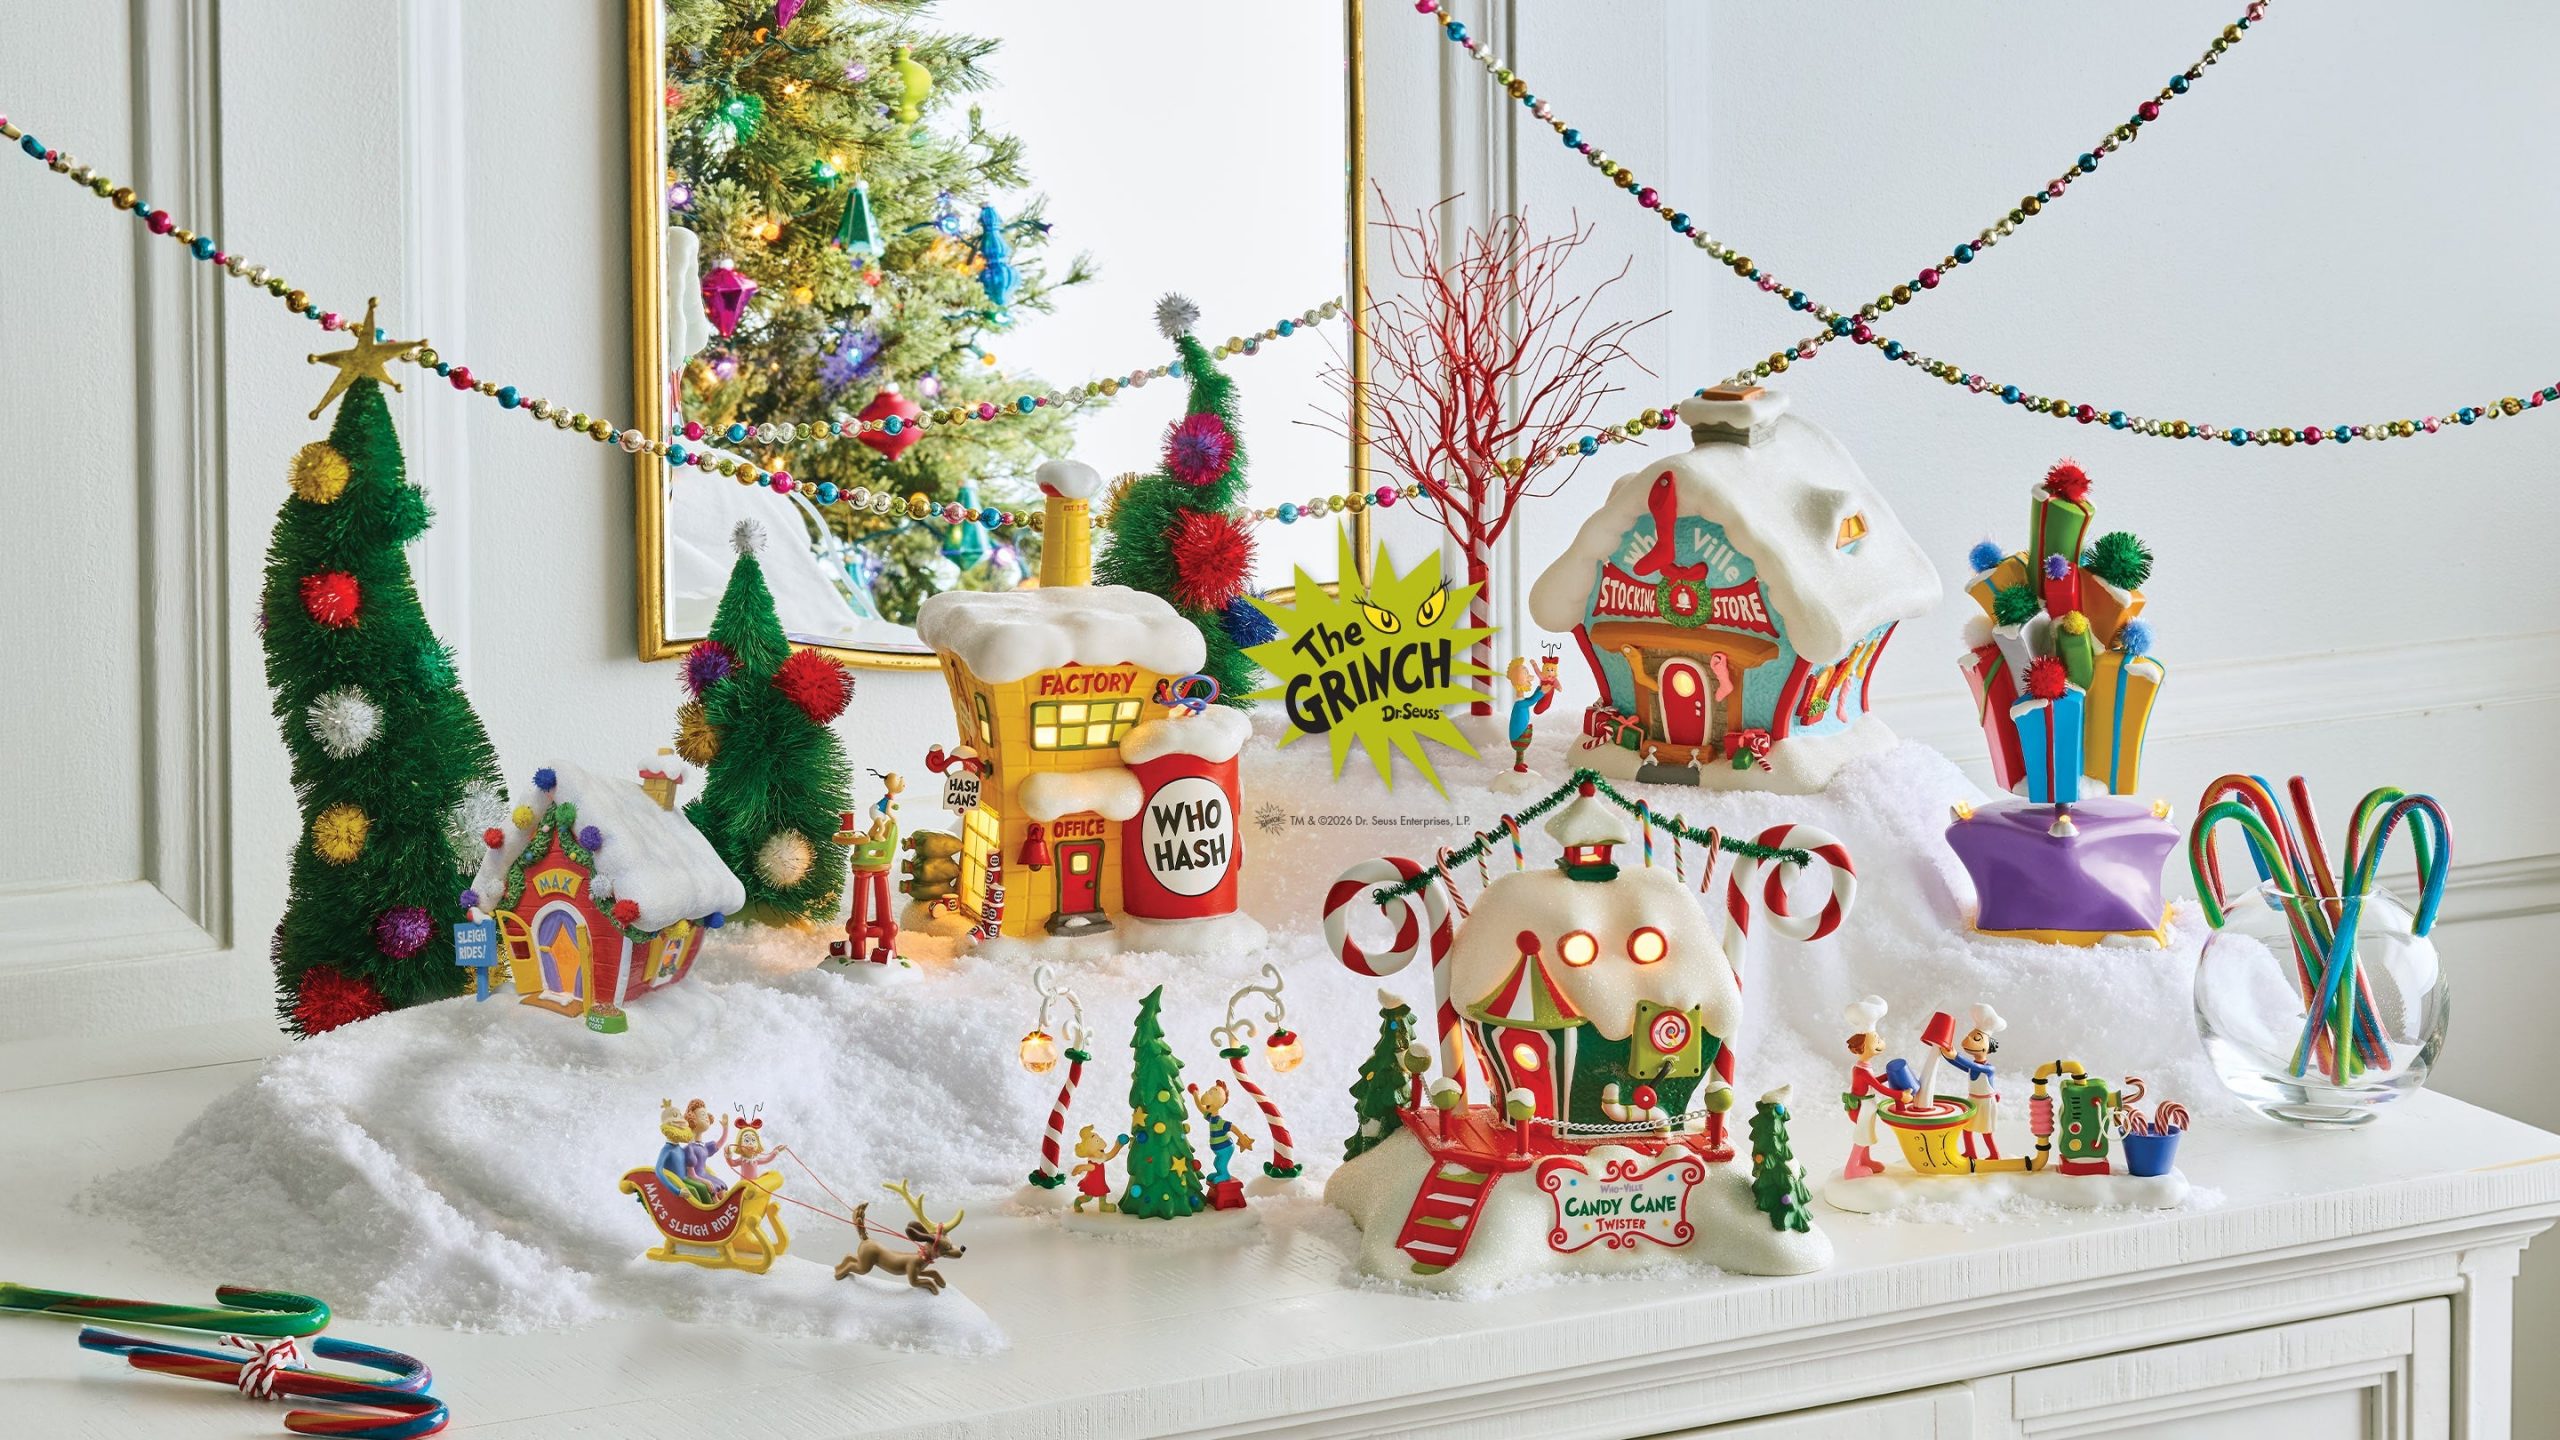
- Lay a white sheet or batting down first — never put loose snow straight on wood.
- Build a cardboard riser in the back so the tallest buildings sit highest.
- Add snow in two passes: a full base layer, then a dusting over the rooftops.
- Place buildings front to back, overlapping, so the village reads with depth.
- Finish with bottle-brush trees at the edges and one glass bowl of candy canes.
Set it on a console or low cabinet at eye level when you’re seated.
The mirror behind the village. Without it, this is a nice $50 tabletop display. With it, the reflection doubles the buildings, gives the whole scene a fogged, deeper-than-it-is look, and makes a two-foot-wide vignette feel like a window into somewhere else. If you have a mantel mirror, a mirrored tray, or a glass-topped table, use it — this is the cheapest trick in the entire article.
24. A Lit Porch Swing, a Frosted Window, and a Character Silhouette Decal
- Measure the window panes — decals need flat glass and a clean, dry surface.
- Check which circuit your porch sconce shares so the lights come on at dusk.
- Confirm the swing’s chain hardware is rated for the weight of garland plus pillows.
- Pick one focal point; the decal and the wreath shouldn’t compete for attention.
- Verify outdoor outlets and use GFCI-protected cords only.
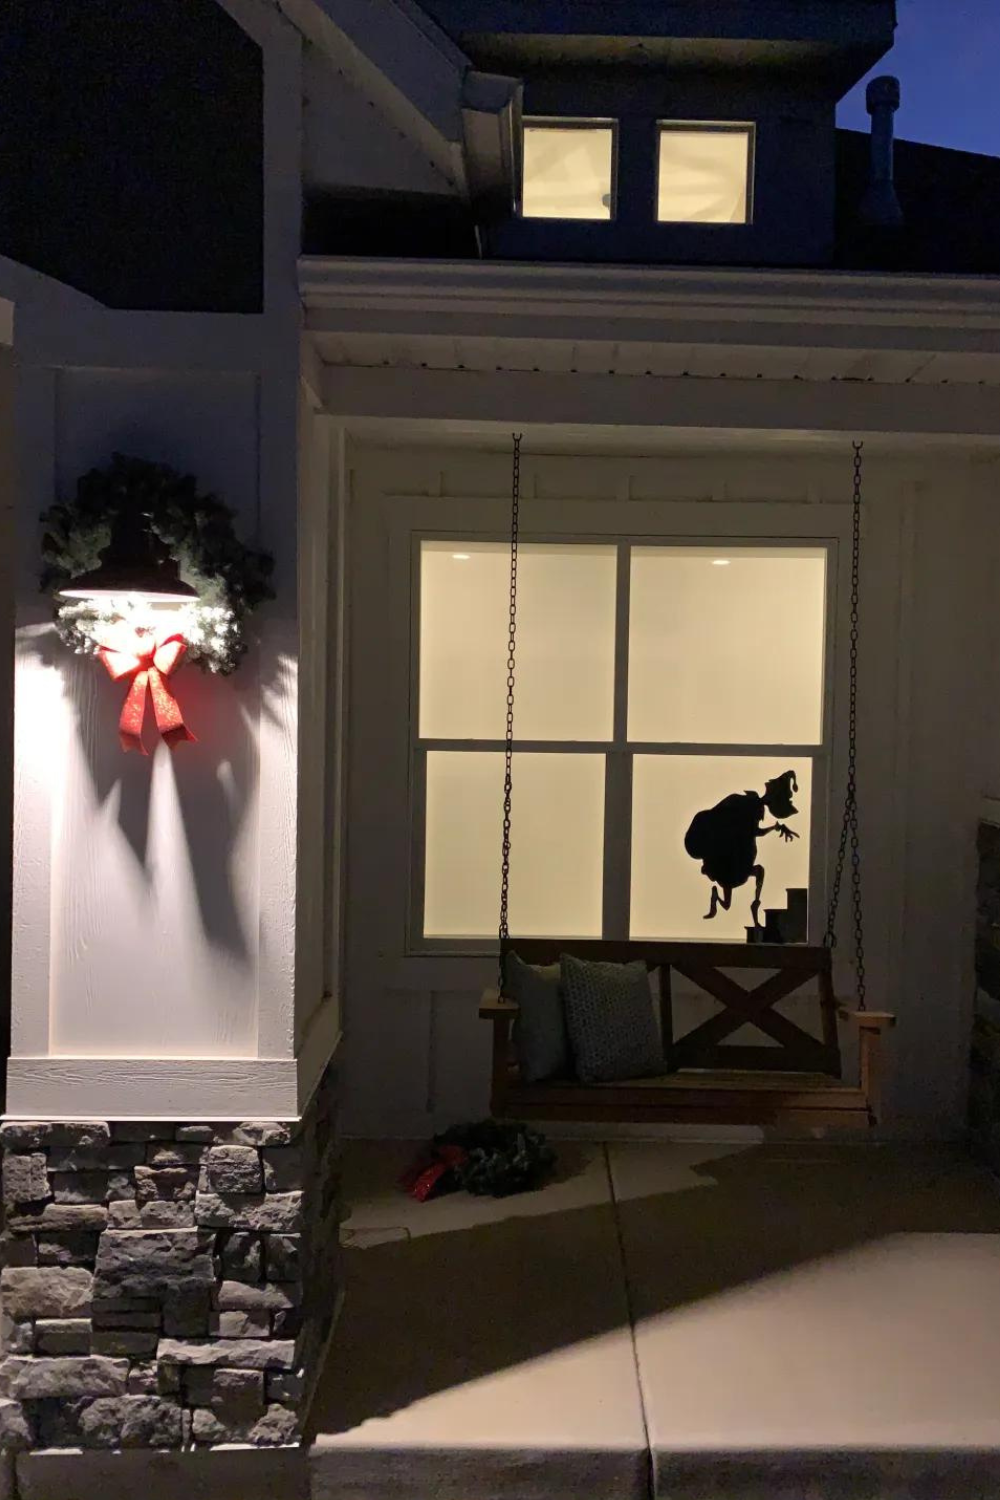
Window silhouette decals are $8 to $20 a sheet on Etsy or Amazon, and they peel off in January without residue. A pre-lit wreath with a red bow runs $30 to $60, or $12 if you buy a plain faux wreath and a $6 strand of battery fairy lights. The porch swing garland is the one spot worth spending on: real-feel cedar garland ($25–$40 for 9 feet) reads better in photos than the cheapest faux, and it’s the piece people walk past.
25. A Life-Size Grinch Cutout on Fake Snow With a Fairy-Lit Stone Pillar
Cutout height is the number that matters. Anything under 3 feet disappears from the sidewalk; 4 to 5 feet reads clearly from the street and photographs well at porch distance. You need a landing or porch at least 5 feet wide and 3 feet deep to place the figure plus gift boxes without blocking the walkway — leave a 36-inch path, always. Small lit trees flanking the pillar should be 18 to 24 inches so they don’t compete with the cutout.
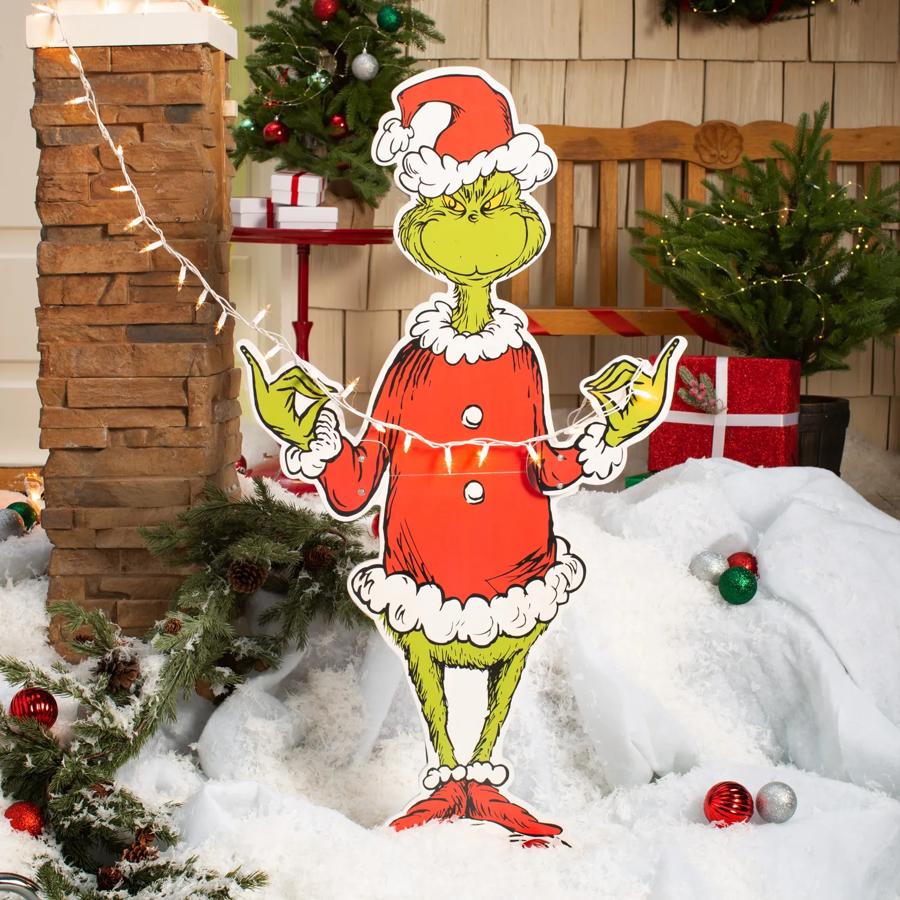
Faux snow outside is a wind issue, not a snow issue. Loose batting blows into the neighbor’s yard within a week, so go with a staked white mat or batting pinned under the props instead. Cutouts need real anchoring — a wide L-bracket behind, sandbags in front, never a single stake into frozen ground. And check your HOA or apartment rules before you set a 5-foot character on the front step; some leases treat holiday figures like signage.
26. An Inflatable Grinch Rising Out of an Orange Chimney on the Front Lawn
- Inflatable Grinch with chimney base: $60–$180
- Replacement blower or spare fan: $25–$45
- Outdoor extension cord and stakes: $20–$35
- Timer and GFCI outlet adapter: $15–$30
- Sandbags or ground anchors: $15–$25
Total: $135–$315
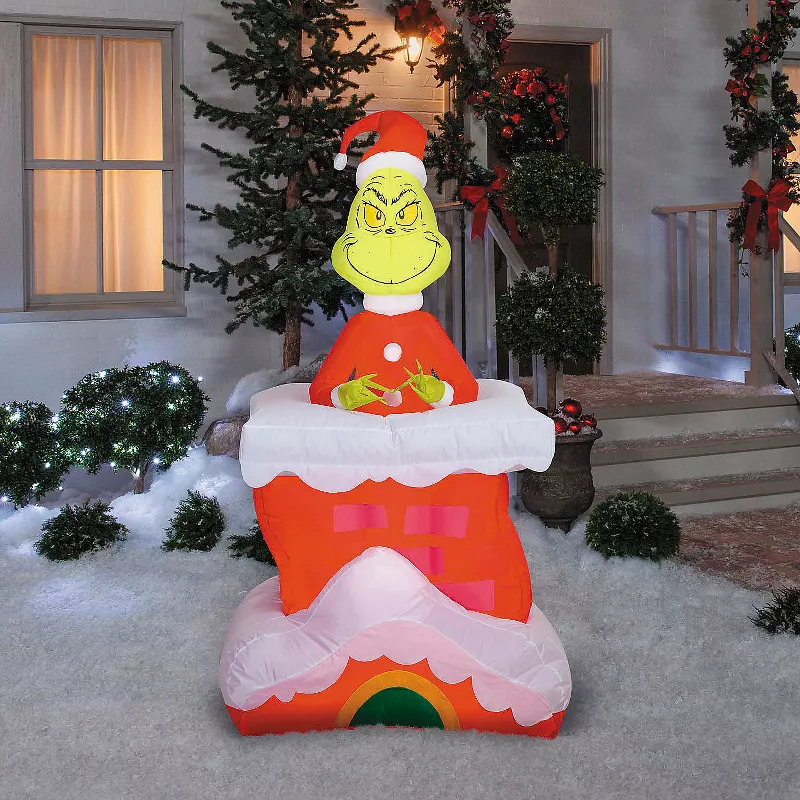
Budget alternative: buy in early November — inflatables routinely drop 40 percent before Thanksgiving, and the same 8-foot figure that’s $160 in December is $90 in October. Thrift stores and Facebook Marketplace are also full of last year’s inflatables for $20 to $40; blowers are the only part that fails, and they’re replaceable for $25.
Run the whole yard on one outdoor timer set for 5 p.m. to 11 p.m. — not dusk to dawn, which is what makes inflatables look tired by mid-December. Hide the cord under a matching mat or a strip of white downspout painted to blend with the snow. And stake the base with sandbags placed behind the figure, not in front, so nothing ruins the silhouette from the street.
27. An Ornament-Packed Archway Framed by Frosted Potted Trees
Roughly 45 percent evergreen, 30 percent ornament color, 15 percent white frost, and 10 percent red-and-gold accents. The ornaments aren’t evenly distributed — they cluster around the arch’s curve, where the garland is thickest, and thin out at the posts. Copy that. Want it calmer? Halve the ornament count and let the frost and the bow carry the drama; the formula still works, just at a lower volume.

This entryway works because the arch shape repeats — the doorway, the wrapped presents, the cutout tree, the striped posts. Repetition is what makes a decorated entrance look composed instead of cluttered. And the red bow at the apex gives you exactly one focal point, which is all an entryway needs. Take the bow away and your eye slides off the top of the frame and onto the driveway.
28. A Lit Grinch Figure Holding a Small Wreath Beside a Planter of Red Ornaments
It’s the wreath in his hands. A molded light-up figure standing by itself is a yard ornament; a figure holding something becomes a scene. That small green wreath with the red bow is also the only object connecting the figure to the planter of red ornaments beside it — it’s the visual bridge between two props that would otherwise just be sitting next to each other. Costs about $8 and changes the entire read.
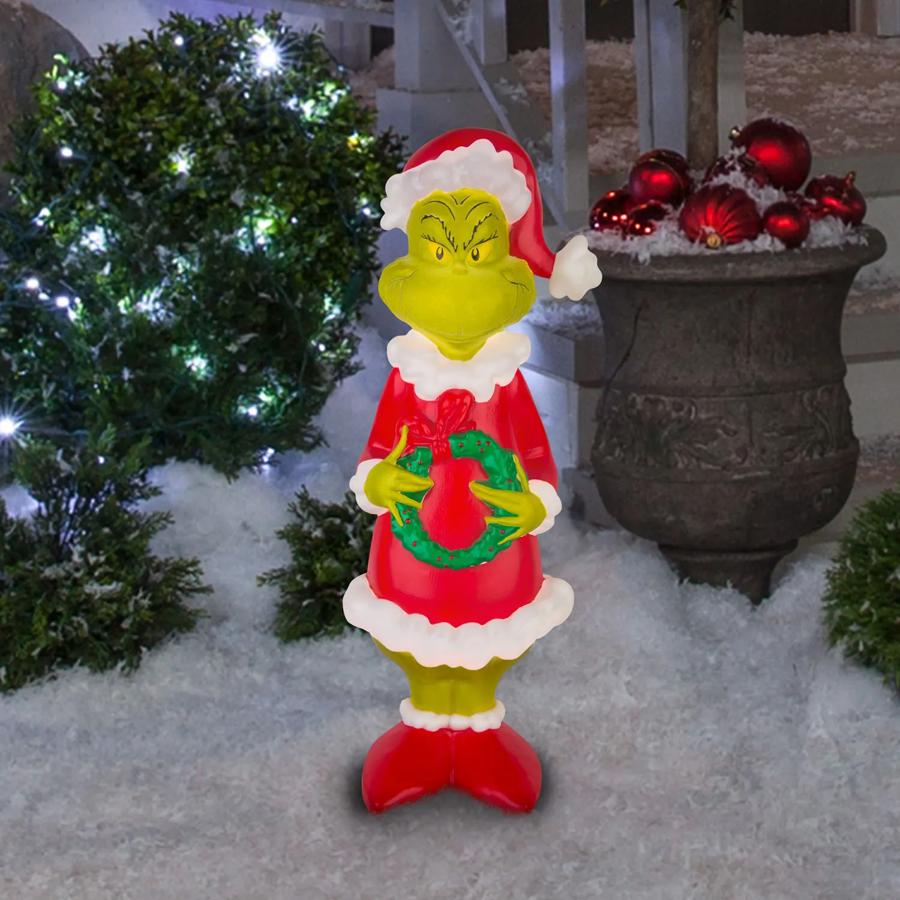
Molded light-up figures yellow. UV exposure bleaches the green to a sad mint within three seasons, and the internal bulbs fail one bay at a time. You’ll get a two- to three-year run by storing it indoors in a cool, dry spot — never a hot attic — and by unplugging it during ice storms. Also: planter ornaments need to be plastic, not glass, and weighted at the bottom, because a bowl of glass baubles in a windstorm is a January cleanup project.
29. A Whoville Pancake House With a Fork on the Roof
Collectible village pieces are $40 to $90 new, which adds up fast, but the good stuff shows up used. Thrift stores, estate sales, and Facebook Marketplace regularly have lighted village buildings for $5 to $15, and Dollar Tree’s holiday village line runs $1.25 to $5 a piece. Mixing brands works fine if you keep scale consistent — aim for pieces within 2 inches of each other in height, and repaint any that clash badly.
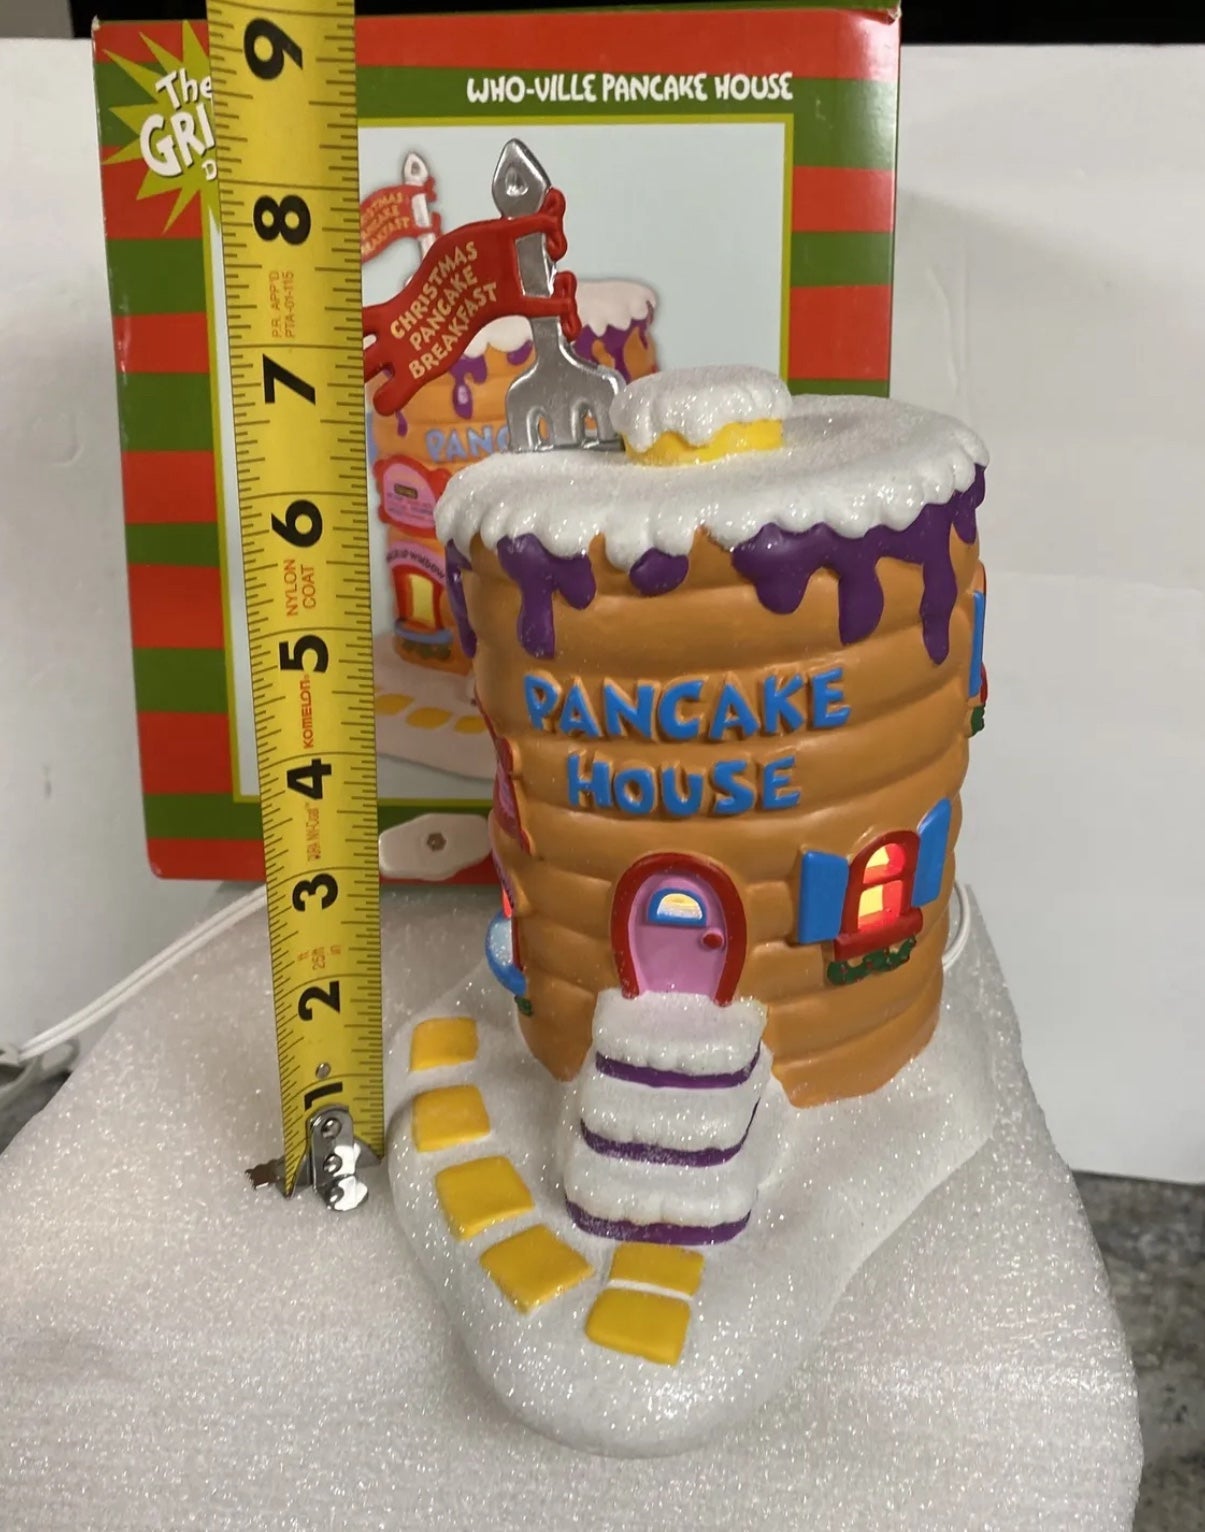
Building a tabletop village platform takes an afternoon and $20 to $40:
- Cut foam board or a thrifted shelf to fit your console or sideboard.
- Cover it in white batting or a white sheet, taped underneath.
- Add risers — books or boxes — for a back row so the buildings step upward.
- Set the tallest piece slightly off-center; symmetry kills the charm here.
- Thread a warm LED strand underneath and around the bases, not over the roofs.
30. Grinch Cupcakes With Fur-Textured Frosting on a Marble Tiered Stand
That fur texture is a grass tip, not a custom nozzle. A Wilton #233 grass tip runs about $4, and piping green frosting in short upward strokes gives you the fuzzy look — but the real trick is temperature. Chill the frosted cupcakes 20 minutes before adding the eyes and hats, or the green will slump and swallow them. Use gel paste coloring, not liquid food dye, which thins American buttercream and breaks the peaks.

Dessert tables stopped being a party detail and became a decor category around 2023, and by 2026 the styling is the point — a marble tiered stand, gold ornaments, and greenery behind it photograph as well as any shelf display. The upside of food-as-decor: it’s the only holiday styling you can eat. The downside: it has a four-hour shelf life, so plan the photo before the party, not midway through it.
Your Whoville Moment Starts With One Wreath
Pick the single idea from this list you can actually finish this weekend — the pom-pom ornaments, the drooping-hat wreath, the flocked tree with feet — and start there. Everything else can wait until December, or honestly until next year, because a half-finished theme always beats a half-hearted one. 📌 Save this guide to Pinterest so your Grinch plans are ready the moment the boxes come down from the attic.